Quantcast
Channel: Chitra's Food Book
Viewing all 967 articles
Browse latest View live

Avarekalu Mixture Recipe – Hyacinth/Field Beans Snacks - Avarekalu Recipes

$
0
0
Avarekalu mixture
Avarekalu season is started in Bangalore. Every year I never forget to try some interesting avarekalu recipes during this season. My School moms friends are the biggest inspiration & source for my Karnataka recipes. This year they suggested me to try Avarekalu uppittu & avarekalu mixture recipe. Avarekalu mixture is an yummy South Indian mixture recipe prepared with the combination of deep fried avarekalu(Hyacinth beans / Flat beans/ Indian lilva beans in English, Mochakottai in Tamil, Surti papdi in Hindi), poha, peanuts, nuts and raisins. One can find it easily in most of the snacks and savory shops in Bangalore at this time. In many places, people make this mixture only with avarekalu. But I like to add all the other ingredients to yield more quantity and taste. Hitikida avarekalu (Skinless beans) works well for this mixture recipe. It was so good and crunchy to taste. I am sure kids and adults would love to munch it during tea time. It would be ideal for their snacks box as well. Even though its high in calories, its a very tasty indulgence. You can also make this mixture with dry avarekalu/ dried beans by soaking overnight in water. Do try this yummy mixture recipe in this avarekalu season. You will love it. Ok, lets see how to make Avarekalu mixture recipe with step by step pictures.
Check out my other Avarekalu Recipes below
  1. Avarekalu Saaru
  2. Avarekalu pulao
  3. Avarekalu sagu for poori, roti 
  4. Avarekalu huli
Avarekalu mixture

Avarekalu mixture recipe


Avarekalu mixture recipeHow to make South Indian style mixture recipe with avarekalu / Mochai / Hyacinth beans
Cuisine:South Indian
Category:Snacks
Serves:Serves 4
Prep time:5 Minutes
Cook time:15 Minutes
Total time:20 Minutes
1 cup - 250ml
  • Hitikida Avarekalu / Skin less Field beans / Hyacinth beans / Pachai mochai kottai - 1 cup
  • Thick poha - 1/2 cup ( Use 1/4 cup for less poha)
  • Peanuts – 2.5 tbsp
  • Fried gram dal - 1 tbsp
  • Cashew nuts - 5 nos (Break into two)
  • Dry grapes/ Raisins - Few (Optional)
  • Red chilli powder - 1 tsp
  • Curry leaves – few
  • Cooking oil – to deep fry
  • Salt - as needed
  • Sugar – 1/4 tsp (optional)
  • Dry coconut pieces – Few (Optional, I din’t use it)
  • Hing / asafetida – A big pinch
HOW TO MAKE AVAREKALU MIXTURE
  1. Wash and soak avarekalu in water overnight or for 6 hours.
  2. Peel the skin and keep it ready.
  3. Spread them in a cloth. Pat it dry.
  4. Heat oil and deep fry avarekalu in batches. Cook till bubbles cease.
  5. Remove them in a paper towel. Deep fry poha, peanuts, cashews, dry grapes and fried gram dal one by one and add to fried avarekalu.
  6. Add salt, red chilli powder and hing. Mix well.

METHOD - STEP BY STEP PICTURES
  • Wash and soak avarekalu in water overnight or for 4 to 6 hours. Peel the skin by pressing the avarekalu between your thumb finger and pointer finger. Skin comes off easily. Collect them in a bowl. You can also split them into two halves if you like. Refer the picture below.
    Avarekalu mixture
  • Spread the peeled avarekalu in a cotton cloth and pat it dry to remove its moisture completely. Make sure its dry. Do not rest the avarekalu in the cloth for long time. It will become hard to eat after frying. So its enough if you just pat it dry nicely.
  • Heat oil in a kadai to deep fry. Fry avarekalu in 3 batches. When you put the avarekalu in oil, it settles down in the bottom of oil with lots of bubbles. Once its cooked and becomes crispy, it will float on the top of oil without bubbles. You can remove them at this stage. Cook in medium high flame and keep tossing gently till its crispy else the entire mixture will become soggy the next day. So please be patient while frying avarekalu. Each batch takes nearly 5 minutes but its color won’t change.
    Avarekalu mixture
  • Drain the oil and Remove the avarekalu in a tissue paper. Now deep fry poha till crispy and add to fried avarekalu. Then deep fry peanuts, cashews till golden and remove them.
    Avarekalu mixture
    Avarekalu mixture
  • Collect them in the avarekalu bowl.Deep fry dry grapes till puffy. Remove and add to the mixture. Lastly fry the fried gram dal just for a minute and remove it. Fry curry leaves and add it.
    Avarekalu mixture
  • Avarekalu mixture
  • Mix all the fried items in a wide bowl. Add salt, red chilli powder, sugar and a pinch of hing. Toss it to coat well. Serve with hot coffee/tea. Enjoy !
    Avarekalu mixture
    Avarekalu mixture
  • Store in an air tight box after it comes to room temperature. Enjoy up to a week!

Note

  • For variations, you can roast Kellogg's corn flakes in 2tsp oil and add to the mixture instead of poha.
  • Frying the avarekalu properly is the key to make perfect crispy mixture.
  • If you rest the avarekalu in the cloth for long time, it loses all the moisture and becomes very dry. So it will taste hard once you deep fry. So it is enough if you just pat it dry.
  • Adjust the quantity of chilli powder as per taste.
  • For variations, you can also add 2 pinches of chat masala powder and black salt.
Try this easy, yummy, crispy Avarekalu Mixture and enjoy with tea/coffee !
Avarekalu mixture recipe

Kormolas Recipe – Eggless Kormolas - Goan Christmas Recipes

$
0
0
Kormolas recipe
Kormolas is a Goan special Christmas sweets recipe. Traditionally the Christmas goodies, called kuswar are specially prepared by the Catholics in Goa and are distributed to neighbors, friends and relatives during Christmas. It is very similar to Kulkul/ Gala Gala in ingredients and the method of preparation. But its shape is different. Authentically Kormolas is prepared with all purpose flour, sugar, egg, semolina and coconut milk. But I tried an eggless version following the recipe of Hilda’s Touch of Spice. It came out really well with a crunchy taste even without egg and tasted mildly sweet. Though I couldn’t make proper shapes, we loved its taste very much. Friends do try this easy, yummy Kormolas recipe during this Christmas. I am sure your family members would enjoy it to the core. Lets see how to make this Goan special Christmas sweet recipe – KORMOLAS with step by step pictures.
Check out my Kerala special Achappam/Rose cookies recipe andGoan KULKUL/KALKAL too.
Kormolas recipe

Kormolas Recipe - Eggless Version


Kormolas Recipe - Eggless VersionHow to make Goan special Christmas sweet KORMOLAS without egg
Cuisine:Indian
Category:Sweet
Serves: 30 nos
Prep time:15 Minutes
Cook time:20 Minutes
Total time:35 Minutes


INGREDIENTS
1 cup - 250ml , 1 tbsp - 15ml , 1 tsp - 5ml
  • All purpose flour/Maida - 1 cup (Levelled)
  • Sugar - 1/3 cup ( Powder the sugar)
  • Melted butter – 1.5 tbsp
  • Salt - a pinch
  • Vanilla Essence - Few drops
  • Cooking oil - to deep fry
METHOD
  • Powder the sugar and keep aside. Take a wide bowl and add maida,salt and powdered sugar.( If you powder 1/3 cup of sugar, you will get around 1/2 cup. Use all the sugar.) Mix well and check for taste.If sweetness is less,add more powdered sugar as per your taste.
Kormolas recipe
  • Melt the ghee and let it become warm. Add it to the maida mixture and make a crumbly mixture. Ghee should spread all over the maida.
Kormolas recipe

  • Now add milk little by little( I used 2 tbsp) and make a dough like a thick, non-sticky roti dough. Let it rest for 10 minutes.Keep it covered.( Suppose if you have added more water,add little maida and correct the dough)

  • Divide the dough into 2 balls. Take one ball and dust it lightly with maida. Roll it thin to a circle. Trim the edges to bring square shape. Cut into small squares. Make shapes immediately. Do not dry it for long time.
Kormolas recipe
Kormolas recipe
  • Take one square and join one of the opposite edges. Pull the other two edges in the opposite direction and join them. Make a twist at both the ends to give a bud like shape. If you don’t twist it properly, it will open up while frying. Please refer the pictures below to get the idea.
Kormolas recipe
Kormolas recipe
Kormolas recipe
  • Heat cooking oil and test it by dropping a pinch of dough.It should rise on top immediately.( If you are a beginner,make a trial by frying 1-2 before you put them in batches.Check whether it breaks in oil.If it breaks in oil,add little more maida and make the dough.)
Kormolas recipe
  • Lower the flame completely and drop a batch of kormolas at a time.Flame should be low to medium.Let them cook for few minutes till one side turns light golden brown.Flip it and cook the other side till light golden brown. Don’t wait for all the bubbles to cease because kormolas will cook even after removing from the oil. So remove it as soon as it turns golden. While you take out from the oil,it looks & tastes soft.  But when it cools down completely,it will become super crunchy and becomes dark in color too.So please wait till it cools down to enjoy its best taste.Cook the remaining kormolas in batches.Adjust the flame from low to medium whenever needed.
Kormolas recipe
Store in an air tight box after it cools down completely.It stays good for a week or two.Enjoy this crispy and yummy snack with your family !
Note
  • Suppose if you add excess milk and make the dough very sticky,add some more maida to it.
  • If you add more ghee,Kormolas will break in oil.So add the mentioned amount.
  • If the heat of oil is more,the color of kormolas turn golden brown quickly without cooking inside.So deep fry them in low to medium heat oil for uniform cooking.
  • Kormolas will absorb more oil if you fry them in low insufficient heat.So deep fry in proper heat.

Enjoy this crispy Goan special Christmas sweet at home !! Merry Christmas !
eggless Kormolas recipe

Millet Pongal Recipe Using Millet Ven Pongal Mix

$
0
0
Millet pongal
Recently I got a packet of Millet Ven Pongal Mix / Siruthaniya pongal mix & Millet Sambar rice mix from Native Food Store. I tried Pongal mix for my weekend breakfast as I got up late. Its so easy and quick to make.  Our breakfast got ready under 15 minutes. This millet pongal mix is a combination of roasted moong dal, varieties of millets, pepper corns, jeera, salt and cashews. I just followed the instructions given in the pack. All we need to do is to add the mentioned amount of water and cook this mix in a pressure cooker. We can also season it with curry leaves and hing in ghee at the end to make it more flavorful. It came out very soft, flavorful & tasty just like homemade ven pongal. Sendhil & Myself loved it very much. We enjoyed it with coconut chutney. Friends, Native food store products are available online and they deliver their products all over India. I would strongly recommend to buy this pongal mix from them. I am sure you will love its taste and buy it often. Ok, now lets see how to make Millet ven pongal using Native food store’s millet pongal mix.
Check out their varieties of millet products & rice mix, cold pressed oil in their website.
Also find my post on Millet Noodles .
Millet pongal

Millet Pongal Using Pongal Mix


Millet Pongal Using Pongal MixMillet Ven Pongal recipe using Pongal mix from Native food store.
Cuisine:South Indian
Category:Millet Recipes
Serves:Serves 2-3
Prep time:5 Minutes
Cook time:20 Minutes
Total time:25 Minutes
1 cup - 250ml
  • Millet Pongal Mix - 1 packet ( 200gms)
  • Water - 4 cups
To season
  • Ghee - 1 tbsp
  • Curry Leaves - Few
  • Chopped Ginger – 1 tsp 
  • Hing - a pinch
METHOD
  1. In a pressure cooker base, take the millet pongal mix.
  2. Add the mentioned amount of water given in the pack.
  3. Cook for 2 whistles in very low flame.
  4. Open the lid after steam is released. Mix well.
  5. Season curry leaves, ginger and hing in ghee. Add to pongal.
  6. Mix well and serve hot with coconut chutney !
METHOD - STEP BY STEP PICTURES
  • Take 1 cup of pongal mix in a pressure cooker. Add 4 cups of water, mix well. Close the lid.

  • Pressure cook in very low flame for 2 whistles. Remove the lid after steam is released. Mix well. Its consistency would be just right. Heat ghee & temper ginger bits, curry leaves & hing. Add to pongal, mix well.
    Millet pongal
  • Serve hot immediately with coconut chutney. You can add a tsp of ghee while serving If you like. This pongal tastes very soft & flavorful !
    Millet pongal

    Enjoy !


Try this healthy, yummy, quick millet pongal with pongal mix. You will love it.
Siruthaniya pongal

Orange Skin Kuzhambu – Orange Peel Kulambu Recipe

$
0
0
Orange skin kuzhambu
Orange skin/peel kuzhambu has become my most favorite dish among all the orange skin recipes I had tried so far. Yes, for the last 2 weekends I shared recipes using orange skin like orange peel sweet pachadi and orange peel spicy pachadi. Today I thought of sharing this yummy vatha kuzhambu recipe with orange skin.  I am yet to post orange skin pickle and orange juice rasam recipes. I will try to do it in this weekend. The method of preparation of orange skin kuzhambu is very similar to Brahmin style vatha kulambu without onion and garlic. When I tried this kulambu, I was doubtful whether it will taste bitter. But to my surprise, it came out really tasty without much bitterness. I loved it a lot with plain rice topped with sesame oil. My MIL also liked it very much and told that she will be making it regularly at home. Friends, do try this orange peel kuzhambu next time when you buy oranges. I hope you all know about the amazing health benefits of orange skin. So do not discard the skin. Try this orange peel kuzhambu, you will love it for sure. So lets see how to make kuzhambu using orange skin with step by step pictures.
Check out my other orange recipes below :
Orange peel kuzhambu

Orange peel / Orange Skin kuzhambu for rice


Orange peel kuzhambuHow to make gravy with orange skin
Cuisine:Indian
Category:Orange peel recipes
Serves:Serves 4
Prep time:5 Minutes
Cook time:10 Minutes
Total time:15 Minutes
1 cup - 250ml
  • Orange skin – 1/4 cup
  • Tamarind – a big gooseberry size
  • Sambar powder – 1 tbsp
  • Jaggery – 2 tsp
  • Salt - as needed
  • Water – as required ( I used 1 cup)
To temper
  • Sesame Oil  / gingely oil – 2 tbsp
  • Mustard seeds - 1/2 tsp
  • Urad dal - 1 tsp
  • Methi seeds - 1/8 tsp
  • Cumin seeds - 1/2 tsp
  • Green chilli - 1 no
  • Red chilli - 1 no
  • Curry leaves - Few
METHOD
  1. Wash and chop orange skin into small pieces.
  2. Heat oil in a kadai. Temper all the ingredients given under “To Temper”.
  3. Saute orange skin for a minute. Add sambar powder and mix well in low flame.
  4. Add tamarind extract, salt, turmeric powder, jaggery and boil till gravy thickens & oil floats on top.
  5. Serve hot with plain rice adding sesame oil.
METHOD - STEP BY STEP PICTURES
  • Wash and chop orange skin into small pieces. Set aside. Soak tamarind in warm water for 15 minutes and take the extract with 1 cup of water. Keep it ready.
    Orange peel kuzhambu
  • Heat oil in a kadai.Splutter mustard seeds, cumin seeds, methi seeds, urad dal, pinched red chilli, slit green chilli, curry leaves. Add the orange pieces. Saute for a minute till it becomes soft.( Actually I forgot to add orange pieces along with seasoning.So I sautéed it separately and added to tamarind extract.Hence the stepwise pictures distract from the instructions).
    Orange peel kuzhambu
  • Add sambar powder, saute in very low flame for few seconds.Quickly add 1 cup of tamarind extract, turmeric powder, salt and jaggery. Mix well, check for taste. Add more water, sambar powder if needed. Roll boil the kuzhambu till  orange pieces cook and oil starts to float on top. Remember, this kuzhambu thickens once it cool down completely. So do not boil till too thick. Remove when its semi gravy.
    Orange peel kuzhambu
  • Transfer the kuzhambu to a bowl and serve hot with plain rice. Top with sesame oil for more flavor and taste.
    Orange peel kuzhambu


    Enjoy !

Note

  • Adjust the quantity of sambar powder as per the tanginess of tamarind.
  • Do not add more orange pieces, it may make the gravy bitter in taste.
  • Adjust the quantity of water based on the consistency you like.

Try this easy, yummy Orange skin kuzhambu just for a change and enjoy with plain rice topped with sesame oil. Serve with any kootu and papad !
Orange peel recipes

11 Kesari Varieties – Indian Sheera/Kesari Recipes

$
0
0
Kesari varieties
Collection of 11 Rava Kesari varieties / Sheera Recipes.In this new year 2018, I wanted to start with a sweet post. So here I made a collection of different types of rava kesari recipes from my website. Kesari is basically an Indian sweet dish prepared with semolina, sugar and ghee. People in South India and North India call this yummy dessert recipe in different names like rava kesari, Kesaribath, Sheera, Halwa etc. We love to make Rava Kesari / Ksheera at home for all the festivals and occasions. Even today I made kesari bath for new year celebration. Kesari is basically a beginners sweet. Its so easy to make and takes less time to prepare. Even though its considered as a beginners sweet, many of us doesn’t get it right in texture. Sometimes it becomes hard, chewy, dry or with lumps. To prepare hotel style, soft and ghee dripping kesari must be the dream of many. Me too not an exception. When I was a beginner, I struggled a lot to make perfect kesari.  So my MIL taught me some useful tips about the ratio of water and rava, perfect cooking of rava/semolina without lumps and much more. From then, I started to make good kesari every time and I got the confidence to explore different types of rava kesari recipes like milk kesari/ Paal kesari, pineapple kesari, mango kesari, Karnataka style kesaribath, microwave rava kesari, other kesari recipes like Vermicelli kesari, Aval kesari/Poha kesari and some North Indian Sheera recipes like suji ka halwa/ suji sheera, Atta ka sheera and Moong dal dal sheera. I am yet to try banana sheera and fruit kesari recipes. I will add them in this list once I do that. Now lets see the collection of 10 Kesari recipes from Chitra’s Food Book in this New Year 2018 as my first post Happy.
I thank all my readers and followers of my website for your unconditional love and support. I am really blessed to have you all Love Struck. Hoping to get more and more support, encouragement and love from you in this new year as well. Ok, lets move on to the post !

Kesari Varieties - South Indian, North Indian Sheera Recipes


Kesari varieties 11 Kesari Varieties– Different types of South Indian & North Indian Sheera Recipes
Cuisine:Indian
Category: Kesari Recipes
Serves:Serves 3-4
Prep time: 10 Minutes
Cook time:15 Minutes
Total time: 25 Minutes
Rava kesari recipe
Karnataka Kesaribath recipe
Microwave Rava Kesari
Paal Kesari
Pineapple sheera
Mango sheera recipe
Semiya kesari
Aval kesari
Sooji sheera
Moong dal halwa


    Green Chutney For Chaat Using Preethi Turbo Chop

    $
    0
    0
    Green chutney for chaats
    Green chutney recipe can be prepared in many ways based on the requirement. Today I have shown how to make green chutney for chaats with simple ingredients. I prepared this chutney using Preethi turbo chop I received recently for a review. When I got a request to review this product, I accepted it happily as Preethi is one of my favorite brands for kitchen appliances. I have been using Preethi products for more than 10 years and it would be my first choice for mixer grinders.
    Preethi turbo chop
    USES OF PREETHI TURBO CHOP
    Preethi Turbo Chop is a handy, electric vegetable chopper that perfectly chops the vegetables very finely in no time. It has a 450W powerful motor and sharp blade. So it takes less than a minute to chop onion, tomato and other veggies finely. It also helps to grind chutneys, dips, sauce and puree tomato, onion and coconut masala for gravies. Its an ideal gadget for Indian cooking. Basically Indian cooking needs lots of chopping works. This useful gadget makes our job much easier. Chopping gets done in one touch operation which saves lot of time. Working women, bachelors and people who wants to spend less time in chopping during busy morning hours would find this gadget very helpful. Price is also reasonable. As I already have Philips Chopper and blender, I could easily compare both the products. Preethi turbo chop is easy and fast to use than other brands.

    You can find this product in PREETHI KITCHEN APPLIANCES WEBSITE, WITH A DISCOUNTED RATE ATAMAZON& FLIPKART.

    Preethi turbo chop

    PARTS OF PREETHI TURBO CHOP

    Washable and food grade Lid
    Transparent, food grade Bowl with measurements
    One Sharp blade
    A Motor unit
    Plug and instruction manual.

    FEATURES OF PREETHI TURBO CHOP
    • Powerful Motor
      It has 450 Watts powerful motor in this category
    • One Touch Operation
      It does operations like Chopping, Puree, and Grinding in less than a minute
    • Quality
      The blade is made up of food grade stainless steel - Laser sharp blades gives superior chopping performance
      It is a food grade material
      Blade is a stainless steel material for longer life
    • Reliability
      Easy View - Transparent bowl enables us to have complete control over chopping process
      1 Year Warranty
      Life Long Free Service
    TECHNICAL SPECIFICATIONS
    Model No. : Turbo Chop
    • Voltage: 230V AC 50 Hz
    • Power Consumption: 450 Watt
    • Capacity: 0.7 Ltr Bowl
    • Warranty: 1 Year
    WHERE TO BUY THIS PRODUCT

    You can find this product in PREETHI KITCHEN APPLIANCES WEBSITE&WITH A DISCOUNTED RATE ATAMAZON& FLIPKART

    PROS & CONS

    PROS
    • Preethi turbo chop looks small & handy. So it occupies less space in kitchen counter.
    • Chops the vegetables very finely in less than a minute.
    • Chops the nuts too.
    • It works really great if you want to grind masala to a coarse paste.
    • Perfect for making salsa.
    CONS
    • You should do it only in batches if you are chopping in large quantity.
    • For smooth paste, it takes more than a minute to grind. At that time, the motor body gets heated slightly.
    • It would have been better if the product has a wiper/whipping blade for whipping curd & milkshakes.
    In the picture below, you can find finely chopped onion, tomato and boiled kabuli chana paste for making chana masala.
    Preethi turbo chop

    Green chutney for Chaat


    Green chutney for ChaatHow to make green chutney for chaat
    Cuisine:Indian
    Category:Chutney Recipes
    Serves:Serves 4
    Prep time:5 Minutes
    Cook time:2 Minutes
    Total time:7 Minutes
    1 cup - 250ml
    • Coriander leaves - 1/2 cup
    • Mint leaves - 1/4 cup
    • Green chilli - 2 nos
    • Lemon juice - 1 tsp
    • Sugar - 1/4 tsp
    • Cumin powder - 1/4 tsp
    • Garlic cloves - 2 nos
    • Ginger - Very small piece ( Quarter inch)
    • Salt - as needed
    METHOD
    1. Wash & Chop coriander leaves & mint leaves roughly.
    2. In the Preethi turbo chop, take all the ingredients given above.
    3. Grind to a smooth paste adding required water.
    4. You should wipe the sides and grind at regular intervals to make a smooth paste.
    5. Remove in a bowl. Dilute with little water while making chats.
    6. Store and refrigerate in a clean bottle. It stays good for a week in refrigerator.
    METHOD - STEP BY STEP PICTURES
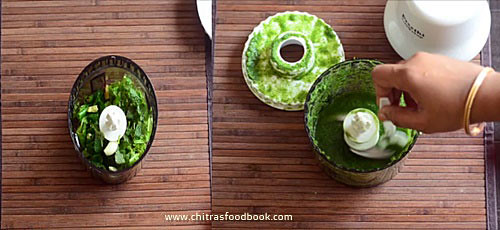
    • Wash and chop coriander leaves, mint leaves roughly. Take all the ingredients given in the list. Take the Preethi turbo chopper bowl and fit the blade. Add all the ingredients to it. (You can use mixie instead of turbo chop and grind to paste.)


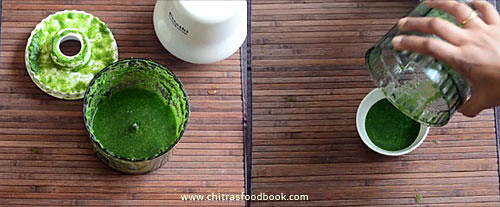
    • Cover with the lid and grind it without adding water. Wipe the sides, add required water and grind for a minute. Wipe the sides again and grind if needed.

    • After the chutney becomes smooth, transfer to a bowl. Store in a box , refrigerate and use clean spoon every time.  You can dilute the chutney adding little water while adding in chaats.

    • Stays good for a week to 10 days in refrigerator.Enjoy !

     Try this easy, yummy Chaat chutney at home and use it for making bhel puri, papdi chaat, pani puri etc.

    Green chutney for chaat

    Orange Peel Pickle – Instant Orange Skin Pickle Recipe

    $
    0
    0
    Orange peel pickle
    Orange peel pickle is one of the easy and yummy pickle recipes that can be prepared instantly. It doesn’t need any soaking or setting time. You can taste it immediately. When my MIL prepared this instant pickle recipe with orange skin, I never expected that it would taste so good with curd rice. We loved it a lot. Actually we prepared orange skin pachadi and orange skin pickle at the same day. Even though both tasted good with its own taste, my vote is for this pickle. I must thank my MIL for teaching me this easy pickle recipe.You too give a try and let me know how you liked it. Ok, lets see how to make orange peel pickle with simple and easy ingredients.
    Check out my other orange recipes :
    Orange skin pickle

    Orange Peel Pickle Recipe


    Orange Peel Pickle RecipeHow to make Instant pickle recipe using Orange skin
    Cuisine:Indian
    Category:Pickle recipes
    Serves:1/4 cup
    Prep time:10 Minutes
    Cook time:20 Minutes
    Total time:30 Minutes
    1 cup - 250ml
    • Orange Skin - 1/4 cup
    • Red Chilli Powder – 1.5 tsp
    • Powdered Jaggery – 1 tbsp
    • Small sized Lemon - 1/2 no
    • Roasted Methi seeds powder – 1/8 tsp
    • Turmeric powder – 1/4 tsp
    • Water – 1/2 cup
    • Hing – 1/4 tsp
    • Salt - A needed
    To Temper
    • Cooking oil or sesame oil – 1 tbsp
    • Mustard seeds - 1/2 tsp
    METHOD
    1. Wash and chop orange skin into small pieces.
    2. Pressure cook in high flame for 2 whistles adding little water.
    3. To the cooked orange pieces, add red chilli powder, hing, turmeric powder, methi powder, jaggery and salt.
    4. Boil in a kadai adding water. Switch off the flame and add lemon juice. Mix well.
    5. Temper mustard seeds and add to the pickle. Store in a clean box after pickle cools down.
    6. Stays good for a month when stored in a refrigerator.
    METHOD - STEP BY STEP PICTURES
    • Wash the orange skin and chop into small pieces. Pressure cook it adding little water in high flame for 2 whistles.Open the lid after steam is released. Drain the excess water if any. Keep the cooked orange pieces in a bowl.
    • Dry roast methi seeds till it starts to turn golden brown. Powder it using a mortar and pestle and set aside.
      Orange peel pickle
    • Add red chilli powder, turmeric powder, hing, methi seeds powder, crushed jaggery and salt.Mix well.
      Orange peel pickle
    • Add this mixture to a kadai and add 1/2 cup of water. Mix well and boil in low flame for few minutes till the raw smell of spice powders vanish. Add little more water if pickle looks too thick while boiling. Check for taste and add more red chilli powder, jaggery or salt if needed.
      Orange peel pickle
    • Switch off the flame when the pickle looks semi solid because it thickens when it cools down. Switch off the flame and add the juice of half of a small lemon. 
    • In a small kadai, temper mustard seeds in oil and add to the pickle. Mix well and let it cool down.
      Orange peel pickle
    • Let it cool down and store in a clean glass bottle. Use clean spoon every time while you handle. It stays good for a month if refrigerated.
      Enjoy with curd rice !

    Note

    • Adjust the quantity of red chilli powder as per your taste..
    • You should cook the orange pieces before adding spice powders else it will become chewy and hard while cooking.
    Try this yummy orange skin pickle and enjoy with rice ! Don’t forget to check out my other orange peel recipes.
    Orange skin pickle


    Mangalore Buns Recipe With Coconut Chutney – Banana Poori Recipe

    $
    0
    0
     Mangalore buns 
    Mangalore buns recipe @ Banana poori served with coconut chutney as side dish is one of the most popular breakfast combo in Karnataka. I have tasted this few times in hotels like Anna Kuteera, SLV etc. Mangalore buns is a kind of Poori/ puri made with all purpose flour, banana, sugar and curd. As this poori tastes soft, spongy with a mild sweet taste, its called as buns. Mangalore buns cannot be prepared instantly.Its dough should be fermented for at least 4 to 6 hours or overnight to get the best results. Recently I prepared it for our breakfast along with coconut chutney by watching few YouTube video. It came out very well. We liked it very much. Its a unique, Karnataka style breakfast recipe. Friends, do try this banana poori / Mangalore buns at home. You will love it for sure. Ok, lets see how to prepare Mangalore buns recipe with step by step pictures. Video is under editing. I will update it tomorrow.

    Do check out my collection of 10 Poori varieties& 20 Side dish for Poori

    Mangalore buns with coconut chutney

    Mangalore buns recipe - Banana Poori


    Mangalore buns recipe - Banana Poori With Coconut chutneyMangalore buns recipe with coconut chutney as side dish. - Karnataka special breakfast recipe
    Cuisine:Indian
    Category:Breakfast
    Serves:6 to 8 no.
    Prep time:6 Hours
    Cook time:5 Minutes
    Total time:6 Hours 5 Mins
    For Mangalore buns
    1 cup - 250ml
    • All Purpose flour - 1 cup
    • Ripen Banana - 1 no ( I used 2 small yelakki banana)
    • Sugar - 1 tbsp (Add 1.5 tbsp for more sweetness)
    • Curd - 1.5 tbsp  (Add 2 tbsp if needed)
    • Salt - 1/2 tsp
    • Cumin seeds - 1/2 tsp
    • Cooking soda / baking soda – 1/4 tsp
    • Cooking oil - To deep fry
    Coconut chutney
    • Grated coconut – 1/2 cup
    • Green chillies – 3 to 5 nos (Adjust based on spice level)
    • Tamarind – a small pinch
    • Curry leaves – 3 leaves (optional)
    • Fried gram dal – 1 tbsp
    • Garlic cloves – 4 nos
    • Salt & water – as needed
    METHOD
    1. In a wide bowl, mash the banana with a fork.
    2. Add curd, sugar, salt, all purpose flour and mix well
    3. Make a dough without adding water.
    4. Cover and keep it aside for minimum 6 hours.
    5. Knead it well and make thick, round poori.
    6. Deep fry it both the sides till golden brown.
    7. Remove in a tissue paper. Serve hot with coconut chutney.
    METHOD - STEP BY STEP PICTURES
    • In a wide bowl, mash the ripen banana with a fork or hands. Do not grind in a mixie.  
      Mangalore buns
    • To this, add salt, sugar, cooking soda, cumin seeds and curd.Mix well to make a paste.
      Add all purpose flour gradually and mix well to make a dough. Do not add water. Add little curd if needed. Knead for few minutes. Dough should be thick. Cover the dough and rest for minimum 6 hours or overnight. 
      Mangalore buns
    • Grease your hands and knead the dough for few minutes. Make small balls of uniform size. Dust the ball with maida and roll it to small, thick poori of palm size. Arrange in a plate.
      Mangalore buns
      Mangalore buns
    Mangalore buns
    • Heat oil and drop a pinch of dough. If it rises to the top immediately, drop one poori. Splash oil over the puri and press gently. It will become puffy. Flip it and cook the other side till golden brown. Remove in a tissue paper and drain it.
      Mangalore buns
      Mangalore buns
    • Grind all the ingredients given under “Coconut chutney” to a smooth paste adding required water. You can temper the chutney if you like. Serve hot poori with coconut chutney.
      Coconut chutney for mangalore buns
      Enjoy !

    Note

    • You can add more sugar if you like more sweet taste.
    • Do not use water to make the dough.Add little more curd if needed.
    • Resting time of minimum 6 hours is needed. Overnight is also fine.
    • If you rest the dough for lesser time, Poori will come out hard and chewy.
    • For variations you can add equal quantity of wheat flour and maida. But poori comes out bit dense in texture.

    Try this yummy, Karnataka special Mangalore buns with coconut chutney for your breakfast.
    Tastes Yummy !
    Mangalore buns recipe

    Iyengar Sakkarai Pongal – Iyengar Style Sweet Pongal Recipe In Pressure Cooker

    $
    0
    0
    Iyengar sakkarai pongal
    Iyengar style sweet pongal / Sakkarai pongal recipe was in my try list for long time. Recently I bought a cookbook named “Iyengar Pandigai Samayal “ from Kumbakonam. All the Iyengar specialty recipes are discussed in that book according to the festival. I found a traditional Sakkarai Pongal recipe prepared using a pot ( bronze pot/ Venkala paanai). When I saw that recipe, I immediately called my school friend Sumi who is the only source for my Tamil Iyengar Recipes in my website to confirm the recipe and ingredients. She shared all the most important tips to get perfect Perumal temple style Sakkarai Pongal. Thank you so much Sumi.  I became very happy and tried it for my Thursday Guru Pooja Neivedyam yesterday. It came out finger licking good. But for your help, this post would not have come up today :). My friend told me to prepare this pongal in a bronze pot to get the authentic flavor and taste. But my pot is too big to make small quantity. So I used a pressure cooker to ease my job. My job was done in less than 30 minutes. Friends, I have shared all the tips shared by my friend Sumi if you like to try the authentic version like temples. If you wish, you can prepare in a bronze pot like temples or use your cooker to make it quickly. Choice is yours ! But taste wise pot pongal is the best. Next year during pongal festival,  I will try to buy a small pot and make a separate & detailed post. Now lets see how to make Iyengar style sakkarai pongal recipe / Sweet pongal recipe with step by step pictures. I will post a video tonight.
    Sweet pongal recipe Iyengar
    POINTS TO NOTE
    1. To make temple style pongal, you should cook the rice & dal in an open pot, preferably in a bronze pot as it helps to retain the heat longer & maintain the consistency of pongal.
    2. Addition of Pachai karpooram/ edible camphor is a must in Iyengar Pongal.
    3. They also use freshly made ghee from butter to roast the cashews and add to pongal for neivedyam. They do not use the ghee used for regular cooking. So the taste & flavor of fresh ghee matters a lot.
    4. Never use boiled rice. Always use good quality Sona masoori rice for best taste.
    5. Do not use basmati rice as well.
    6. Roasting moong dal is an optional step. Some people add it as such.
    7. My friend told me to soak rice & moong dal in milk & water for 15 to 30 minutes to cook quickly.  But I din’t soak it as I used pressure cooker.
    8. Milk should be used in Iyengar pongal. Some people cook the rice only with milk. But I have used a combination of water & milk as suggested by my friend.
    9. The quantity of milk may vary based on the consistency of pongal. So reserve some boiled milk and add it while serving if needed.
    10. I have used rice & jaggery in the ratio of 1: 2. Some people use 1:1.5 for mild sweet taste. It all depends on your taste buds.

    Iyengar Sakkarai Pongal - Sweet Pongal recipe


    Iyengar Sakkarai Pongal - Sweet Pongal recipeHow to make Iyengar style sweet pongal recipe / sakkarai pongal with milk & jaggery.
    Cuisine:South Indian
    Category:Iyengar recipes
    Serves:Serves 3-4
    Prep time:5 Minutes
    Cook time:20 Minutes
    Total time:25 Minutes
    1 cup - 250ml
    • Raw rice - 1/2 cup ( Good quality Sona Masoori rice)
    • Yellow moong dal - 2 tbsp 
    • Boiled milk - 1 cup
    • Water - 1.5 cups
    • Powdered Jaggery - 1 cup
    • Water- 1/2 cup ( to melt jaggery)
    • Ghee - 2 to 3 tbsp ( I used 2 tbsp butter to roast nuts)
    • Cashew nuts - Few
    • Cardamom powder - 1/2 tsp
    • Edible camphor / Pachai karpooram - A pinch

    METHOD

    1. In a pressure cooker base, heat 1 tsp ghee. Roast moong dal for a minute.
    2. Add raw rice to it and roast for another minute. Wash them.
    3. Add water + milk to the cooker along with a pinch of salt.
    4. Pressure cook in very low flame for 2 whistles.
    5. Mash the cooked rice & dal. Boil and melt jaggery adding water and strain the syrup.
    6. Add jaggery syrup, 1 tbsp ghee to the mashed rice. Mix well and boil till semi solid in consistency. Switch off flame.
    7. Add cardamom powder, a pinch of edible camphor and cashews roasted in ghee.
    8. Mix well and remove from flame. Garnish with more cashews if you like and serve hot !

    METHOD - STEP BY STEP PICTURES

    • In a pressure cooker base, heat 1 tsp of ghee. Roast yellow moong dal for a minute. To this, add rice and roast for one more minute. Remove the cooker and wash the rice + dal. Drain the water and keep it back in flame.

    • Add milk + water to the washed rice, dal mixture. Add a pinch of salt as well. Mix well.
      Iyengar sweet pongal
    • Pressure cook in very low flame for 2 whistles.Open the cooker after steam is released. Mash the rice and dal very well with a ladle or masher. Make sure rice + dal is mashed properly. Add more boiled milk or water if needed. Mix well. Keep the cooker aside.
      Iyengar sweet pongal
    • In a kadai, boil and melt jaggery adding water. Strain the syrup in a wire mesh.
      Iyengar sweet pongal
    • Add the syrup to the mashed rice and mix well. Add little more hot water or milk if the pongal is too thick at this stage. Add 1 tbsp ghee to avoid sticking of rice to the bottom of cooker.
      Iyengar sweet pongal
    • Mix well and boil till pongal comes to semi solid in consistency. Do not cook till too thick. It will harden as it cools down. So make it semi thick.  Remove from the flame.
    • Roast cashews in the remaining 1 tbsp ghee and add to pongal. (  I used fresh butter, melted to make ghee and roasted the cashews as suggested by my friend.) Add cardamom powder, a pinch of edible camphor and mix well. Add 1 tbsp more ghee and few more roasted cashews for garnishing. Serve hot !
      Iyengar sweet pongal
      Iyengar sweet pongal


      Enjoy !

    Note

    • The ratio of rice & water depends on the quality of rice. Old rice takes more water. For pongal festival, we buy new rice ( pudhu arisi).So it takes less water. I used 1:5 ratio of rice and water. You can also use 1:4 or 1:6 based on the rice.
    • Similarly the quantity of jaggery depends on the type of jaggery. If you use paagu vellam, you can add 1:1.5 ratio of rice & jaggery else use 1:2 as I did to get nice color and taste.
    • If you feel the sweetness is more, you can add more boiled milk or hot water to reduce the sweetness.
    • Edible camphor is the most important to get temple flavor.
    • You can also add powdered nutmeg and roasted cloves if you like.
    • Do not reduce ghee than the mentioned quantity. You must add more ghee to get ghee dripping pongal else pongal looks dry.
    Try this easy, yummy Iyengar style Sakkarai pongal for this Pongal festival at home and enjoy !
    Iyengar sakkarai pongal

    Pongal Kuzhambu – Pongal Festival Sambar With Mixed Vegetables

    $
    0
    0
    Pongal kuzhambu
    People in Tamil nadu prepare Pongal kuzhambu on Pongal festival day adding 5 or 7 vegetables. We call it as 7 kai kuzhambu or kootu in Tamil. There are many versions for Pongal kuzhambu. It differs based on their custom. In Chettinad region, people make it without adding any dal or coconut. But this version is a no onion, no garlic Arachu vitta sambar kind of Pongal kuzhambu I learnt from my friend Shalini. But the quantity of dal and coconut used is very less for this kuzhambu. It is prepared with freshly roasted & ground spices. So its too flavorful just like Brahmin’s style arachuvitta sambar. Shalini told me to use 5 vegetables. So I blindly followed her recipe and came up with this version. If you are making on a normal day, you can skip all these vegetables and use yellow pumpkin alone. This pongal festival sambar tastes good with white pongal / Paal pongal, rice, ven pongal andidli,dosa. Friends If you are planning to make Pongal kuzhambu with mixed vegetables in sambar taste, you can follow this recipe. You will like it for sure.Next year before Pongal festival, I will try to share Chettinad Pongal Kuzhambu Recipe. Now lets see how to make no onion, no garlic pongal festival kuzhambu with step by step pictures.
    Check out my Brahmin style Thalagam kuzhambu recipe too !
    Pongal festival kuzhambu

    Pongal Kuzhambu - Mixed vegetable sambar for Pongal Festival


    Pongal Kuzhambu - Mixed vegetable sambar for Pongal Festival

    No onion, no garlic mixed vegetable kuzhambu for Pongal festival day !


    Cuisine:South Indian
    Category:Sambar
    Serves:Serves 3
    Prep time:10 Minutes
    Cook time:20 Minutes
    Total time:30 Minutes
    1 cup - 250ml
    • Mixed vegetables - 1.5 cups ( 5 cluster beans, 1/2 raw banana, 1/2 sweet potato, 4 pumpkin pieces, 1/2 cup of mochai)
    • Toor dal - 2 tbsp
    • Tamarind - Medium gooseberry size
    • Green chilli - 2 nos
    • Asafetida / Hing - A pinch
    • Turmeric powder - 1/4 tsp
    • Salt & water - as needed
    To roast & grind
    • Cooking oil - 1 tsp
    • Coriander seeds - 1.5 tsp
    • Chana dal - 1 tsp
    • Urad dal - 1 tsp
    • Pepper corns - 2 nos
    • Cumin seeds / Jeera - 1/2 tsp
    • Methi seeds - 1/4 tsp
    • Raw rice - 1/4 tsp
    • Red chillies - 3 to 5 nos
    • Grated coconut - 1 tbsp
    To Temper
    • Ghee - 2 tsp
    • Mustard seeds - 1/2 tsp
    • Curry leaves - Few
    • Coriander leaves - to garnish

    METHOD

    1. Wash and soak toor dal. Chop all the vegetables and keep aside.
    2. In a pressure cooker base, take toor dal and add vegetables, green chillies.
    3. Cook for 2 whistles in low flame. Open and mash the dal.
    4. To the cooked dal, add tamarind extract, roasted & ground masala.
    5. Boil for few minutes. Temper mustard seeds, curry leaves and add to sambar.
    6. Garnish with coriander leaves. Serve hot with white pongal / Paal pongal.

    METHOD - STEP BY STEP PICTURES

    • Wash and soak toor dal in a cooker base. Wash and chop all the vegetables into cubes and set aside. Soak tamarind in 1/2 cup of water. Take the extract and keep aside.
      pongal kuzhambu
    • Add chopped vegetables to toor dal. Add slit green chilli. Add required water, turmeric powder and cook for 2 whistles in low flame. Remove the lid after steam is released. Mash the dal well. Set aside.
      pongal kuzhambu
    • Heat 1 tsp oil in a kadai. Roast all the ingredients given under “to roast and grind” and grind to a smooth paste.
      pongal kuzhambu
    • Add this paste and tamarind extract to the cooked dal.Mix well and boil for few minutes till its raw smell goes off. 
      pongal kuzhambu
    • Temper mustard seeds, curry leaves in ghee and add to sambar.Garnish with coriander leaves and serve with white pongal / Paal pongal. This sambar tastes good with idli , dosa too.
      pongal kuzhambu
    • Enjoy !

    Note

    • Adjust the quantity of red chilli as per your taste.
    • Do not add more tamarind.
    • You can skip toor dal if you want to make this kuzhambu without dal. But adjust the quantity of coconut and roasting spices to give thickness to kuzhambu.
    Try this yummy Pongal kuzhambu with 5 vegetables and enjoy !
    Pongal sambar

    Mochakottai Kathirikai Kara Kuzhambu Recipe – Mochai Kulambu For Rice

    $
    0
    0
    Mochakottai kathirikai kuzhambu

    Mochakottai kathirikai kuzhambu  ( Field beans, brinjal gravy for rice) is one of the most popular kuzhambu varieties in Tamil nadu. Now mochai is in peak season. So I bought one kg of it during Pongal festival and started trying varieties of Tamil nadu and Karnataka style recipes. Usually my MIL makes pacha mochai kulambu without coconut (Fresh beans). But today I tried this mochai kara kulambu with coconut for the first time today after referring so many recipes. I made it directly in a pressure cooker to easy my job. It came out very well with a nice flavor of mochakottai and brinjal. I loved it very much. I am sure it will taste even better tomorrow. So I have reserved some gravy in the refrigerator. Friends, do try this Tamil nadu special mochai kottai kathirikai kuzhambu and share your feedback with me. You can also add kidney beans, brown chana and make this gravy. Ok, lets see how to make mochai kuzhambu with step by step pictures.


    Mochakottai Kathirikai Kuzhambu Recipe


    Mochakottai Kathirikai Kuzhambu RecipeMochakottai Kathirikai Kara Kuzhambu for rice
    Cuisine:South Indian
    Category:Kuzhambu Recipes
    Serves:Serves 3
    Prep time:5 Minutes
    Cook time:20 Minutes
    Total time:25 Minutes
    1 cup - 250ml
    • Mochakottai / Field beans - 1/2 cup
    • Tamarind – Big gooseberry size
    • Brinjal -1 no (I used 2 small brinjals)
    • Tomato - 1 no
    • Big onion - 1 no OR small onion - 10 nos
    • Garlic cloves - 10 nos
    • Grated Jaggery – 1/2 tsp
    • Salt & water - as needed
    To grind
    • Grated coconut - 1/4 cup
    • Fennel seeds - 1/2 tsp
    • Garlic cloves - 2 nos
    • Big onion - 1/4 no. Or small onion - 2 nos
    • Red chilli Powder – 1.5 to 2 tsp ( adjust)
    • Coriander seeds powder / Dhania powder – 1.5 tsp
    • Water - to grind
    To Temper
    • Cooking oil or Sesame oil - 2 tbsp
    • Mustard seeds - 1/2 tsp
    • Cumin seeds - 1/4 tsp
    • Methi seeds - 1/8 tsp
    • Urad dal - 1/2 tsp
    • Chana dal - 1/2 tsp
    • Curry leaves - Few

    METHOD

    1. Wash and chop brinjal, tomato, onion. Peel garlic. Wash mocha kottai. Keep in water.
    2. Heat oil in a pressure cooker & temper it. Saute onion, garlic, curry leaves. After it turns golden, add tomato and saute till mushy.
    3. Add the ground paste, saute till raw smell goes off.
    4. Add tamarind extract,  chopped brinjal, jaggery, salt and pressure cook in low flame for one whistle.
    5. If the gravy is thin, boil till thick. Serve hot with rice.

    METHOD - STEP BY STEP PICTURES

    • Wash and chop brinjal into lengthy, thick pieces. Keep immersed in water to avoid color change. Wash and clean fresh mochai kottai. Keep in water along with brinjal. (If you are using dried mochakottai/ field beans, you must soak it over night or for 8 hours).Soak tamarind in 1 cup of water and take the extract.
      Mochakottai-kathirikai-kulambu-1
    • Grind all the ingredients given under “To grind” to a smooth paste. Set aside.
      Mochakottai-kathirikai-kulambu-2
    • Heat oil in a pressure cooker. Temper mustard seeds, methi seeds, urad dal, cumin seeds,chana dal and curry leaves. Saute onion, garlic cloves till it turns golden.
    • Add tomato and saute till mushy. Add the ground paste and saute till its raw smell goes off.
      Mochakottai-kathirikai-kulambu-3
    • Now add the tamarind extract, jaggery, chopped brinjal, salt and mix well. Pressure cook in very low flame for one whistle. Open the lid after the steam is released.
      Mochakottai-kathirikai-kulambu-4
    • If the gravy is too thin, boil for few minutes till it becomes thick. If the gravy is too thick, add some water, give a roll boil and remove it. Serve hot with rice.
      Mochakottai-kathirikai-kulambu-5
    • Enjoy !

    Note

    • Adjust the quantity of spice powders as per your taste.
    • Addition of fennel seeds gives a mild masala flavor to this gravy.
    • Mochai and kathirikai adds a nice smell to this gravy.
    • You can also make this gravy with small onions alone. You can also use cooked brown chana, red beans or cow peas/ Thattai payaru.

    Try this easy, yummy mocha kottai kathirikai kara kuzhambu recipe for rice and enjoy !
    Mochakottai-kathirikai-kulambu

    Jeera Rice Veg Biryani - Seeraga Samba Rice Veg Biriyani Recipe - Jeerakasala Biryani

    $
    0
    0
    Jeera rice veg biryani


    Jeera rice biryani (Seeraga samba arisi biriyani in Tamil , Jeerakasala biryani in Malayalam) is an awesome, flavorful biryani that everyone must try at least once in your kitchen. Most of the South Indian special, traditional biriyani recipes uses jeera rice.This tiny-grained seeraga samba rice gets its name from its resemblance to cumin, which is known as seeragam in Tamil Nadu. It is also known as Kaima rice. Most of us use Basmati rice for making veg biryani. I was also using the same till I tried Ambur veg biryani using jeera rice. I just love its flavor and texture more than basmati rice. From then, I started to use this rice very often for preparing veg biryani at home.  So far I have prepared Dindigul thalappakkati biryani, Bangalore special Donne biryani (Veg version using mushroom and soya chunks), Coimbatore Angannan biryani using seeraga samba rice. This is yet another version of Tamil nadu style jeera rice veg biryani using a pressure cooker. Its so easy to make. It tastes and smells awesome. I have used carrot, potato and soya chunks. You can use beans, green peas, cauliflower to make it colorful and healthy. Do try this easy, yummy vegetable biryani using jeera rice in a pressure  cooker. I am sure you will love its taste. Ok, lets see how to make this seeraga samba biriyani with step by step pictures and video.

    Do check out my 40+ Vegetable biryani recipes collection.


    seeraga samba rice veg biryani


    Jeera Rice Veg Biryani Recipe


    Jeera Rice Veg Biryani RecipeHow to make Vegetable biryani using jeera rice in a pressure cooker
    Cuisine:South Indian
    Category:Biryani Recipes
    Serves:Serves 3
    Prep time:10 Minutes
    Cook time:20 Minutes
    Total time:30 Minutes
    1 cup - 250ml
    • Jeera rice - 1 cup
    • Water - 1.5 cups
    • Mixed vegetables – 1 cup ( 1 carrot, 1 potato, handful of soya chunks)
    • Cooking oil + ghee - 2 tbsp + 1 tbsp
    • Bay leaf - 1 no
    • Black stone flower / Kalpasi - 1 no
    • Big onion - 1 no
    • Ripe tomato - 1 no
    • Mint leaves - 1/2 tbsp (optional)
    To Grind
    • Cinnamon - 1 inch
    • Cloves - 2 nos
    • Cardamom - 1 no
    • Green chilli - 3 nos
    • Big onion - 1 no ( medium size)
    • Ginger garlic paste - 1/2 tsp
    • Fennel seeds - 1/2 tsp
    • Mint leaves - 1 tbsp
    • Coriander leaves - 1/2 tbsp
    • Water - as needed ( to grind paste)

    METHOD

    1. Wash and chop carrot and potato into thin, long strips.
    2. Grind ingredients for masala. Keep aside.
    3. Heat oil + ghee in a pressure cooker. Saute bay leaf and black stone flower.
    4. Add onion. Saute well. Add tomato, saute till mushy. Add masala paste, salt.
    5. Saute till raw smell goes off. Now add vegetables, soaked soya chunks, washed rice and mix well.
    6. Pressure cook in low flame for one whistle. Remove and fluff the rice. Serve with raita !

    METHOD - STEP BY STEP PICTURES

    • Wash the jeera rice and keep aside. No need to soak the rice in water. Wash and chop all the vegetables and keep aside.
      Jeera rice veg biryani
    • Grind all the ingredients given under “to grind” to a smooth paste.Set aside.
      Jeera rice veg biryani
    • Heat oil + ghee in a pressure cooker base. Saute bay leaf, kalpasi. Saute onion till transparent.


    • Add tomato, required salt and saute till mushy. Add the ground masala paste, turmeric powder. Saute till its raw smell goes off. Lastly add the chopped vegetables and saute for a minute to coat the masala.
      Jeera rice veg biryani
    • Add water. When the water roll boils, add washed rice.Add some mint leaves if you like. Mix well. Pressure cook in very low flame for one whistle. Remove the lid after steam is released. Mix gently and serve hot with onion raita or brinjal gravy for biryani if you like.
      Jeera rice veg biryani
    • Enjoy !

    Note

    • Adjust the number of chillies as per your taste.
    • You can add 1 tbsp of grated coconut while grinding.
    • You can also use coconut milk & water in equal quantity.
    Enjoy this yummy, flavorful Jeera rice veg biryani at home !Jeera rice biryani

    Mixed Vegetable Paratha Using Preethi Zodiac Mixer Grinder

    $
    0
    0
    Vegetable paratha recipe


    Recently I got Preethi zodiac mixer grinder for product review.  As Preethi Kitchen appliances is one of my favorite brands, I agreed to do it. In this post, I have shared my opinion about Preethi Zodiac after using it for 10 days. I have also shared the recipe of an easy vegetable paratha made using Preethi Zodiac chopper and atta kneader.
    Preethi Zodiac offers a wide range of user friendly options like grinding, atta kneading, juicing, grating, slicing, chopping and citrus juice press. Its more than a mixer grinder for sure. It has a powerful 750w motor which is ideal for grinding dosa batter as well. I have tried all these options and shared my opinion about the same. Read on..


    SPECIFICATIONS
    • Model No.: Zodiac - MG 218
    • Voltage: 230V AC ~ 50 Hz
    • Power Consumption: 750 Watt
    • Motor: Universal 750 Watt High Power Motor
    • Material of Body: A.B.S
    • Material of Jars: Stainless Steel & Transparent Plastic
    • Blade Assemblies: Stainless Steel, Machine Ground and Polished
    • Speed Controls: Rotary Switch with 3 Speeds and incher
    • Flex Cord: PVC insulated 3 Core, Flexi cord with Plugtop and earthing
    • Country of Origin: INDIA
    Preethi Zodiac MG 218 750-Watt Mixer Grinder (Black/Light Grey)

    It's a real looker. Yes, it looks awesome and attracts us by its first look especially the shiny black colored body and the steel rim combination makes it a real winner. Its Package is so neat. Every part was individually well wrapped on plastic bag and kept in a cardboard hosting so that it would be safe while shipping.
    Its instruction manual is very small but its crisp with all the details. So I din't have any difficulties in assembling the jars and bottom. Before using the jars, I washed them individually using soapy water to remove the plastic smell.

    PROS & CONS

    PROS
    • Zodiac has a wide bottom with rubber holders. So it is stable while running and vibrates less.
    • It has a powerful 750w motor. So grinding job gets done quickly.
    • The air vent is at the bottom so that if the jar is over flowing/leaking during grinding, water seeping into the motor is minimal.
    • It has two blue light indicators.One at the speed knob and other just below that. The bottom light turns red to indicate overload conditions.
    • Master chef jar and its accessories are too good. But the chopping blade is sharp. Please be careful while handling them.
    • I loved the Atta kneader more than other attachments.
    • Juicer, extractor, chopping blade is also equally good. Spout in the juicer is a good idea.
    • Grater and slicer is doing its job perfectly. 
    • Small Chutney Jar is quite helpful to grind very small quantity. Its handle is very strong and sturdy. Its lids are also interchangeable.
    • Medium and Big jars are useful for grinding Vada batter and Idli,dosa batter. Everything comes out great.
    CONS
    • Too noisy. This is the first thing that irritated & scared me. Even though its noise level is mentioned as permissible in the specifications in AMAZON, I felt its high when compared with the other Preethi mixers I had used.
    • Other than grinding jars, all the accessories and atta kneading jars are plastic. So I am not sure about its life. It may break if heavily loaded or fallen down. But Preethi service center is available all over India.So getting the spare parts may not be difficult.
    • There is no coconut grater. Zodiac would become a complete food processor if its available.
    • Slicer has one size. So you cannot make very thin slices of vegetables for making chips.
    • Though the cleaning is easier, there are too many small parts. This mixer parts are not dish washer friendly.
    Overall, I liked this product and felt worthy for its features. It would have been much better and  secured 5 star rating if the noise is less. If you're looking for a good mixer grinder with multi-functions, you can go for it.

    You can buy this product online in PREETHI Website Or in AMAZON, FLIPKART  at a lesser price.

    Now lets see how to make an easy mixed vegetable paratha using Preethi zodiac chopper and atta kneader. It does the job quickly and easily.

    Preethi Zodiac review


    Easy mixed vegetable paratha recipe


    Easy mixed vegetable paratha recipe

    How to make vegetable paratha recipe easily using Preethi Zodiac.


    Cuisine:Indian
    Category:Paratha Recipes
    Serves:Serves 2
    Prep time:5 Minutes
    Cook time:5 Minutes
    Total time:10 Minutes
    1 cup - 250ml
    • Wheat flour / Atta - 2 cups
    • **Mixed vegetables - 1 cup ( chopped finely)
    • Ajwain - 1/2 tsp
    • Red chilli powder - 1.5 tsp
    • Garam masala powder - 1 tsp
    • Cooking oil - 1 tbsp
    • Salt - as needed
    • Water - Little ( I used around 1/2 cup)
    • Cooking oil or ghee - to drizzle
    • **Mixed vegetables : I used 1 small carrot, 1 big piece of cauliflower, 2 leaves of cabbage, 1/4 capsicum, 1 big onion, 1 green chilli, 2 tbsp coriander leaves)

    METHOD

    1. Wash and chop all the vegetables into 2 inch size to chop in Preethi zodiac.
    2. Take the master chef jar and put the chopping blade.
    3. Chop the vegetables finely. Remove the chopping blade and replace with atta kneader.
    4. Add wheat flour, spice powders, salt and oil. Grind to mix well.
    5. Add water little by little while the mixer runs. Dough will be kneaded in few minutes.
    6. Remove and make shapes. Cook paratha on both the sides drizzling oil or ghee.
    7. Serve with onion raita and pickle.
    METHOD - STEP BY STEP PICTURES

  • Wash and chop all the vegetables into 2 inch size. Place the master chef jar and put the chopping blade with the coupler. Drop all the vegetables and coriander leaves. Grind to very fine pieces. Wipe the sides whenever needed.
    vegetable paratha recipe 
    vegetable paratha recipevegetable paratha recipe

    • Now remove the chopping blade and replace with atta kneader. Add in wheat flour, red chilli powder, garam masala powder, salt, ajwain and cooking oil.

    vegetable paratha recipe

  • Grind well to mix them evenly. Wipe the sides of jar using the spatula. Now add water gradually to make a non-sticky dough. Remember this dough needs less water. So add it carefully.

  • Pulse the mixer in speed one and grind till it becomes a smooth dough. It takes just few minutes. Check the dough if its non-sticky and smooth. If its too sticky, add some more wheat flour and knead again in the mixer.

  • Dough will come out easily without sticking to the walls of the jar. Remove the dough and make balls of uniform size.
    vegetable paratha recipe
  • Roll into thin or thick paratha by dusting in wheat flour. Roll it as you wish. I make slightly thick paratha. Heat dosa tawa and cook paratha on both the sides by drizzling and greasing oil on the paratha. Cook till you find brown spots all over the paratha. Cook in medium flame for better results. Remove and serve hot immediately with onion raita and pickle.
    vegetable paratha recipe
    vegetable paratha recipe
  • Enjoy !

  • Note

    • Adjust the quantity of spice powders as you like.
    • If you have added more water while kneading, you can add more wheat flour and knead to make smooth, non-sticky dough.
    • You can add up to 3 cups of atta for kneading the dough.
    • For variations, you can make masala using chopping vegetables and spice powders and then stuff it in the dough while rolling.

    Do try this easy, yummy vegetable paratha using Preethi Zodiac.It makes your job done quickly and easily without any hassles !

    vegetable paratha recipe

    Double Beans Poriyal – South Indian Style Double Beans Curry For Rice

    $
    0
    0
    double beans curry

    I prepared this double beans curry recipe for the first time following my MIL’s South Indian style raw banana curry recipe adding fresh masala and coconut. Double beans is also known as lima beans. We call it as double beans poriyal in Tamil. It is high in nutrition, packed with soluble fiber that helps to reduce cholesterol and manage diabetes. I have seen my friends making sambar and kurma using fresh beans. But to begin with, I tried this yummy double beans poriyal recipe using dried double beans as I don’t get fresh ones in my place. It came out very well and tasty. Its a good side dish for sambar rice, rasam rice &curd rice. Except the soaking time, its very easy to make & can be done quickly. Do try this healthy poriyal recipe for rice and enjoy. Lets see how to make double beans/ lima beans poriyal recipe with step by step pictures.


    Double beans poriyal


    Double beans poriyal recipe


    Double beans poriyal recipe

    How to make double beans poriyal for rice


    Cuisine:South Indian
    Category:Poriyal recipes
    Serves:Serves 4
    Prep time:6Hours
    Cook time:20 Minutes
    Total time:6H20 Minutes
    1 cup - 250ml
    • Double beans / Lima beans - 1 cup
    • Salt & water - as needed
    To Grind masala
    • Grated coconut - 1/3 cup
    • Coriander seeds - 1.5 tbsp
    • Red chillies – 4 nos
    • Turmeric powder - 1/4 tsp
    • Sambar Powder - 1 tsp
    • Big onion - 1 no
    • Cumin seeds - 1/2 tsp
    • Garlic cloves - 3 nos
    To Temper
    • Cooking oil – 2 tbsp
    • Mustard seeds –1/2 tsp
    • Urad dal – 1 tsp
    • Curry leaves - Few

    METHOD

    1. Wash and soak double beans in enough water for minimum 6 hours or overnight.
    2. Pressure cook soaked beans adding water and salt. Cook in low flame for one whistle.
    3. Grind all the ingredients for masala to a smooth paste without adding water.
    4. Heat oil and temper mustard seeds, urad dal, curry leaves. Add cooked double beans without water.
    5. Add the ground masala paste and mix well to coat the masala. Add 1/4 cup of water and boil in low flame for few minutes till poriyal becomes semi dry. Remove in a plate. Serve with rice.

    METHOD - STEP BY STEP PICTURES

    • Wash and soak double beans in enough water for one whistle in very low flame. Remove the lid after steam is released. Drain the excess water and set the beans aside. ( I cooked the beans by keeping in a box inside the pressure cooker. I kept the dal in cooker base.)
      double beans Poriyal
    • Grind all the ingredients given under “ To grind masala” to a paste without adding water. Water content in onion and coconut is enough to make it a paste. Set aside.
      double beans curry
    • Heat oil in a kadai. Splutter mustard seeds, urad dal, curry leaves. Add the cooked double beans, ground masala paste and mix well to coat the beans.

    • Sprinkle 1/4 cup of water and mix well in low flame till the poriyal looks semi dry. Transfer the poriyal to a kadai. Serve with rice, sambar rice or curd rice.
      double beans curry

    • Enjoy !

    Note

    • Add more red chillies if you want spicy poriyal.
    • You can add some lemon juice at the end if you like.
    • If you are using fresh double beans, you don’t have to soak it. Just pressure cook them directly adding water.
    Try this easy, healthy double beans poriyal at home. I enjoyed it with Paruppu rasam rice.

    Double beans curry recipe

    Shenga Chutney Pudi - North Karnataka Peanut Chutney Powder - Shenga Hindi

    $
    0
    0
    Shenga chutney pudi

    Shenga hindi (Kadlekai chutney pudi in Kannada, Peanut chutney powder in English) is a North Karnataka special side dish for rice, chapathi, idli, dosa and jolada roti. It is a dry chutney recipe prepared without coconut. I learnt this from my friend Megha whose mom is from North Karnataka. It can be prepared easily with very less ingredients. People in Karnataka love to mix this shenga chutney pudi with curd and enjoy with jolada roti. But we liked it very much with plain rice drizzled with ghee more than roti, idli or dosa.If you have roasted peanuts in hand, this chutney pudi can be prepared instantly. You don’t need to remove skin of peanuts as well. This peanut powder stays good for a week and its ideal for travel too. Recently I shared 3 Karnataka special recipe in Tamil for Aval kitchen magazine. Many of my readers asked me to post those recipes in my website too. So here you go, North Karnataka style Shenga hindi pudi / Kadlekai chutney pudi with step by step pictures. I will upload video tomorrow.

    Shenga Chutney Pudi Recipe


    Shenga Hindi Pudi Recipe

    How to make North Karnataka style Peanut chutney powder recipe for rice, jolada roti.


    Cuisine:Indian
    Category:Chutney Powder Recipes
    Serves:Serves 4
    Prep time:5 Minutes
    Cook time:5 Minutes
    Total time:10 Minutes
    1 cup - 250ml
    • Roasted Peanuts - 1 cup
    • Garlic cloves - 6 nos
    • Cumin seeds - 1 tsp
    • Red chilli powder - 4 tsp (adjust)
    • Salt - as needed

    METHOD

    1. Dry roast peanuts in microwave high power for 3 minutes or on stove top till golden brown.
    2. Let it cool down. No need to deskin peanuts.
    3. In a mixer grinder, take roasted peanuts, chilli powder, cumin, garlic cloves & salt.
    4. Grind it to coarse powder. Transfer to a container & store for a week.
    5. Mix with plain rice adding ghee OR mix with curd and serve with Jolada roti.

    METHOD - STEP BY STEP PICTURES

    • Dry roast peanuts in microwave high power for 3 minutes or roast in a kadai in stove top. Roast in medium flame without burning them. Roast till its skin crackles & turn golden.Remove the peanuts & let it cool down.
      Shenga Chutney pudi - North Karnataka
    • In a mixer grinder take roasted peanuts, red chilli powder, cumin seeds, salt and garlic cloves. Grind to a slightly coarse powder.Check for taste and add more salt, chilli powder if needed.

    • Transfer to a clean, air tight box and store up to one week to 10 days. This chutney pudi tastes the best  for Jolada roti / Jowar flour roti when mixed with curd. You can enjoy it with plain rice adding ghee. If you like, you can have it with idli, dosa and chapathi too. You can also add this pudi in broad beans, cluster beans poriyal/Palya.
      North Karnataka chutney pudi
    • Enjoy !

    Note

    • Adjust the amount of chilli powder as per your taste.
    • Some people add little sugar. But I didn’t use it.
    • For variations, you can roast cumin seeds, garlic cloves before grinding.

    Try this easy, yummy Karnataka style Shenga hindi pudi and enjoy with plain rice & jolada roti !
    Karnataka chutney pudi recipe


    Mullangi Poriyal - Radish Stir Fry Recipe - Mullangi Palya

    $
    0
    0
    Mullangi poriyal
    Recently I tasted this mullangi poriyal in Roti ghar hotel’s Bharjari oota. It is called as Moolangi palya in Kannada. When I had this stir fry, I couldn’t recognize its prepared with radish. It was very tasty and flavorful. So I asked the name of the dish from the waiter and surprised to know its ingredients. As I got bored of making mullangi sambar or mooli paratha, I wanted to try this radish stir fry and see the response of my family. Everybody liked it very much. I am sure, this poriyal is a welcome change from my usual mullangi recipes. My MIL makes a different variety of mullangi poriyal by grating it. Soon I will share that recipe too. Ok, now lets see how to make Karnataka style mullangi palya/ mullangi poriyal at home with step by step pictures.

    Do check out my Mullangi sambar & easy mooli paratha recipes.

    Mullangi palya

    Mullangi poriyal / Radish stir fry recipe


    Mullangi poriyal / Radish stir fry recipeMullangi poriyal recipe / Radish stir fry - Side dish for rice
    Cuisine:South Indian
    Category:Poriyal recipes
    Serves:Serves 2 to 3
    Prep time:10 Minutes
    Cook time:20 Minutes
    Total time:30 Minutes
    1 cup = 250ml
    • Radish / Mullangi - 4 nos (Long, thin ones)
    • Salt & water - as needed
    To grind
    • MTR bisibelebath powder - 1 tbsp
    • Grated coconut - 1/3 cup
    • Jaggery - 1/2 tsp (optional)
    To Temper
    • Cooking oil - 2 tbsp
    • Mustard seeds - 1/2 tsp
    • Urad dal - 1 tsp
    • Cumin seeds - 1/2 tsp
    • Big onion - 1 no ( finely chopped)
    • Curry leaves - Few
    METHOD

    • Wash and peel the skin of radish. Chop the head and tail portions. Cut into two pieces lengthwise. Chop into semi circles as shown in the picture below. Set aside. This poriyal can be prepared in two ways. You can either pressure cook radish or stir fry and cook in the kadai directly.   If you are cooking in a pressure cooker, cook it adding less water, salt in high flame for 2 whistles.
      mullangi poriyal
    • In a mixie jar, take grated coconut, MTR bisibelebath powder, jaggery (optional) and grind to a coarse powder without adding water.  It looks like a semi dry paste.
    mullangi poriyal
    • Heat oil in a kadai. Temper mustard seeds, urad dal, curry leaves, red chilli and hing. Saute big onion till transparent.
      mullangi poriyal
    • Add the chopped radish and saute till it becomes soft. ( If you have pressure cooked radish, add it without water). Toss gently without breaking the radish pieces. Keep the flame low, add 1/4 cup of water, mix well and cover cook for sometime.After the radish is 3/4th cooked, add the ground coconut masala. Mix well and cook till its raw smell goes off and radish is completely cooked.
    mullangi poriyal

    mullangi poriyal
    • Remove after the raw smell of masala goes off.( If you don’t want to pressure cook radish, add the raw ones and saute till it becomes soft. Add ground masala, sprinkle some water and cover cook till done). Serve with sambar rice or curd rice.

      Enjoy !
    Note
    • Adjust the quantity of MTR powder as per your taste.
    • You can also add 1/2 tsp of red chilli powder in addition to MTR powder.
    • If you don’t have MTR powder in hand, you can use 1 tsp red chilli powder + 1/2 tsp garam masala powder.
    Try this yummy radish poriyal for a change & enjoy with sambar rice.
    Radish stir fry

    Cauliflower Kuzhambu Recipe - South Indian Cauliflower Gravy For Rice, Idli, Roti

    $
    0
    0
    cauliflower kuzhambu
     Cauliflower is in season now. Last week I bought 2 flowers and tried some new recipes with it. I prepared this South Indian, Tamil nadu style Cauliflower kuzhambu for rice, idli and chapathi for the first time watching a video in YouTube. It came out very well. Its a kurma kind of gravy that suits well for rice,idli and chapathi. My mom makes a similar cauliflower kulambu adding green peas. Though the ingredients are the same, this kuzhambu tasted completely different. Tamarind is not used in this recipe instead onion, tomato and coconut masala forms the base. I am sure I will make it very often in my kitchen. Lets see how to make cauliflower kuzhambu recipe with step by step pictures.

    Do check out my mom's style cauliflower gravy for rice and idli, Gobi 65, Gobi manchurian and Cauliflower poriyal, Gobi paratha, cauliflower biryani 


    Cauliflower kuzhambu for rice

    Cauliflower kuzhambu recipe for rice, idli , dosa and roti


    Cauliflower kuzhambu recipe for rice, idli , dosa and roti

    South Indian style Cauliflower kulambu for rice, idli, dosa , roti


    Cuisine:South Indian
    Category:Kuzhambu recipes
    Serves:Serves 4
    Prep time:10 Minutes
    Cook time:20 Minutes
    Total time:30 Minutes
    1 cup - 250ml
    • Cauliflower - 20 florets
    • Big onion - 2 no
    • Ripe tomato - 3 nos (Medium sized)
    • Ginger garlic paste - 1/2 tsp
    • Grated coconut - 1/4 cup
    • Fennel seeds - 1 tsp
    • Red chilli powder - 1.5 tsp
    • Turmeric powder - 1/4 tsp
    • Garam masala powder - 1 tsp
    • Salt & water - as needed
    • Cooking oil – 2 tbsp + 1 tbsp
    • Mustard seeds - 1/2 tsp
    • Curry leaves - Few
    • Coriander leaves – to garnish

    METHOD

    1. Wash and boil cauliflower florets in 3 cups of water adding turmeric powder.
    2. Heat 1 tbsp oil in a kadai.Saute onion, gg paste and tomato.
    3. Take in a mixie jar. Add grated coconut, fennel seeds, red chilli powder, garam masala powder and turmeric powder. Grind to smooth paste adding required water.
    4. Heat 1 tbsp oil and add the ground paste. Add the cauliflower florets.
    5. Boil the gravy adding 1 cup of water, required salt. Simmer for 10 minutes till its raw smell goes off.
    6. Garnish with coriander leaves and serve hot with rice, idli, dosa and roti.

    METHOD - STEP BY STEP PICTURES

    • Wash the cauliflower florets. Boil 3 cups of water adding turmeric powder,little salt. Add cauliflower to hot water & parboil for 5 minutes. Drain the excess water & set aside.
      cauliflower kuzhambu
    • Heat 1 tbsp oil in a kadai.Saute onion, ginger garlic paste till onion turns transparent. Now add tomato and saute till mushy.
      cauliflower gravy for rice
    • Grind to a smooth paste adding coconut, fennel seeds, turmeric powder, red chilli powder, garam masala powder and salt.Add required water to make a smooth paste.
      cauliflower gravy for rice
    • Heat oil in a kadai and when it gets heated , add the ground paste. Add 1.5 cups of water and parboiled cauliflower pieces. Mix well and check for taste. Add more salt or chilli powder if needed.
      cauliflower gravy for rice
    • Keep the flame medium and let the gravy boil till nice masala smell wafts through your house. Check for thickness. If its too thick, add some water and bring to desired consistency. Garnish with coriander leaves and serve hot with plain rice. Enjoy !
      cauliflower gravy for rice
    • Enjoy !

    Note

    • Adjust the quantity of red chilli powder and garam masala powder as per your taste.
    • You can also use boiled potato instead of cauliflower.
    • If you like, you can add boiled green peas along with cauliflower.
    • Make it slightly thin if you are serving for rice, idli or dosa. If you want to serve for roti/chapathi, boil the gravy till semi thick and serve as kurma.
    Try this easy, yummy cauliflower gravy for rice, idli and roti. Enjoy !
    Cauliflower gravy for rice

    Sabudana Kheer Recipe – Javvarisi Payasam Recipe With Sugar - Sago Payasam

    $
    0
    0
    Sabudana kheer recipe

    We celebrated Maha Shivaratri festival today. I made Sadudana kheer with sugar ( Sago kheer in English, Javvarisi payasam in Tamil, Sabbakki payasa in Kannada, Saggubiyam Payasam in Telugu, Sabudana kheer in Hindi) using big, white sago for the first time. Its an yummy Indian dessert recipe. Usually I make this kheer instantly by roasting nylon sabudana / nylon javvarisi( small sized). But this year, I wanted to try with maavu javvarisi which we use for making upma/ Kichdi.I watched a Marathi video in Youtube channel and tried this recipe. It came out very well. It tasted so rich and creamy with all the full fat milk, sugar, nuts and saffron. I loved it to the core. For variations, you can also use condensed milk instead of milk & sugar. Sendhil loves sabudana kheer with jaggery more than sugar. So I am planning to prepare it with the leftover sago tomorrow WinkingLove Struck for Thursday Guru pooja.
    Sabudana kheer is one of the most commonly prepared vrat ki recipes / fasting food across North India. Basically Sabudana/ sago is healthy as its made from Tapioca. It has so many health benefits. Hence its considered as one of the best baby/toddler foods. Its good for muscle development, helps to gain weight, good for bones, improves digestion, energy levels and reduces body heat. Even though it is high in calories and full of carbohydrates, it keeps the tummy full for long time.So people make sabudana recipes on vrat/ fasting days. Just 100gms ( 1 cup) of serving has more than 200 calories. Hence its advised to consume in small amounts.  . Ok, Lets see how to make sabudana kheer with sugar / Javvarisi payasam recipe with step by step pictures and video.


    Sabudana kheer recipe with sugar


    Sabudana Kheer Recipe / Javvarisi payasam recipe


    Sabudana Kheer Recipe / Javvarisi payasam recipe

    How to make sabudana kheer/ sago kheer/ Javvarisi payasam for Shivratri fasting and Navratri festival.


    Cuisine:North Indian
    Category:Payasam recipe
    Serves:Serves 3
    Prep time:10 Minutes
    Cook time:20 Minutes
    Total time:30 Minutes
    1 cup - 250ml
    • White Sabudana / Sago / White javvarisi - 1/3 cup ( I used big ones)
    • Water - 1.5 cups
    • Boiled milk - 2 cups
    • Sugar - 1/4 cup
    • Saffron threads - Few
    • Cardamom powder - 1/2 tsp
    • Cashews and dry grapes - Few
    • Ghee - 1 tsp ( to roast the nuts)

    METHOD

    1. Wash the sabudana twice in enough water. Drain it.
    2. Add 1/2  to 3/4 cup of water to it and soak it overnight or minimum 4 hours.
    3. In a kadai, boil 1 cup of water. Add soaked sabudana with water.
    4. Cook in medium flame till sabudana turns translucent. Stir constantly.
    5. After its cooked well, add milk and boil for 5 minutes. Add saffron threads while milk boils.
    6. Sabudana cooks completely. Add sugar. Mix well till sugar dissolves. Give a boil. Check for thickness and add more milk if needed.
    7. Switch off the flame and add cardamom powder. Roast nuts in ghee and add to kheer. Mix well and serve warm or chilled by refrigerating it for 30 minutes.

    METHOD - STEP BY STEP PICTURES


    • Take sabudana/ sago in a wide bowl and wash it twice adding enough water. Drain the water completely. Add 1/2 to 3/4 cup of water and soak it for minimum 6 hours to overnight ( 12 hrs). It will increase in size after soaking.
      How to make sabudana kheer
    • Take a wide non-stick kadai. Add water and let it start to roll boil. Add sabudana with soaked water. Mix well and cook in medium flame till it turns translucent. It takes nearly 10 to 15 minutes to cook well. Stir occasionally to avoid sticking to the bottom of kadai and becomes like porridge.
      How to make sabudana kheer
    • When its 80% cooked, add milk and boil for 5 minutes in medium flame.Add saffron threads while the milk boils. Kheer turns mild yellow in color due to saffron. If you want white colored kheer, avoid saffron.
      How to make sabudana kheer
    • When the milk becomes slightly thick and sabudana is completely cooked, add sugar. Mix well and let the sugar dissolve. Check for consistency of kheer. If its too thin, let it boil for some more time. If its too thick, add little more boiled milk to bring desired consistency.Switch off the flame.
    • Add cardamom powder to the kheer. Roast cashew + dry grapes till golden in 1 tsp ghee and add to the kheer. Mix well and serve warm. If you like to serve chilled, refrigerate the kheer for sometime  and serve. Remember this kheer thickens after it cools down. So add little milk and adjust its consistency when needed.
      How to make sabudana kheer
    • Enjoy with yummy sabudane ki kheer along with poori , sabzi & rice for breakfast or lunch.
      How to make sabudana kheer
      !

    Note

    • Quantity of milk should be adjusted as per your taste and desired consistency.
    • For variations, you can directly cook sabudana in milk instead of water but milk may curdle. To avoid this, we are cooking in water firstly and add milk to it.
    • If you are using small sized nylon sabudana, you don’t need to soak it. Just wash it twice and cook in water directly.
    • Bigger sized sabudana needs to be soaked for more time.

    Enjoy this yummy, creamy Sabudana kheer for festivals and occasions at home.
    Sabudana kheer recipe with video

    How To Make Eggless Red Velvet Cake Recipe Without Condensed Milk

    $
    0
    0
    Eggless red velvet cake recipe

    My daughter Raksha is a big fan of Red velvet cake. So I tried eggless red velvet cake recipe at home with whipped cream frosting for the first time on Valentine’s day. Last year during this day I had shared a simple and easy eggless red velvet cake in a mug using microwave. So this year I wanted to try in convection oven. It came out moist, soft, spongy without even usingcondensed milk, butter & eggs. Cooking oil and buttermilk are the magic ingredients in this recipe. I was very happy with the result even though its my first attempt. Thanks Ranjani for the fool proof recipe. Actually cream cheese frosting is most suitable for red velvet cake. But I used heavy whipping cream for the frosting as I din’t have cream cheese in hand. We loved this combo as well. I used food coloring liquid for the bright red color. I din’t want to test with beetroot juice as its my first attempt. Last year we ordered red velvet cake from a popular bakery chain for Raksha’s birthday. But it was not good at all. We were disappointed with the taste of frosting and felt the cake was not even moist. When compared with that cake, my homemade eggless red velvet cake is outstanding. Beginners can dare to try this recipe. You will get good results for sure. You can also use this recipe to make red velvet cupcake. Ok, Lets see how to make eggless red velvet cake at home with step by step pictures.
    PS : Sorry for the bad decoration. I am still in the learning phase. Hope I can do a perfect frosting soon ;).

    How to make eggless red velvet cake at home

    Eggless red velvet cake recipe


    Eggless red velvet cake recipe

    How to make soft, moist eggless red velvet cake without condensed milk.


    Cuisine:Indian
    Category:Eggless cakes
    Serves:1/4 kg
    Prep time:10 Minutes
    Cook time:30 Minutes
    Total time:40 Minutes
    1 cup - 250ml
    • Maida / All purpose flour - 1 cup
    • Baking powder - 1 tsp
    • Baking soda - 1/2 tsp
    • Cocoa powder - 1 tbsp
    To mix
    • Sugar – 1/2 cup ( I used regular crystal sugar)
    • Buttermilk - 1/2 cup ( thick curd ( 1.5 tbsp + 1/3 cup water)
    • Cooking oil - 1/3 cup ( Any flavorless oill)
    • Vanilla essence - 1 tsp
    • Colorless vinegar - 1 tbsp
    • Red food color - 1 tsp
    Frosting
    • Heavy whipping cream - 1/2 cup ( I used Tropolite brand)
    • Icing sugar - 1/4 cup
    • Vanilla essence - 1/2 tsp
    • Sugar + water – 1 tbsp each for sugar syrup.

    METHOD

    1. In a small bowl, whisk curd & water to make buttermilk. Keep aside.
    2. In another wide bowl, take sugar and cooking oil. Mix till sugar melts.Then add the remaining wet ingredients and make a smooth liquid.  
    3. Keep a sieve over this bowl. Sieve maida, baking powder, soda and cocoa powder.
    4. Mix gently with a whisk to make cake batter. Transfer to a greased baking pan.
    5. Bake in a preheated oven for 30 to 35 minutes.Check with toothpick.
    6. Remove the pan and let the cake cool completely. Invert in a plate and cover with a cling wrap to avoid drying.
    7. Now beat the heavy whipping cream adding icing sugar, vanilla essence till stiff peak using electric beater.
    8. Slice the cake into two rounds. Drizzle sugar syrup all over the cake base.  Apply frosting.Decorate with piping nozzles as you like. Refrigerate the cake for an hour before use.
    9. Cut the cake and enjoy chilled cake.

    METHOD - STEP BY STEP PICTURES

    • In a small bowl, whisk thick curd + water. Make buttermilk. Set aside. In a wide bowl, whisk sugar and cooking oil. Mix till sugar dissolves. To this  add buttermilk, vinegar, vanilla essence, food color and mix well.
      Eggless red velvet cake recipe
    • Place a sieve over the bowl. Sieve maida, baking powder, baking soda and cocoa powder. Mix gently and make the cake batter. Batter consistency should be pourable and fall like ribbon.
      Eggless red velvet cake recipe
    • Take a baking pan, grease with cooking oil or butter at the sides & bottom pf pan. Dust the pan with maida & coat it completely. Pour the cake batter till half of the pan.
      Eggless red velvet cake recipe
    • Preheat convection oven at 180c for 10 minutes. Place the baking pan inside the oven and bake the cake for 30 minutes. Prick the cake with a toothpick and check if it comes out clean without batter. If not, bake for another 2 minutes to 5 minutes. Remove the cake pan and allow it to become warm.
      Eggless red velvet cake recipe
    • After 30 minutes, run a knife in the sides of cake and invert it in a plate.Cake falls smooth without sticking to the pan. Let the cake cool down completely if you are frosting it with cream. Else you can make pieces and serve warm as teatime cake immediately.
    • After the cake cools down completely, cover the cake in a cling wrap or polythene cover and rest it for 6 hours to overnight. This will help to slice the cake without or with less crumbs. But If you want to apply icing on the cake, you can also slice it once the cake becomes warm but crumbs will be more. No problem, you can collect the crumbs and use it for decoration.
      Eggless red velvet cake recipe
    • Now remove the cling wrap. Slice into two using a knife or thread.Cut the cake into two roundels using a knife or thread as shown the picture below. Place the base on seperate plate.
      Eggless red velvet cake recipe
    •  Drizzle sugar syrup on both the layers. Do not add too much of sugar syrup. Cake base will become soggy. Stop adding sugar syrup once you feel the cake is completely wet by pressing with your fingers gently.
    • To make frosting, take the heavy whipping cream in a wide bowl. Add icing sugar, vanilla essence. Whip it using an electric beater till soft peaks form. Remove more than half of this cream to another bowl and use it to apply on the cake base. Beat the remaining cream till firm peaks, add food color to a portion of it ( I used pink) and use it for piping.
      Eggless red velvet cake recipe
      Eggless red velvet cake recipe
    • Apply cream on the cake base and layer the cake one over the other. Cover the top and sides with the cream. Now take the piping bag and insert a nozzle. Fill with cream. Decorate the cake as you like. If there are crumbs in the cake, you can sprinkle them all over the cake. Refrigerate the cake for an hour and then cut it. Enjoy !
      Eggless red velvet cake recipe
      Eggless red velvet cake recipe

    Note

    • Do not reduce the quantity of cooking oil. Instead you can replace with soft butter.
    • To substitute buttermilk, you can use 1/2 cup warm milk + 1 tsp lemon juice.
    • Baking time may vary as per the oven settings. So keep an eye after 25 minutes.
    • After you apply frosting on both of the cake base, refrigerate it for 30 minutes to set well. Then you can layer them and give the top coating. After coating the sides and top of the cake, again refrigerate it for 30 minutes. Finally you can do the piping design, refrigerate for 1 hour and cut it. All these steps helps to make the frosting set well.
    Make this rich, creamy, soft, spongy, delicious looking eggless red velvet cake at home for birthdays, anniversaries and special occasions, enjoy !
    Moist red velvet cake recipe

    Vegetable Brinji Rice Recipe – Seeraga Samba Rice Pulao Recipe

    $
    0
    0
    Vegetable brinji rice
    Brinji rice is a very popular rice variety in small hotels in Chennai. Long back I had shared a plain brinji recipe with coconut milk. Recently I came across a vegetable brinji rice recipe(Brinji sadam in Tamil) in Eesha’s kitchen YouTube video which is completely different from my earlier version. So I tried it for our Sunday lunch. It came out well and tasted more like biryani/ pulao made with coconut milk.We all loved it. But I felt there is no much difference between the taste of brinji and biryani. There are many versions available for this particular recipe. Some recipes call for using freshly ground masala. As I had already shared a plain brinji sadam recipe, I wanted to prepare it with vegetables. Friends, If any of you know the authentic Chennai brinji rice recipe, please let me know.I am ready to try again and update this post. I have used jeera rice as its popularly known as brinji rice. So you can call this rice as Seeraga samba pulao as well. In the original recipe, it is prepared with basmati rice. So you can also use basmati or even Sona masoori raw rice to make this brinji. But the flavor and the quantity of water varies. For variations, you can add fried bread pieces at the end. As this recipe has no grinding job and done directly in a pressure cooker bachelors can give a try and pack it for your lunch box. Ok, Lets see how to make Tamil nadu style Vegetable brinji rice with step by step pictures.

    Check out my Plain brinji rice recipe, Jeera rice veg biryani and my 40+ veg biryani varieties.

    I used my Preethi Zodiac mixer grinder for extracting coconut milk easily. So I have shared separate step by step pictures for the same. Please check it out if interested. Preethi zodiac has really made my cooking much easier by helping me in chopping, grinding, atta kneading etc. Friends, you can think about buying this product if you are planning to change your old mixer. 


    COCONUT MILK EXTRACTION USING PREETHI ZODIAC
    • Take the coconut and cut into small pieces. You can also use grated coconut.Preethi zodiac coconut milk extractor
    • Now take the super extractor jar and fit the blade. Cover the spout with the cap. Put the coconut pieces and grind to a coarse paste without adding water.
    Preethi zodiac coconut milk extractor
    • Now add the required warm water ( 1:1 ratio of coconut and water for thick milk) and grind continuously.Coconut milk collects in the jar.
    Preethi zodiac coconut milk extractor
    • Pour into a bowl and use as required.
    Preethi zodiac coconut milk extractor

    Vegetable Brinji Rice Recipe


    Vegetable Brinji Rice Recipe

    How to make Chennai special Brinji rice with vegetables & coconut milk


    Cuisine:South Indian
    Category:Main course
    Serves:Serves 2 to 3
    Prep time:5 Minutes
    Cook time:15 Minutes
    Total time:20 Minutes
    1 cup = 250ml
    • Mixed vegetables - 1/2 cup ( 1 small carrot, 2 beans, handful of green peas, 1 potato)
    • Basmati rice / jeera rice/ Raw rice - 1 cup
    • Cooking oil + ghee - 2 tbsp + 1 tbsp
    • Cinnamon - 1 inch piece
    • Cloves - 2 nos
    • Cardamom - 1 no ( crushed)
    • Bay leaf - 1 no
    • Black stone flower / Kalpasi- 1 no
    • Big onion - 1 no
    • Ginger garlic paste - 1/2 tbsp ( Use freshly ground paste for best taste)
    • Green chillies - 2 nos. ( Use 3 to 4 for spicy brinji)
    • Mint leaves - 2 tbsp
    • Ripe tomato - 1 no
    • Coriander leaves - Few
    • Turmeric powder - 1/8 tsp
    • Red chilli powder - 1/2 tsp
    • Salt - as needed
    • Curd - 1 tbsp
    • Water + coconut milk - 1 cup + 3/4 cup
    Fried bread pieces – Few (Optional)

    METHOD

    1. Wash and chop all the vegetables into small cubes. Set aside.
    2. Heat oil + ghee in a pressure cooker. Saute the whole garam masala.
    3. Add sliced onion and saute till transparent.Saute GG paste till raw smell goes off.
    4. Add green chillies + mint leaves. Saute for a minute.
    5. Saute tomato + coriander leaves till mushy.
    6. Add spice powders, salt, curd and mix well.
    7. Lastly add water, coconut milk and let it roll boil. Add washed rice and pressure cook in low flame for one whistle.
    8. Remove the lid after steam is released. Fluff the rice and serve hot with raita, kurma or brinjal gravy as side dish.

    METHOD - STEP BY STEP PICTURES

    • Wash the rice, drain the water completely and keep aside. No need to soak if using Jeera rice/ seeraga samba rice. If you are using basmati rice or raw rice, soak for 30 minutes.

    • Wash and chop vegetables into small cubes, slice onions, finely chop tomato. Heat oil in a pressure cooker base. Saute cinnamon, cloves, bayleaf, black stone flower and crushed cardamom.
      Vegetable brinji rice
    • Add onion, gg paste and saute till onion turns transparent. Add slit green chilli and mint leaves. Saute for a minute. Add tomato pieces, coriander leaves and saute till tomato becomes mushy.
      Vegetable brinji rice recipe
    • Add turmeric powder, red chilli powder and salt. Saute well and add curd. Mix well. Add water and coconut milk.
      Vegetable brinji rice recipe
    • After it comes to roll boil, add washed rice. Mix well and cover the cooker with a lid. Pressure cook in low flame for one whistle. Remove the lid after steam is released. Mix gently and serve hot with onion raita, vegetable kurma, Biryani brinjal gravy, tomato gravy etc.
      Vegetable brinji rice recipe
    • Enjoy !
    Vegetable brinji rice recipe

    Note

    • Adjust the quantity of green chillies as per your taste.
    • You can also use basmati rice or raw rice. In that case, soak the rice for minimum 30 minutes and use 1: 1.5 cups to 2 cups of water.  
    • You can skip red chilli powder and use green chillies alone. 

    Yummy Tamilnadu style vegetable brinji rice is ready ! Try at home and relish with your favorite side dish !!
     Vegetable brinji rice recipe
    Viewing all 967 articles
    Browse latest View live