Pottukadalai murukku / roasted gram flour murukku recipe is a simple, easy and instant murukku recipe that is usually prepared for Diwali and Krishna jayanthi /Gokulashtami. It comes out super crispy, crunchy with soft and melt in mouth texture. It can be prepared easily and quickly with store bought rice flour / Idiyappam flour (arisi maavu), roasted gram flour (pottukadalai maavu) and butter/ hot oil. As murukku with roasted gram flour is less flavorful when compared with urad dal ones, we can add ajwain/ Omam, red chilli powder, hing for enhanced flavors and taste. I learnt this simple murukku recipe from my neighbor Divya. Recently I shared a picture of this murukku along with sweet boondi and mysore pak in my Instagram page too. We all loved it especially the smell of ajwain in this murukku. Usually I add cumin seeds /jeeragam or sesame seeds / ellu. I never knew ajwain can be added too. So when my neighbor shared her mom’s recipe, I tried it instantly. It was so good, soft and melted in mouth. Raksha liked this murukku more than my Chettinad thenkuzhal as it was prepared without butter and slightly hard to bite. For variations you can skip red chilli powder to make white colored murukku. Remember pottukadalai murukku absorbs some oil when compared with urad dal murukku. Ok, lets see how to make super easy and quick pottukadalai murukku recipe with step by step pictures.
Grind 1/4 cup pottukadalai and measure 1/4 cup powder from it.
In a bowl, sieve rice flour, roasted gram flour.
Add salt, red chilli powder, ajwain, sesame seeds and melted butter.
Mix well to spread butter in the flour. Add required water and make a slightly sticky dough.
Fill murukku press with dough and squeeze in hot oil. Deep fry both sides till bubbles cease.
Remove and drain in a paper towel. Store in a box after cooling down.
Stays good for 10 days.
METHOD - STEP BY STEP PICTURES
Take 1/4 cup of pottukadalai / roasted gram flour and grind to fine powder. You will get around 1/3 cup of powder after grinding. So measure 1/4 cup of powder from it and set aside.
In a wide plate bowl, sieve store bought rice flour, 1/4 cup pottukadalai powder. Add salt, red chilli powder, sesame seeds, ajwain and melted butter. Mix well to spread the butter in the flour.
Sprinkle required water and make a smooth, slightly sticky dough. If the dough is dry, murukku gets cut while pressing. So make the dough slightly sticky so that making shapes would be easy.
Fill the murukku mould with the dough. Cover the remaining dough with a wet cloth to avoid drying. Take 3 holed or single holed mould. I used murukku mould with 5 holes.
Heat oil to deep fry. Check the oil temperature by dropping a pinch of dough. If it rises to the top immediately, heat of the oil is perfect. Now squeeze the murukku in circular motion in the oil directly OR press murukku in a greased ladle or butter paper ( I used oil wrapper). Drop in the hot oil. Do not disturb for a minute. Cook in medium flame.
Flip and cook both the sides till bubbles cease. No problem if there are one or two bubbles. Remove and drain in a tissue paper. Store the murukku after it cools down. Keep in an air tight box and enjoy. It stays good for 10 days.
I got this Andhra hotel style peanut chutney recipe from Vahchef’s video. Vahchef mentioned that he learnt this chutney recipe from the cook of a popular street side hotel. As this recipe is completely different from the usual hotel style peanut chutneywithout coconut, I tried it immediately. It came out so well. We all loved it very much. If you have roasted peanuts in hand, you can make this chutney under 10 minutes with very less ingredients. The best part is adding roasted and crushed urad dal at the end which is unique and gives a mild crunchy taste. Friends, do try this Andhra hotel style peanut chutney without coconut (palli chutney / Verusenaga pachadi in Telugu) for idli, dosa. You will love it. I served it with thatte idli ( plate idli).
Kashmiri red chilli powder - 1/2 tbsp (1.5 to 2 tsp)
Tamarind - small gooseberrey size
Salt & water - as needed
Cooking oil - 1 tbsp
To saute and grind
Cooking oil - 2 tsp
Mustard seeds – 1/2 tsp
Cumin seeds – 1/2 tsp
Urad dal – 1.5 tbsp
Curry leaves - 5
Hing / Asafetida – 2 pinches
To Temper
Cooking oil - 1 tsp
Mustard seeds - 1/2 tsp
Curry leaves - Few
HOW TO MAKE HOTEL PEANUT CHUTNEY
To make hotel peanut chutney, heat oil in a kadai and roast the garlic.
To this add roasted peanuts with skin. Lower the flame and add chilli powder, tamarind extract. Mix well and switch off the flame.
Add salt and grind to a smooth paste adding required water. Chutney should be slightly watery.
Transfer to a bowl. Again heat oil in a kadai. Splutter mustard seeds, cumin, urad dal, curry leaves and hing. Roast and grind to coarse powder.
Add this powder to peanut chutney. Mix well. Temper mustard, curry leaves. Add to chutney. Mix well and serve with hot idli, dosa.
PEANUT CHUTNEY - STEP BY STEP PICTURES
Dry roast the peanuts in a hot kadai till it skin crackles OR microwave peanuts in high power for 2 minutes. No need to remove the skin. Cool down and set aside. Soak tamarind in 1/2 cup water and take the extract. Keep it aside.
In a kadai, heat 1 tbsp oil and roast the garlic cloves. Add roasted peanuts, mix well. Lower the flame. Add salt, red chilli powder. Mix quickly and add tamarind extract without burning chilli powder.
After it cools down, grind everything to a smooth paste. Do not add more water while grinding, it may splash. So first grind the peanuts with required water to a smooth paste. Then add more water and grind to a watery chutney.
Transfer to a serving bowl. Now heat oil in a kadai and temper mustard seeds, cumin seeds, urad dal, hing and curry leaves. Roast the dal till golden. Grind to a powder.
Add to chutney, mix well. Again temper mustard seeds, curry leaves and add to chutney. Tempering is not mentioned in original recipe. But I did it. Please check the main pictures for this step.
Serve this chutney with hot idli and dosa. Enjoy !
Note
Adjust the quantity of red chilli powder based on your taste.
For variations, you can add 1 tbsp coconut while grinding.
If you are looking for a simple kuzhambu without tamarind and coconut to prepare during busy morning hours Paruppu kuzhambu is the best choice. Paruppu kulambu is a simple, healthy, protein rich, easy to make one pot kuzhambu recipe that can be prepared under 10 minutes using a pressure cooker. This recipe would be helpful for bachelors and working women. You can also call this as paruppu kadaiyal. When I came across this recipe in YouTube video, I was so excited to try it as Sendhil and Raksha loves dal based gravies without tamarind. This recipe looks similar to North Indian Dal tadka. But this kuzhambu recipe is of Tamil style. Its completely different from South Indian Sambar too. In Tirunelveli, we make paruppu for rice (tempered dal) and paruppu kuzhambu but its with coconut. Soon I will try to share that version. For variations, you can use moong dal / Paasi paruppu instead of toor dal / thuvaram paruppu. Ok, lets see this simple paruppu kulambu recipe with step by step pictures and video(under editing).
Wash and take toor dal and other ingredients except “To temper” in a pressure cooker.
Add required water and pressure cook in low flame for 2 whistles.
Open the cooker and mash it well.
Temper mustard, urad dal, hing, curry leaves and red chilli in ghee.
Add to the mashed dal, required salt. Garnish with coriander leaves.
Roll boil for one minute. Serve with plain rice adding ghee.
METHOD - STEP BY STEP PICTURES
Wash and take toor dal/ thuvaram paruppu, chopped onion, tomato, green chilli, garlic cloves cumin seeds, turmeric powder, few drops of cooking oil and 2 cups of water.
Pressure cook in very low flame for 2 whistles. Open the cooker lid after the steam is released. Mash the cooked dal using a whisk. Garnish with coriander leaves and set aside.
Mix well, add required salt. Roll boil for a minute till the desired consistency is achieved. Serve hot with plain rice adding few drops of ghee. Enjoy !
Note
Add more green chilli for spicy paruppu kuzhambu.
For variations, you can add 1 tsp of tamarind extract while roll boiling the cooked dal.
Easy, yummy paruppu kuzhambu is ready . I served with carrot beans poriyal and papad.
I got this Karnataka style red coconut chutney recipe fromUdupi recipes blog and prepared it as side dish for thatte idli ( plate idli). As its a no onion no garlic red coconut chutney recipe, ginger is used for the flavor. Actually I was hesitant to try coconut, red chilli with ginger combination. But in the original recipe it was mentioned as her father’s North Karnataka style hotel chutney. So I gave a try following the same recipe. dli. It came out well. I liked it very much more than Sendhil and Raksha as they both are against ginger in chutney. You can make this chutney thick or slightly watery based on your liking. Using byadge red chilli is a must for this chutney to give a nice, bright red color. For variations, you can skip roasted gram dal and use coconut alone. This chutney tastes the best with hot idli and dosa. Serve it topped with gingely oil. Ok, lets see how to make Karnataka style red coconut chutney with step by step pictures.
Roasted gram dal / Pottukadalai / Hurigadale - 3 tsp
Byadgi red chilli - 4 nos.(Use 6 for spicy chutney)
Tamarind - Small berry size(pinch into small pieces)
Ginger - 1/2 inch piece
Asafetida/ hing - a pinch
Salt & water - as needed
To Temper
Coconut oil - 2 tsp
Mustard seeds -1/2 tsp
Urad dal - 1 tsp
Curry leaves - Few
HOW TO MAKE RED COCONUT CHUTNEY
Wash and soak byadgi chilli in little water for 5 minutes.
Take the grated coconut, red chilli, tamarind, ginger, roasted gram dal and hing in a mixie jar.
Add required salt, water and grind to a smooth paste.
Temper mustard seeds, urad dal and curry leaves in coconut oil.
Add to chutney and mix well. Serve with idli, dosa.
METHOD - STEP BY STEP PICTURES
Soak byadgi red chilli in little water for 5 minutes. In a mixie jar, take the freshly grated coconut, soaked red chilli, tamarind pieces, ginger, hing, salt and dry grind to a thick coarse paste without water.
Now add the required water and then grind again to a smooth paste. You can make it thick or slightly watery if you like. Transfer the chutney to a bowl.
Recently I tried this Cabbage masala curry recipe as side dish for rice and roti. Generally I make South Indian style cabbage curry with coconut or cabbage sambar for rice. For a change, I tried this easy cabbage masala curry adding onion, tomato, ginger, garlic and garam masala powder. It came out flavorful and tasty. Many people hate cabbage because of its smell. Cabbage masala curry can be prepared in both North Indian and South Indian style. But there is no much difference in the ingredients and recipe. If you temper cumin seeds alone and add boiled potato in this recipe, it is of North Indian style. But I have used shredded cabbage and frozen green peas. Also I made in a pressure cooker directly to ease my job and save time. Just pressure cook cabbage adding little water in high flame for one whistle, its is done under 10 minutes. I am sure this curry helps you save time during busy morning hours cooking. Friends, do try this easy cabbage peas masala curry for rice and roti. If you like, you can even use this masala as stuffing for samosa and bread sandwich. I served it with rice and paruppu kuzhambu / South Indian dal. Ok, lets see how to make cabbage masala recipe in detail with step by step pictures.
In a pressure cooker base, heat oil. Splutter mustard seeds, urad dal, chana dal and curry leaves. Add finely chopped onion, ginger and garlic. Saute till onion becomes transparent.
Add the finely chopped tomato pieces and saute till mushy. Then add in the grated cabbage. Saute till it shrinks in size and reduces in quantity.
Now add turmeric powder, red chilli powder, coriander seeds powder, garam masala powder, salt and a pinch of sugar. Mix well till raw smell leaves off.
Lastly add 2 tbsp of water if you are making in pressure cooker. Do not use more. Cook in high flame for 2 whistles. Remove the lid after steam is released. Cabbage will be cooked perfectly soft. Fluff it gently using a fork. If you feel there is excess water in the bottom, just boil in high flame till water evaporates. Mix gently to avoid cabbage becoming mushy. Suppose if you make this masala in a kadai or pan, sprinkle little water, cover cook in low flame till its done. Toss it once or twice in the middle.
After the masala is ready, garnish with coriander leaves. Sprinkle few drops of lemon juice if needed. Mix well and serve with rice.
Mushroom gravy / Kalan kuzhambu for rice and chapathi was in my try list for long time. Recently my neighbor shared this all rounder button mushroom gravy recipe with me. She told this mushroom kuzhambu goes well with rice, chapathi, idli and dosa too. I was so excited and tried it immediately. It came out so good and truly flavorful. I must call this gravy as mushroom kurma kuzhambu. The taste and flavor of this gravy is awesome. You will love it for sure. My house was completely filled with the aroma of this kuzhambu which made us eat more. Even though I buy mushroom rarely, I try to make some different and interesting Indian style mushroom recipes. Glad I tried this yummy mushroom kulambu recipe. This recipe is sure a keeper. I will make it very often. If you like, you can add boiled potato cubes along with mushroom. Ok, lets see how to make this easy, flavorful mushroom kuzhambu recipe with step by step pictures.
In a kadai, heat oil. Saute fennel seeds, onion till transparent. Add tomato and saute till mushy. Lastly add cashews and mix well. Switch off the flame and cool down. Add coconut, coriander leaves. Grind to a smooth paste adding enough water.
In the same kadai, heat oil and add in cinnamon, cloves, cardamom and black stone flower. Saute onion till transparent. Then add ginger garlic paste and saute till raw smell goes off. (Refer the above picture).
Add chopped mushroom and saute for a minute. It will leave water. Add turmeric powder, red chilli powder, sambar powder and salt. Mix for a minute.
Add the ground tomato paste and required water. Mix well and boil in low flame till oil floats on top. Gravy leaves a nice smell too. Switch off the flame. Garnish with coriander leaves. This kuzhambu thickens when it cools down. So add water to adjust the consistency. Check for salt too. Mix with plain rice and enjoy with papad. I served with potato curry. To serve as a side dish for idli, dosa dilute the gravy like sambar by adding some water. Boil and serve. For chapathi, you can make it in kurma consistency. Enjoy !Image may be NSFW. Clik here to view.
Note
For variations, you can add boiled and cubed potatoes along with mushroom.
Adjust the quantity of chilli powder and sambar powder as per your taste.
Do not add more tomato. If you add more, gravy tastes tangy. Mushroom itself has mild tanginess. So please be careful.
For variations, you can replace sambar powder with red chilli powder and dhania powder 1 tsp each.
For best taste and flavor, this gravy should boil till oil floats on top.
Try this easy, yummy mushroom kuzhambu for rice, roti, idli and dosa. You will love it !
Mushroom stir fry (Kalan poriyal / Kalan varuval in Tamil) is an easy, simple, Indian style, healthy and quick side dish for rice. It can be prepared with button mushroom under 10 minutes using very less ingredients. Today I have shared a simple mushroom stir fry recipe with onion, garlic, chilli powder and garam masala powder. It is a basic South Indian style stir fry / poriyal recipe without coconut that tastes good for sambar rice and rasam rice. I got this recipe from my neighbor who taught me mushroom kuzhambu. If you like, you can have this as a stuffing for chapathi and bread sandwich. For variations, you can add pepper powder instead of chilli powder to make mushroom pepper fry. All edible mushrooms are high in protein, anti oxidants which help to improve immunity. Its low in calories and fat. So lets try to include mushroom in our diet by making this simple recipe. Now we will see how to make this simple mushroom stir fry/ kalan poriyal for rice with step by step pictures.
Add the required salt, red chilli powder, turmeric powder and garam masala powder. Mix well. Mushroom will leave some water. So do not add water additionally.
Cover and cook in low flame till mushroom becomes soft and well cooked. Switch off the flame. Garnish with coriander leaves. Squeeze some lemon juice if you like. Serve with sambar rice and rasam rice. Roll in chapathi or stuff in bread sandwich. Enjoy !
Note
For variations, you can add 1/2 tsp of ginger garlic paste and saute with onion till raw smell goes off.
You can use sambar powder instead of red chilli powder.
To make it like a semi gravy consistency, you can saute 1/2 cup of tomato too.
I always pack dosa varieties for Raksha’s lunch box and travel as it is her most favorite food. Usually I add poha / pressed rice or leftover cooked rice to make soft dosa that stays good for long time. Recently I came across this soft dosa batter recipe using raw rice (pacharisi in Tamil) and urad dal in Mallika Badrinath’s cook book. This recipe is without poha/aval, sabudana/javvarisi/sago or curd. Even though it looks similar to set dosa, ingredients of this soft dosa recipe is different from sponge dosa and set dosa. Its a very simple dosa recipe without using idli rice. You can also call it as raw rice dosa or pacharisi dosai. It can be prepared during Navratri and other fasting days to offer God. You can grind the batter in mixie or grinder as you wish. When I was young, my mom used to pack dosa and podi for school and college lunch box. She doesn’t even smear idli podi over the dosa to keep it soft. My mom just adds a tsp of sesame oil over the dosa. Still dosa stays soft and good till lunch time. When I tried this recipe, I reminded my mom’s dosa. Friends, if you want to pack this dosa for travel or lunch box, just follow the tips I have shared in this post. I am sure it will stay soft for hours. For variations, you can make it small in size, top this dosa with finely chopped onion, mixed vegetables or even add cheese if making for kids. If you like you can stuff it with potato masala as well. Ok, lets see how to make soft dosa batter at home with step by step pictures.
Soft dosa recipe for lunch box and travel - Soft dosa batter recipe
Image may be NSFW. Clik here to view.
How to make soft dosa batter recipe at home. This dosa is prepared with raw rice and urad dal. It stays soft for hours. You can pack it for lunch box and travel.
Wash and soak raw rice, urad dal and fenugreek seeds in a bowl for 3 to 4 hours.
Grind to a smooth batter in a mixie or grinder. Transfer to a bowl.
Let it ferment overnight. Batter will rise. The next morning, add salt and mix well.
Make thick dosa. Drizzle oil over the dosa and cook one side.
Flip it and cook the other side. Sprinkle few drops of water over the dosa to make it soft. Remove and keep it in a plate.
Make the second dosa in the same way and stack it. Cover with a plate.
Pack in a lunch box or for travel after dosa becomes warm.
Serve with idli podi or any chutney.
METHOD - STEP BY STEP PICTURES
Wash and soak raw rice/ Pacharisi, Urad dal, Fenugreek seeds together for 4 hours. Grind to a smooth batter using grinder or mixie in batches. (Use ice cold water for grinding if using mixie). No need to add salt. Collect the batter in a bowl.
Let it ferment over night or for 12 hours (timings vary during winter season). Batter will rise. The next morning, add the required salt, mix well. If the batter is too thick, add little water to bring dosa batter consistency.
Heat a dosa pan and sprinkle some water. It should sound ssshh. Then lower the flame completely and wipe the dosa pan with a cloth. Now pour a ladleful of batter. Spread it slightly and make thick or medium thick dosa as you like.
Now increase the flame to medium. Bubbles will appear all over the dosa. Then drizzle a tsp of oil around the dosa and cook for a minute.
Flip the dosa and cook the other side. Before removing the dosa from the pan, sprinkle few drops of water all over the dosa. It helps to keep the dosa for long time.
Remove the dosa from the pan and keep it on a plate or banana leaf. Make the other dosa in the same way. Stack all the dosa one over the other if you are packing for travel or lunch box. Cover with a plate to prevent drying.
Enjoy eating hot immediately OR You can pack the dosa and idli podi/chutney in separate boxes. You can also smear idli podi mixed with oil all over the dosa and pack in a box. I tried making crispy, thin dosa too. It came out well.
Boiled tomato chutney is an easy, simple chutney recipe for idli, dosa. Its a new recipe to me. As an ardent fan of tomato I keep trying some interesting recipes with it. Recently I came across this boiled tomato chutney recipe (Vethakkali chutney) in my Instagram feed by Mullai (spiceindiaonline). I checked few more versions and tried this recipe from Cookatease. It can be prepared easily in a pressure cooker. All you need to do is to just pressure cook onion, tomato, chilli and garlic. Mash or grind it. Boil and temper. It takes less oil. You can also make it as a no grind version by just mashing the cooked tomato onion mixture. But If you don’t boil the chutney, it may smell raw due to cooked green chillies. So boiling the chutney is mandatory. Even though its my first attempt, it came out so well. I loved it with hot idli more than dosa. If you like, you can make it thick and have it with chapathi too. It reminded my mom’s tomato sambar recipe. This chutney tastes great when drizzled with sesame oil / Nalla ennai. Tomato chutney can be prepared in N number of ways. This is one easy method of making it. Friends, if you are bored of your regular tomato chutney recipe, you can try this boiled version. You will like it for sure. Ok, lets see how to make easy and simple boiled tomato chutney recipe with step by step pictures.
Gingely oil / sesame oil / nalla ennai – to drizzle over the chutney while serving.
HOW TO MAKE BOILED TOMATO CHUTNEY
Wash and chop onion, tomato, green chilli, garlic.
In a pressure cooker, take the chopped ingredients.
Add turmeric, red chilli powder, salt and water.
Pressure cook in low flame for one whistle. Cool down. Mash or grind the chutney.
Temper the above ingredients. Add to chutney and boil the tomato chutney for few minutes. Remove when thick. Garnish with coriander leaves.
Serve hot with idli, dosa drizzled with gingely oi / nalla ennail.
METHOD - STEP BY STEP PICTURES
Wash and chop onion, tomato, green chilli and garlic cloves. Chop it roughly if you are grinding it else chop it finely and mash with a ladle after pressure cooking tomato.
In a pressure cooker take the chopped ingredients. Add curry leaves, red chilli powder, turmeric powder, salt and water. Mix well and pressure cook. Keep the flame high till vapor starts to come. Put the weight valve. Lower the flame completely and cook for one whistle.
Remove the lid after the steam is released. Strain the excess water. Keep aside. Let the tomato cool down completely.
Do not grind the tomato, onion when hot. It will splash everywhere. So cool down the mixture completely before grinding. In case you are mashing the tomato, you cam do it when hot. So you can either grind the mixture or mash it with a ladle. Its your choice. I ground the tomato to a smooth paste. You can grind it coarsely if you like.
Add the ground tomato paste to the strained water. Mix well. Temper mustard seeds, urad dal, cumin seeds, hing and curry leaves. Add to the chutney. Boil the chutney for few minutes till thick. Garnish with coriander leaves. Remove and serve with idli, dosa. Do not forget to drizzle the chutney with gingely oil/ nalla ennai for best taste ! Enjoy.
Adjust the quantity of chilli as per your taste. But I will suggest you to add more chill powder or red chillies instead of green chillies to avoid raw smell.
Pressure cooking and mashing the tomato mixture gives a different taste than grinding the tomato.
Garnishing with coriander leaves is optional.
For variations, you can skip cooking curry leaves along with tomato.
You can boil the chutney till oil separates. It stays good for more than a week when refrigerated.
Try this interesting boiled tomato chutney recipe and enjoy with hot idli and dosa !
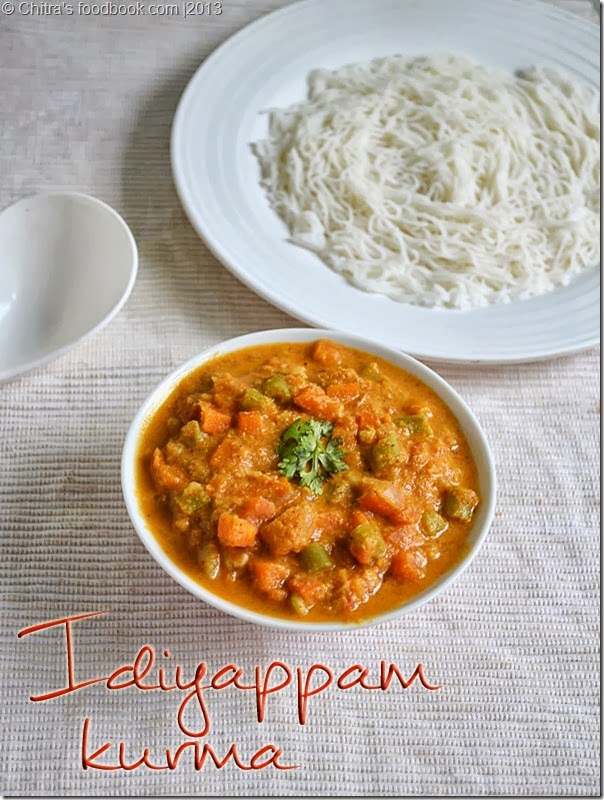
Saravana bhavan hotel style white kurma for idiyappam and chapathi was my long time pending readers requested recipe. My friends and readers who had tried my Saravana bhavan vegetable kurma for parottaand chapathi asked me to try and post Saravana bhavan white kurma recipe that is served for Idiyappam. As I have not tasted it in that restaurant, I had no clue about it. Recently when I was going through my cook book collections, I got this hotel style white kurma recipe (vellai kurma in Tamil) from Aval vikatan’s supplementary book – 30 hotel recipes. Most of the recipes in that book are fool proof ones. So I tried this recipe confidently. It was captioned as hotel vellai kuruma. In the original recipe, it is mentioned to saute the spices, garam masala ingredients, cashews and coconut in little oil before grinding. When I tried the same, I felt the color of kurma was not perfect white in color instead it was on yellowish side. So I tweaked the recipe slightly and made it in a pressure cooker to ease my job. Voila! it was done under 15 minutes. The best part of this kurma is its prepared without onion. You can skip garlic too. If you have chopped vegetables in hand, making this kurma is so easy. Its a good side dish for idiyappam, chapathi, appam and dosa too. Yes, I liked it with dosa as well. You can make it for your dinner quickly. Chettinad vellai kurma recipe is also similar to this. Friends, do try this white kurma recipe and share your feedback with me. Lets check how to make hotel Saravana bhavan style white kurma recipe with step by step pictures.
Heat coconut oil in a pressure cooker base. Add black stone flower and mix well. Add the chopped vegetables, sugar, salt and mix well for a minute in medium flame.
When the vapor starts to come out, put the weight valve and reduce the flame to low. Pressure cook for one whistle in low flame. You will get a nice smell.
Switch off the flame. Remove the cooker lid after steam is released. If the kurma is too thick, add some water and give one boil. Heat ghee in a kadai and splutter curry leaves. Add to kurma and mix well.
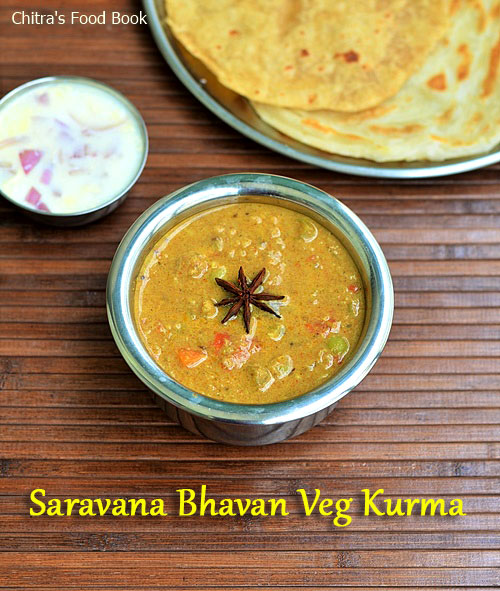
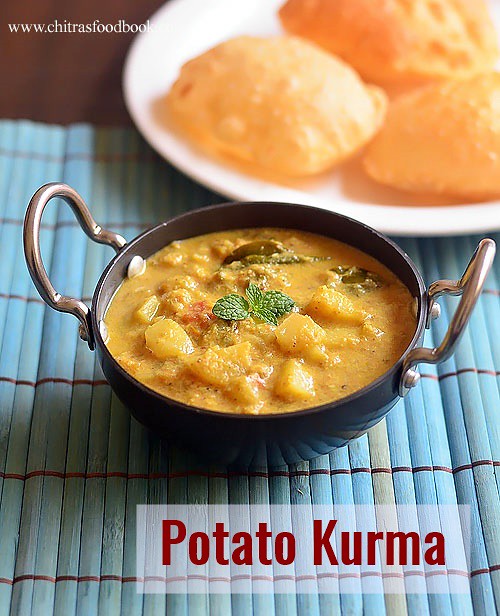
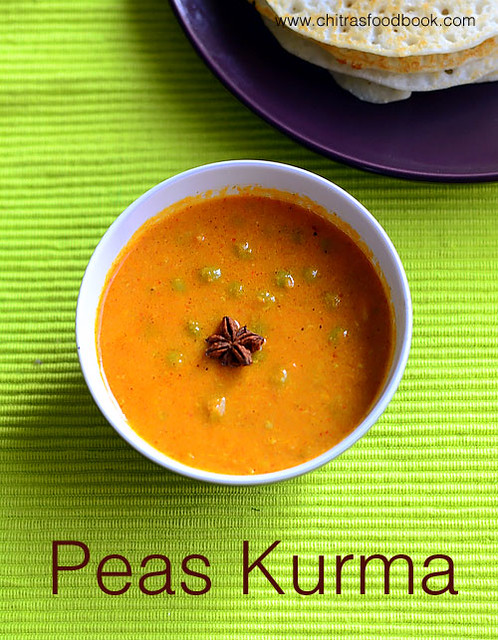
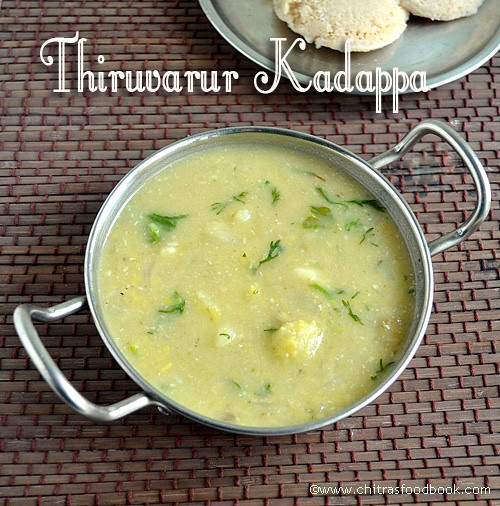
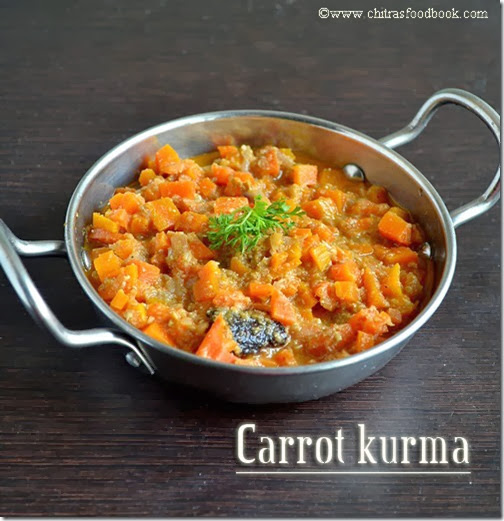
Here is a collection of vegetarian kurma varieties as side dish for chapathi, poori, parotta and dosa. South Indians love to eat chapathi with coconut based kurma varieties. Kurma recipes tastes good with parotta, idli, dosa, appam, idiyappam, poori and sometimes with rice as well. Most of the Tamil people make vegetable kurma for chapathi/ roti. Chapathi kurma would be the most preferable dinner for us. As I got bored of the regular mixed veg kurma for chapathi, I started trying varieties of kurma recipes at home. For any South Indian kurma, be it Tamil nadu style, Andhra, Kerala or Karnataka coconut masala or pottukadalai (roasted dal), khuskhus paste forms the base whereas North Indian gravies / sabzi is made with tomato, onion base. With sight variations in the ingredients and cooking method, kurma can be prepared in different taste. In this collection, I have shared 20 different types of kurma recipes for chapathi, parotta, idli, dosa and rice. It includes the most popular Saravana bhavan hotel style vegetable kurma for parotta and chapati (with video), white kurma for idiyappam, tomato kurma/ thakkali kurma for idli, dosa, potato kurma for poori (with video), cauliflower kurma, chana kurma (kondakadalai kurma), Green gram kurma ( pachai payaru kurma) in Kerala style, green peas kurma, cabbage kurma for rice, vegetable salna for parotta, special vegetable kurma for idiyappam, potato paya for appam, vegetable stew for appam, capsicum kurma, carrot kurma for kids, Kumbakonam kadappa for idli, brinjal kurma for idli, dosa, Karnataka style vegetable sagu for poori, set dosa and avarekalu kurma/ mocha kottai kurma recipe. Most of these kurma recipes are tried and certified by my readers. You too choose your favorite and give a try. I am planning to try some idly kurma and more. I will add in this list once I make the post. Ok, lets see the collection of South Indian kurma recipes for chapathi, idli, dosa, rice, idiyappam and parotta. Please click on the picture or the title to view the respective recipe.
Image may be NSFW. Clik here to view. Friends, choose your favorite kurma. Give it a try ! You will love them for sure. Also don’t forget to share your feedback with me .
Recently I started making Instant plain rava idli (suji ki idli) without any seasoning for the sake of Raksha. This instant suji idli is a simple and quick version of our usual rava idli (semolina idli). It takes very less preparation time. All you have to do is to just mix a cup of Bombay rava, curd, ENO fruit salt, salt and water. Make idli batter and steam for 10 minutes. Your instant breakfast or dinner would be ready in no time. This recipe of plain rava idli is ideal for bachelors and working women to make food quickly. You can use roasted or unroasted rava. Both gives great results. This idli stays soft for few hours. So you can even pack it for your lunch box if you like. A mixed vegetable kurma or tomato chutney would be a great side dish for this rava idli recipe and makes it a wholesome, tummy filling breakfast or dinner. Most of my readers have asked me to post rava idli without curd and ENO. But I am not sure how it works. As this idli is an instant version without fermentation curd, ENO or cooking soda is necessary to make it soft and spongy. Even in hotels, cooking soda is used to make it fluffy and spongy. If you want to make rava idli without curd, you should increase the quantity of ENO. Similarly if you want to skip cooking soda or ENO, you must add more curd to retain the softness. Ok friends, lets check out how to make instant, plain rava idli recipe with curd and Eno. Do watch the video and refer the step by step pictures for better understanding. Don't forget to try this instant, plain rava idli recipe and share your feedback with me.
Heat a kadai and dry roast the Bombay rava(Semolina/ Suji) for few minutes without changing the color.
Let it cool down completely. Roasting is completely optional.
Add curd, water and salt. Make smooth batter without lumps.
Lastly add fresh Eno fruit salt and mix well. It will bubble and make the batter light and frothy.
Add some water and adjust the consistency of batter if its too thick.
Take an oil greased idli mould. Fill the batter till 3/4 th of the mould.
Boil water in an idli pot. Keep the idli plate and steam for 10 minutes till rava idli is cooked well.
Remove the idli and serve hot with coconut chutney, tomato chutney, sambar or kurma.
METHOD - STEP BY STEP PICTURES
To make instant, plain rava idli you can either dry roast the rava/suji for 5 minutes in medium flame without changing the color OR you can skip roasting and make idli directly. Both works well.
If you roast the rava, allow it cool down completely. Do not add curd if the rava is hot. If you are using unroasted rava, you can add curd immediately.
In this recipe, I roasted the rava and used it. Add curd, salt and 1/2 cup of water to the rava. Mix without lumps. No need to rest the batter.
Add ENO fruit salt and mix well. If the Eno is active, it should bubble up as soon as you add it to the rava, curd mixture. Mix gently till the batter is light.
Check the consistency of batter and add some water (say 1/4 cup) to make it slightly thick and pourable. Grease idli plate with little oil. Pour the batter till 3/4th of the mould.
Boil water in an idli pot. Place the idli plate and steam for 10 to 15 minutes till idli is cooked well. Remove the idli plate and rest for 2 minutes. Then remove the idli with a spoon. Serve hot with coconut chutney or tomato chutney, Sambar or kurma as you like. Enjoy !Image may be NSFW. Clik here to view.
Note
You can use baking soda / cooking soda instead of Eno fruit salt.
If you want to skip curd, add 1 tsp of Eno instead of 1/2 tsp.
Do not make the batter too thick or too thin. It should be semi thick and pourable.
The size of this idli increases after cooking. So fill the mould till 3/4th or 1/2 as per the size you need.
Try this easy, instant plain rava idli recipe. You will love it. I served it with boiled tomato chutney and coconut chutney.
I tried this eggless apple cake recipe using wheat flour/ atta by watching Sanjeev Kapoor’s YouTube video. As this is my first attempt of trying an apple cake at home without eggs, I followed original recipe to the dot. Chef used wheat flour and maida in equal quantities. Cake came out so soft, moist and spongy. I should call it as apple cinnamon cake because cinnamon acts as the major flavoring ingredient. When the cake is baked, I could feel a nice fruit smell with cinnamon all over the house. We all loved it. During Christmas season, most of us like to bake a fruit cake at home. If you are bored with the regular dry fruits cake, you can try this eggless apple cake instead. The best part is you can make this cake in microwave mode, convection oven and in a pressure cooker as well. Actually I baked 3/4 th of the batter in convection mode and the remaining in microwave mode by keeping in a glass bowl. Both turned out great. Convection oven cake took nearly 40 minutes of baking time whereas in microwave it was done under 4 minutes. So you can bake this eggless apple cake in microwave mode or convection mode in your oven. If you want to bake the same in pressure cooker, it is also possible. Just spread 1 inch of powdered salt in a thick cooker bottom. Put a small plate or slotted plate over the sand, preheat the cooker for 15 minutes in medium flame till salt is heated. Remove the gasket and weight valve from the lid and cover the cooker. After preheating, place the baking pan and cook for 20 to 30 minutes in low flame. Check with a tooth pick & remove after cooling down. This recipe is so versatile and it works great for all the baking methods. Friends, do try this eggless apple cake recipe and share your feedback with me. Hope the step by step pictures can help you better. I will try to share the video recipe soon.
Recently I got a pack of original, high quality almonds, walnuts and organic saffron from Kashmiri online store. I loved their walnuts and saffron. I have never used such a fragrant saffron till now. I could feel the aroma of it even before opening the parcel.. Friends, do check out their website and order the products. I am sure you will love its quality 👍.
Wash and chop apple into small cubes. Grind to a puree adding water.
In a wide bowl sieve wheat flour, maida, baking powder, baking soda and cinnamon powder.
In another bowl mix melted butter, milk, vanilla essence and apple puree.
Add the sieved dry flours and mix without lumps. Lastly add 1 tbsp cooking oil and mix well.
Transfer the apple cake batter to a greased baking pan. Bake in a preheated convection oven for 40 minutes. Check with a tooth pick and remove the cake after warm.
For microwave apple cake, take 1/2 cup of cake batter in a microwave safe glass bowl.
Cook for 4 minutes. Remove it by checking with a tooth pick. Enjoy when warm.
Apple cake stays good only for 2 days. So try to consume it quickly.
METHOD - STEP BY STEP PICTURES
Wash and cut apple into small cubes. Grind to a smooth puree adding 1/2 cup of water. Set aside.
In a wide bowl, sieve wheat flour/ atta, maida, baking powder, baking soda and cinnamon powder. Keep it aside.
Take an aluminum baking pan. Grease it with butter. Sprinkle maida all over the pan and dust off the excess flour. Pour the cake batter to the pan. Fill 3/4th of the pan. Pat the pan to level the batter and break the air bubbles.
Preheat the oven in convection mode at 180c. Place the baking pan and bake at 180c for 35 to 40 minutes. Cake rises and cracks on top. No issues. After 30 minutes, open the oven and insert a tooth pick or knife in the middle of the cake. If its sticky or with batter, bake for another 5 to 10 minutes. If the knife comes out clean, cake is done. Remove the baking pan and set aside to cool down.
After the cake becomes warm, run a knife around the cake and loosen the sides. Invert the cake in a plate and remove it. Make pieces and enjoy ! This cake stays good only for 2 days if kept outside. Refrigeration is not advisable because cake may become dry. So its better to consume soon.
FOR MICROWAVE APPLE CAKE : Take 1 cup of apple cake batter in a big glass bowl. Microwave in high power (800w) for 3 to 4 minutes. Check with a tooth pick and remove it. Invert in a bowl after cooling down.
You can use wheat flour completely instead of atta and maida half and half. But cake looks dense and thick. Not fluffy as shown in the picture. You may need to add more baking soda too.
You can use brown sugar instead of white sugar for healthy options.
Thiruvathirai kali with store bought rice four is a simplified version of the authentic rice kali recipe. Traditionally thiruvathirai kali is prepared by roasting raw rice and moong dal to golden brown, ground to coarse rava like texture and pressure cooked in jaggery syrup. Today I tried thiruvathirai kali recipe with roasted moong dal powder and store bought rice flour (Idiyappam flour). As Thiruvadhirai festival is on this Sunday (23rd December), this recipe must be useful for people who is looking for a short cut version. I prepared it for Thursday Guru pooja neivedyam. Though its taste is not like the traditional kali, it came out surprisingly good. The smell of roasted moong dal powder is the highlight for this kali. This version helps to reduce the preparation time. Friends, do try this easy thiruvathirai kali recipe with rice flour and share your feedback with me.
Dry roast moong dal till golden. Powder like rava.
Melt jaggery adding 1 cup of water and strain it.
Take jaggery syrup and water to 2 cups.
Add coconut, cardamom powder. Bring to a boil.
Switch off the flame. Add powdered moong dal and rice flour.
Mix without lumps. Keep in low flame and stir it well. Cover cook.
It will become a thick dough leaving the sides of pan.
Lastly add ghee roasted cashew nuts. Mix well and serve.
HOW TO MAKE THIRUVATHIRAI KALI - STEP BY STEP PICTURES
Take the moong dal and dry roast in a hot kadai. Roast in medium flame till golden brown with a nice aroma. Grind to rava (semolina) like consistency. Set aside.
In a pan, take jaggery and add 1 cup of water. Heat and melt the jaggery. Strain the syrup in another bowl and measure the quantity. Add more water and make it to 2 cups in total.
Pottukadalai chutney / udahca kadalai chutney is our family favorite chutney recipe for dosa and paniyaram. According to me, roasted chana dal is the tasty and healthy alternative for people who is looking for chutney without coconut. My mom makes a spicy, watery pottukadalai chutney with little coconut (Roasted gram dal chutney in English, Udaitha kadalai chutney in Tamil) for idli, dosa and paniyaram just like street side hotels. Its my most favorite since childhood. Following my mom, I started trying varieties of pottukadalai chutney recipes with and without coconut, tomato etc. Recently I tried this chutney recipe from a cookbook. I served it with soft dosa recipe. Many of my readers were asking about its recipe in my instagram page. So I thought of blogging it here. Its a very simple chutney recipe with minimal ingredients. Actual recipe called for adding coconut as well. But I skipped coconut completely and tried it. It came out very well. Do not forget to add more red chillies and temper with mustard seeds, hing. It is the key to make this chutney flavorful and perfect. Friends, do try this easy, yummy pottukadalai chutney without coconut and share your feedback with me.
Heat oil in a kadai. Temper mustard seed. Make sure mustard seeds splutter well. Then add urad dal, curry leaves and hing. All the ingredients should release nice flavor.
In Tamil nadu, salna recipe is one of the best side dish for parotta that is served in roadside hotels. Parotta salna is a popular streetside hotel food in Madurai, Tuticorin, Salem and Chennai. Salna is a Tamil word I guess. Plain salna is also popularly known as empty salna. Empty salna is nothing but plain tomato based masala gravy without vegetables. Its a vegetarian salna recipe. Its so flavorful and tastes great not only with parotta but also with idli, dosa, chapathi and idiyappam. You can use this salna for making kothu parotta too. Long back I had shared mixed vegetable salna recipe for parotta. It is a super hit recipe in my blog. It got rave reviews from my readers. Its my go to recipe too. Recently I came across this plain tomato salna recipe in a YouTube video just like street side hotel ones. This recipe is slightly different from mine. So I got tempted and tried it. Method of preparation of this plain salna recipe is very easy and quick when compared with my earlier version. I made it directly in a pressure cooker. So my job was done under 15 minutes. I was very happy to see the oil floating, flavorful salna. My house was completely filled with nice aroma. Myself and Raksha loved it with store bought frozen parotta. Hot, flaky, layered parota with this plain salna is a pure bliss. Try it once. You will love it for sure. If you want to add any vegetables, you can add potato or cauliflower. Ok, lets see how to make plain salna recipe for parotta and dosa with step by step pictures.
Add cumin powder, turmeric powder, red chilli powder, dhania powder, crushed fennel powder and garam masala powder. Saute quickly in medium flame without burning the spices.
Add to the boiling salna. Mix well and close the pressure cooker with the lid. Keep the flame high till steam comes out. Now lower the flame completely and put the weight valve. Pressure cook in low flame for one whistle. You will get a nice aroma. Switch off the flame and let it rest till steam releases by itself. Then open the lid. You can see a layer of oil floating on top. Mix well and check for the consistency. If its too thick, add little water and boil for a minute. If its too thin, boil for sometime till it reaches the desired consistency. Check for taste and Serve with parotta, idli or dosa. If you like, you can have it with biryani and chapathi as well. Enjoy !Image may be NSFW. Clik here to view.
Note
Adjust the quantity of red chilli powder as per your taste.
Use Kashmiri chilli powder for bright colored salna.
For variations, you can add potato or cauliflower.
Avarekalu usili or avarekalu sundal is a Karnataka special avarekalu recipe ( Hyacinth beans / field beans in Engligh, Mochai In Tamil, Lilva papdi in Hindi) that is served as an evening snack along with tea. Some people prefer to have this as a side dish for akki roti / ubbu roti, rice and chapathi. My school moms friends told its preparation procedure is similar to avarekalu palya. Its a very simple and healthy recipe with less ingredients and no grinding job. Just temper the cooked avarekalu with mustard, chilli, onion, garlic and garnish with lots of coconut. Based on the inputs from my friends, I tried it for the first time by watching an YouTube video by Mallamma ajji. This recipe is of Gubbi, Tumkur style. I made slight changes in the original recipe and tried it. Actually I found two versions of avarekalu usili recipe. One is a simple way which I have shown below and the other one is with ground coconut masala. As I tried for my lunch to serve as sundal, I chose this easy version. If you have cooked averakalu ready in hand, you can prepare this usili under 5 minutes. You can also make it directly in a pressure cooker using raw field beans. You can make it semi solid or dry in consistency by adjusting the water quantity. Friends try this easy, Tumkur style avarekalu usili recipe. You will love it. Its so easy and quick to make. We enjoyed it as a snack. Ok, lets see how to make Karnataka special avarekalu usili / avarekalu sundal recipe with step by step pictures.
Wash and keep the avarekalu. Finely chop onion, slit green chilli and coriander leaves.
Heat oil in a pressure cooker base. Splutter mustard, curry leaves, green chilli, onion, crushed ginger and garlic.
Saute till transparent. Add salt, hing and avarekalu. Saute for a minute.
Add 1 cup of water and pressure cook for 2 whistles in low flame.
Open the cooker and add grated coconut, coriander leaves. Mix well.
Add water if needed. Give one boil.
Dry roast cumin seeds and methi seeds. Powder it.
Add the powder to the boiling avarekalu usili. Mix well and switch off the flame.
You can make it semi solid in consistency or dry as you like.
Serve as evening snack or along with ubbu roti / akki roti and rice.
METHOD - STEP BY STEP PICTURES
Wash and keep the avarekalu ready. You don’t need to peel the skin of avarekalu. You can use it as whole ones. ( I used cooked avarekalu. So I just tempered all the ingredients in a kadai and made this usili. If you are using raw, uncooked avarekalu follow the procedure given below. So the step by step pictures vary from the instructions). Chop onion, slit green chilli, grate coconut and chop coriander leaves. Keep it ready.
In a pressure cooker base heat oil and splutter mustard seeds, curry leaves. Add slit green chilli and finely chopped onion. Saute till onion becomes transparent.
Add crushed ginger and garlic cloves. Saute for a minute. Add avarekalu, hing and saute in oil for 2 minutes.
Lastly add required salt and 1 cup of water. Keep the flame high. After the steam starts to come out, put the weight valve and lower the flame. Pressure cook for 2 whistles in low flame.
Open the cooker lid after the steam is released. Add grated coconut and chopped coriander leaves. Mix well and check for water content. If the usili is too dry, add 1/2 cup of water else give one boil. Let it be semi solid in consistency because it will become thick and dry once it cools down.
Dry roast methi seeds and cumin seeds in low flame till methi becomes golden in color. Grind to make a fine powder. Add this powder to the avarekalu usili, mix well and switch off the flame. I made it slightly dry to serve as sundal.
Enjoy with akki roti/ ubbu roti, rice or as a snack along with tea !
Note
For variations, you can grind green chilli, ginger and garlic and make it as a paste. Add along with onion and saute it.
To make this as a gravy, grind green chilli, coconut, coriander leaves and cumin seeds. Make a paste and add to the avarekalu, pressure cook. You can serve it with chapathi and akki roti.
Adjust the quantity of green chilli as per your taste.
Try this easy, interesting avarekalu usili recipe and enjoy a healthy snack.
Paal poli recipe also known as paal poori ( milk poli) is a traditional south Indian dessert recipe. This sweet is prepared with poori and sweetened milk. Poori can be prepared with maida / all purpose flour or chiroti rava. Similarly sweetened milk can be made by boiling and reducing the milk adding sugar or by adding condensed milk. Paal poli is usually served in Tamil brahmins wedding feast. They also make it for festivals like Tamil new year, avani avittam, bhogi and krishna jayanthi. I have tasted this in my friend’s house but she had dipped the maida poori in badam milk. I loved it very much and wanted to try at home. Finally I prepared it for this New year celebration and thought of starting my 2019 recipes with this delicious sweet. As this is my first attempt, I followed an authentic recipe from my cookbook collections. Sendhil loved it very much. I liked it too. Though the procedure seems to be lengthy, it can be prepared easily. Just make maida poori and dunk in sweetened, reduced milk. I served it by garnishing with lots of nuts and saffron for enhanced flavor and taste. Friends, do try this yummy paal poli recipe for festivals and occasions at home. I am sure your family members would love it. Lets see how to make paal poli recipe with step by step pictures.
In the mean time boil milk in a pan. When its quantity is reduced slightly, add sugar, chopped nuts and saffron. Boil till sugar melts and switch off the flame. Add a pinch of powdered edible camphor for nice flavor. Its optional though.
Heat oil to deep fry. Check oil temperature by dropping a pinch of dough. If it rises to the top immediately, its heated. Drop one poori and pat it gently. It will puff up and comes to top. Flip and cook the other side. Remove and drain the oil. You can fold into half moon shape if you wish.
This mushroom biryani recipe ( kalan biryani in Tamil) is an interesting, easy South Indian biryani recipe I learnt from my neighbor who is from Madurai, Tamil nadu. It is an easy and flavorful biryani recipe without coconut milk. I prepared it with basmati rice (loose basmati rice from Reliance fresh). You can use jeeraga samba rice or normal rice too. I have tried many biryani varieties like Dindigul thalappakatti biryani, Coimbatore Angannan biryani, Pakistani biryani and Thala ajith biryani with mushroom replacing chicken and mutton. Recent days I have been trying varieties of mushroom recipes at home. Last weekend I tried this kalan biryani using a pressure cooker easily. This is my neighbor’s family recipe. When she shared it with me, I became so happy and tried it confidently. As expected, it came out so good. I loved the flavor of mushroom and freshly ground masala in this biryani. I did not make any side dish. I just served it with onion raitha. If you like, you can make brinjal masala gravy or plain salna as side dish for mushroom biryani. Everyone liked it very much. You can make this healthy mushroom biryani for lunch box as it takes less preparation time. Lets see how to make mushroom biryani recipe / kalan biryani with step by step pictures.
Small onion / shallits OR big onion - 7 nos /1 no.
Green chilli - 2
Ginger - 1 inch piece
Garlic - 5 cloves
Mint leaves / Pudina leaves - a fistful
Coriander leaves a- fistful
HOW TO MAKE MUSHROOM BIRYANI - METHOD
Wash and clean mushroom. Slice it and keep aside. Wash and soak basmati rice for 15 minutes. Wash and chop onion, tomato. Grind all the ingredients given under “to grind” to a smooth paste. Set aside.
Mix well and add soaked rice along with water. Mix gently. Close the pressure cooker and keep the flame high. Let the steam comes off. Then put the weight valve and reduce the flame completely. Cook for one whistle. It takes 8 to 10 minutes.
Switch off the flame and let it rest till steam releases completely. Open the cooker and fluff the rice gently with a fork. Serve hot with onion raita or brinjal gravy / salna as side dish.
Vazhaipoo cutlet is an interesting deep fried snack prepared using vazhaipoo (banana flower in English) and cooked potato as the base ingredients. Recently I got a big banana flower from Salem. As usual I prepared Vazhaipoo usili and vazhaipoo dosa. Still I had a cup of leftover banana flower. So I tried this Vazhaipoo cutlet recipe for the first time. It came out so well with a soft interior and crispy exterior. No one could find out this cutlet is prepared with vazhaipoo. Even kids would love it. In this recipe, I have ground the cooked banana flower to a paste and added it with mashed, boiled potato. So the taste of vazhaipoo won’t be dominant. Anyone would love to eat it. Raksha relished it with tomato ketchup. Friends, do try this vazhaipoo cutlet recipe for a change and enjoy. Ok, here you see banana flower cutlet recipe with step by step pictures.
Red chilli powder - 1/2 to 1 tsp (adjust based on taste)
Garam masala powder - 1/2 tsp
Maida / all purpose flour OR rice flour - 2 tbsp (for binding)
Coriander leaves - finely chopped (to garnish)
Salt & water - as needed
Corn flour - 2 tbsp
Water - to make paste.
Bread crumbs - to coat the cutlet
Cooking oil – to shallow fry cutlets
METHOD
Wash and clean vazhaipoo. Cook in required water till soft.
Drain the water and grind to smooth paste adding little water.
Cook and peel the skin of potato. Mash it well.
Heat oil in a kadai. Add crushed fennel seeds, chopped big onion and saute well.
Add ginger garlic paste and saute till raw smell goes off. Then add ground vazhaipoo paste.
Saute till water content is removed. Then add mashed potato, red chilli powder, salt and garam masala powder.
Mix well and cook till it becomes a whole mass.
If the mixture is too wet and watery, add maida for binding. Garnish with coriander leaves.
Remove and let it cool. Make a thick paste of corn flour for dipping the cutlet.
Make round or heart shaped cutlet. Dip the cutlet in corn flour paste.
Coat in bread crumbs. Shallow fry both the sides in a kadai. Drain in a tissue paper.
Serve with tomato ketchup.
METHOD - STEP BY STEP PICTURES
Pressure cook potato in required water. Peel the skin, mash well and set aside. Wash and clean the vazhaipoo florets by removing the black stamen (kalan). Chop roughly and cook in required water till soft. Drain the water and set aside. To make homemade bread crumbs, just grind the corners (brown part) of bread to a fine powder. Keep in a plate.
Grind the cooked vazhaipoo to a smooth paste adding little water. Heat oil in a kadai. Add crushed fennel seeds. Add finely chopped onion and saute till transparent.
Add turmeric powder, red chilli powder, garam masala powder, salt and mashed potato. Mix well in low flame. Keep mixing till everything comes together like a dough. If there is wetness in the mixture, add some maida or rice flour to make a dough. Lastly add coriander leaves, mix well. Switch off the flame and let it cool down.
Now take the cooled cutlet mixture. Make round or heart shapes as you like. Dip one cutlet in corn flour paste. Immediately coat in bread crumbs. Arrange in a plate. Follow the same for remaining cutlets too.
Heat oil in a kadai to shallow fry the cutlets. Arrange 4 to 5 cutlets per batch. Cook in low flame till golden brown on one side. Flip the cutlet and cook the other side too. Remove in a tissue paper to drain the excess oil. Serve warm with tomato ketchup.Enjoy ! Image may be NSFW. Clik here to view.
Note
Adjust the quantity of chilli powder as per the taste.
For variations, you can also add mashed vegetables along with potato.
Addition of maida or rice flour helps for binding cutlet dough.
You can dip in corn flour paste and bread crumbs twice to make super crispy exterior.
If you are conscious about oil, you can just cook the cutlet in a dosa pan with little oil.