Quantcast
Channel: Chitra's Food Book
Viewing all 968 articles
Browse latest View live

Momos Chutney Recipe–Spicy Chilli Garlic Sauce

$
0
0
Chilli garlic dipping sauce for momos
This recipe was requested by a reader.She had specifically told me to post street shop style momos chutney.Recently I ate Veg momos in a famous momos shop near Banashankari BDA complex to know the actual taste of this chutney/Dipping sauce.Long back,i had posted Momos recipe with a spicy tomato chutney HERE.But this time i prepared momo chutney by asking my friend Megha who is a big fan of Chicken momos with dip/chutney.So she knows the recipe very well.She told me a spicy red chilli garlic chutney recipe without tomato.Yesterday i made this chutney for wheat flour momos.It tasted very close to the ones i had in momos shop.I was completely happy with the outcome.Thanks a lot Megha Happy.I couldn’t click a picture with momo as everything vanished before i clickSmug .I will try to update this picture with momos soon.Now lets see how to make spicy dipping sauce/chutney for momos.
momos chutney

Momos chutney recipe


Momos chutney recipeHow to make spicy chilli garlic chutney for momos
Cuisine:Indian
Category:Side dish
Serves:-
Prep time:10 Minutes
Cook time:5 Minutes
Total time:15 Minutes
INGREDIENTS

  • Garlic cloves - 12 nos ( small)
  • Red chilli - 4-6 nos(use 6 for spicy chutney)
  • Vinegar – 1-2 tbsp ( adjust)
  • Salt - as needed
  • Sugar - 1/2 tsp
METHOD

  • Soak the red chillies in warm water for 20 minutes.You can soak them overnight too.Peel garlic cloves.
Momos chutney recipe
  • Grind the red chillies,garlic cloves,sugar,salt and vinegar to a smooth paste.Adjust the salt.If its too spicy,add more vinegar.Mix well and serve with hot momos.
Momos chutney recipe
    Enjoy !

Note
  • Some people grind one tomato instead of vinegar.But i don’t think Nepali versions use tomatoes in the recipe.So its your choice.
  • Please adjust the quantity of red chillies as per your tastebuds.
  • Here i have used spicy red chillies.You can use byadge chillies/kashmiri chillies for bright red color with less spicy taste.

Enjoy this hot n spicy chilli garlic dip with momos !!
momos chutney recipe

Pongal Festival Recipes –Thai Pongal Recipes

$
0
0
Pongal festival recipes

Hello friends,
In this post, you can find the collection of  Tamil Festival -Thai pongal recipes.In other parts of India,people celebrate this festival as Makar Sankranti.I will try to make a detailed post on our Tamilnadu style Pongal Celebration this week.On Pongal day,traditionally we make sakkarai pongal/Sweet pongal in pot,Vellai pongal,Urad dal vada without onion,suzhiyan,adhirasam,Payasam,Sambar/Pongal kuzhambu,poriyal,kootu,thayir pachadi and offer to God for neivedyam.It should be a no onion no garlic lunch menu.I have shared the links for all these recipes.Please click on the specific picture to see the recipe.Wish you all a very happy pongal !!


  •   Sakkarai pongal in cookerSweet pongal in cooker
  •   Kalkandu pongalKalkandu pongal
  •   AkkaravadisalAkkaradisal
  •   Ven pongal recipeVen pongal
  •   Urad dal vada with pepperUrad dal vada without onion
  •   Samai/Little millet sweet pongal recipeLittle millet sweet pongal
  •   Mixed vegetable kootuMixed veg kootu
  •   Avial recipedescription
  •   Pongal kuzhambuPongal kuzhambu
  •   Varagu pongal/Kodoo millet pongalKodo millet pongal
  •   AdhirasamAdhirasam recipe
  •   Suzhiyan recipeSuzhiyan
  •   Sweet pongal in potSweet pongal in pot
  • Holige/Puran poli/Obbattu Holige/Puran poli/Obbattu
  •   No onion no garlic lunch menuNo onion no garlic lunch menu
  •   20 Payasam varieties20 Payasam varieties

Pongal Celebration Procedure – How To Celebrate Thai Pongal

$
0
0
Pongal celebration
Hello Friends,Today’s post is all about the most popular Tamil festival,Thai Pongal(also known as Makara Sankranti in other parts of India)celebration along with Pongal recipes link.I have shared the details about Pongal Festival/Makar Sankranti and its pooja procedures along with pictures of our last year celebration.So this post would be more of essays with images.Please excuse meWinking.I hope this post would help beginners and newly wedded girls to start their Thai pongal festival celebration on their ownHappy.

Pongal(Thai pongal/Surya pongal) is a harvest festival of Tamilnadu,South India.It is one of the most important and popular Hindu festivals. This four-day long harvest festival of Tamil Nadu, Pongal is all about thanksgiving to nature and takes its name from the Tamil word Pongal means "boiling over" and is held in the month of Thai (January-February). 'Pongal' literally means overflowing and is named so because of the tradition of cooking the new rice in pots until they overflow, which is a symbol of abundance and prosperity.

Pongal is usually celebrated from January 13 to 16 every year.In 2016,Pongal takes place from January 14-17. The main festivities occur on January 15.This festival marks a period of plenty, peace and happiness.On the first day known as Bhogi, people clean their homes thoroughly and in the evening, all unwanted goods are lit in a bonfire. The second day is Perum Pongal, the most important. It is also called Surya Pongal because people worship Surya, the Sun God and his consorts.Women decorate the central courtyard of their homes with beautiful kolams, done with rice flour and bordered with red clay.Traditionally they cook pongal in clay pots on stoves made of stones and offer Sun God along with Freshly grown seasonal vegetables,sugar cane,legumes and pulses. The third day , Mattu Pongal is meant to offer thanks to the cows and buffaloes, as they are used to plough the lands. Jallikattu, a violent taming the bull contest, marks this day. On the last day, Kanum Pongal, people go out to picnic packing Varieties of rice.The festival of Pongal is mainly associated with the rural people. People wish each other on this day. Pongal wishes are exchanged between family and friends, and there are celebrations within the family.
Click this kolam picture to view pongal kolam designs from my in-laws blog :)

 Pongal Kolam Designs


How to celebrate pongal festival
What is Pongal Dish?
The most important part of the Pongal festival is cooking the Pongal dish.A sweet version of pongal called Sakkarai pongal is made with rice mixed with moong dal and cooked with ghee, cashew nuts, raisins adding jaggery (a type of unrefined sugar).A spicy pongal called Ven pongal/Ghee pongal is also prepared adding lots of ghee and spices like pepper & cumin.Traditionally, pongal is cooked in clay pots, on stoves made with stones and wood used as fuel. When it starts to boil over, everyone shouts out "pongalo pongal".

Things required for pongal celebration
  • Pongal Pot – Either Clay pot or brass pot or pressure cooker
  • Clay stove – If using (optional)
  • Rice flour & color powders for kolam –  Click herefor rangoli/kolam designs
  • Manjal kothu/Turmeric plant
  • Mango leaves/Maavilai
  • Banana leaves ( we use 5 leaves)
  • Betel leaves & nuts(Vetrilai paaku)
  • Banana
  • Coconut
  • Sugarcane
Ingredients required for cooking
Usually we make Sweet pongal,white pongal/paal pongal,Sambar with 7 vegetables,Poriyal or kootu,Thayir pachadi,Paruppu/dal along with Vada,Suzhiyan & adhirasam.Click HERE for Pongal recipes collection.Visit my in-laws blog for kolam ideas.
  • Raw rice
  • Moong dal
  • Jaggery ( Buy sugar candy if making kalkandu pongal)
  • Milk
  • Water
  • Cardamom seeds
  • Jathikai/Nutmeg
  • Edible camphor
  • Ghee
  • Cloves
  • Salt
  • 7 vegetables ( broad beans,sweet potato,Cluster beans,Raw banana,Yam,arbi,field beans,Pumpkin)
  • Toor dal
  • Gooseberry or lady’s finger for pachadi
  • Urad dal for vada
  • Rice flour & jaggery for adhirasam(optional)
  • Chana dal,jaggery,maida,rice flour ( for making suzhiyan,optional)
How to celebrate pongal festival

 Pongal festival – Pre Preparations
On bhogi day,wash and clean the entire house.Clean doors,windows & keep turmeric,kumkum dots.If you have the practice of burning old things,you can do it on this day.We used to discard the old clothes.wash all the blankets,pillow cover,screen cloth.Wash the lamps and other pooja vessels.Decorate it and keep it ready for next day pooja.If using clay pot & stove buy them.If using cooker or brass pot,wash and keep it ready.Tie the manjal kothu around the pot.Draw three lines with wet viboodhi and keep a kumkum dot on the pot.Buy all the required ingredients for cooking & pooja on this day and keep everything ready.On bhogi night,after finishing the dinner,clean the gas stove and draw three lines using viboodhi(viboodhi Pattai) and place kumkum dots on all the sides of gas stove.Refer picture to get the idea.If you have the practice of making suzhiyan, adhirasam & obbattu, prepare them and store in a box.soak the urad dal & grind vada batter.Refrigerate it over night.If you wish,you can wash the entrance and draw the rangoli too.The next day morning,you will be having enough time to make neivedyam recipes and perform pooja quickly.Clean the pooja room and draw a rangoli in the place where you are going to spread the banana leaves for neivedyam.
On Pongal day,wake up at early morning 4am because we are supposed to do the pooja during sunrise at around 6am.So wake up early and take head bath.First make sambar,poriyal/kootu,pachadi and paruppu. Keep everything aside.It takes 45 minutes  including chopping & cooking if you have two cookers in hand.My mom keeps Pongal in our backyard by using stone stove and brass pot wheras my MIL keeps pongal in gas stove.She uses brass or silver pot.So make pongal according to your family practice.Now keep the brass pot ( please refer THIS POST if you are making pongal in pot) or cooker ( Refer THIS POST for cooker).Make sweet pongal and paal pongal.When it starts to boil over, shout out "pongalo pongal".Pray for your family’s well being and prosperity. After making pongal,keep it near the pooja room.Make the urad dal vada at the end to maintain crispness.Now everything is ready for pooja !!


Pooja Procedure

Generally Pongal neivedyam is for Sun God.But we do it for our Veetu theivam,Maga maayi and Sun God.So we have offered all the dishes in 9 leaves.But in general, spread 5 leaves for Sun God.In those 5 leaves keep sweet pongal,vella pongal,Pongal sambar,kootu in little quantity.Light two lamps in front of the banana leaves.Spread a banana leaf and keep all the seasonal vegetables like sweet potato,pumpkin,yam,arbi,Panag kizhangu.Keep sugar cane pieces,banana,betel leaves & nuts.Break a coconut and keep it.Now do the pooja and mangala harathi.Finish the pooja.After the pooja,my mom distributes a glass of milk sweetened with jaggery.We call it as “siruveetu paal”.It tastes really yummy and we love it.If you wish,u can make it too.For that,make jaggery syrup and strain it.Add boiled milk to it.Add crushed cardamom.Mix n serve !

Prayers Chanted on Pongal
Aditya Hridayam or Surya Ashtotaram or Gayatri mantra can be recited Or you can simply mediate and say some simple prayers.

After The Pongal Puja
After the prayers, some water and flowers are sprinkled on the kolam and pongal dish. You can also sprinkle some uncooked rice mixed with turmeric (akshata).
After final prayers, pongal & other dishes and fruits are distributed.

Looking at Sun’s reflection in water
In some regions, there is a ritual to look at the Sun’s reflection in a vessel filled with water. Some communities add turmeric and kumkum to the water and look at this reflection. Another unique ritual is to look at sun through the gaps of fingers.

Source : The hindu blog

Disclaimer : I have shared the procedures based on our tradition.Please take this as a reference,consult the elders of your family and do the pooja as per your practice.Beginners can follow this if you don’t have any specific procedure at home.

Paal Pongal / Milk Pongal Recipe(Vellai Pongal)

$
0
0
Paal pongal recipe
Paal Pongal/Milk Pongal – when you hear this name u may think its a sweet pongal recipe using milk.But Nooo,its just a white pongal recipe in which rice is cooked in milk+water.We usually make this pongal in a pot along with sakkarai pongal for the festival.It looks super white and tastes creamy & rich.We mix this rice with Sambar or kootu and enjoy it.But traditionally we offer this to God by keeping a piece of jaggery,banana with few drops of ghee.If you wish to make it as sweet pongal,you can add sugar & cardamom powder to it.This post is my last minute contribution to Pongal Recipes in this year.Lets see how to prepare Vella pongal/Milk pongal recipe with stepwise pictures !!
Check out my other PONGAL RECIPES
Milk pongal recipe

Paal pongal/Milk pongal/Vellai pongal


Paal pongal/Milk pongal/Vella pongalHow to make pongal using milk
Cuisine:Indian
Category:Lunch
Serves:Serves 2
Prep time:5 Minutes
Cook time:15 Minutes
Total time:20 Minutes
INGREDIENTS
1 cup = 200 ml
  • Raw rice - 1/2 cup
  • Milk - 1 cup
  • Water – 2 cups
  • Salt - a pinch
METHOD
  • Wash the rice and keep aside.In a pressure cooker base take milk + water and a pinch of salt.Add rice to it.Cook in low flame for one whistle.Remove and mash it well.Offer God by keeping a small piece of jaggery,banana & few drops of ghee.
Paal pongal
    Serve with Pongal Kuzhambu & kootu.Enjoy !


Make this creamy,rich Paal Pongal and have a great celebration !

Milk pongal recipe 

Veg Biryani Recipes – 40 Biryani Varieties

$
0
0
I have been sharing varieties of Vegetable Biryani recipes for the past few months in my Sunday Lunch recipes series.Usually people make biryani on weekends especially Sundays,for special occasions like marriage,festivals,get together,anniversary & birthdays.Not just for Sunday lunch,many people make biryani for daily lunch box too as most of them are easy to make one pot meals.So i made a series of biryani posts on Sundays to explore biryani varieties for Vegetarians.I was happy that i could try & share 40+ biryani & pulao recipes. I have made a list & stacked all of them in one page for your quick reference.Please click on the specific image to view the respective recipe.In this post, you can find the links for Biryani spices list,How to cook basmati rice & Jeeraga samba rice,A side dish for biryani,Indian Veg biryani recipes,Easy vegetable biryani for bachelors,Hyderabadi Veg biryani,Kerala biryani,Veg Kofta biryani,Veg Dum biryani,Pakistan biryani,Sindhi biryani,Tamilnadu muslim style biryani,Kuska/plain biryani,Mushroom biryani,Cauliflower biryani,Baby corn biryani,Brinjal biryani,Sweet corn biryani,Soya chunks biryani,Tomato biryani and some of the most popular Biryani recipes in Tamil nadu Ambur biryani,Dindigul Thalapakatti biryani,Coimbatore angannan biryani and Anjappar biryani recipes replacing mutton & chicken with vegetables.I have also shared a Celebrity biryani recipe”Thala Ajith biryani”-You must try this onceHappy. You can also find some Healthy biryani recipes like Mixed pulses biryani,Spinach/Palak biryani,Bittergourd biryani,Qabooli chana biryani,Rajma biryani,Millet biryani,brown rice biryani and Kathal biryani.Apart from these recipes,i have shared few pulao recipes like  spicy veg pulao,Mushroom pulao and tomato pulao.Friends,do try these recipes during weekends and share your feedback here.Thanks for visiting this page.Hope u find it usefulHappy.

Biryani,Pulao Varieties


Biryani.Pulao VarietiesBiryani,Pulao varieties for Sunday lunch,Special occasions and for lunch box !
Cuisine:Indian
Category:Lunch
Serves:Serves 3
Prep time:60 Minutes
Cook time:20 Minutes
Total time:80 Minutes


INGREDIENTSUSED

  • Basmati rice & Jeera Rice(Samba rice)
  • Whole Garam masala(Cinnamon, cloves, cardamom, Bayleaf, Black stone flower)
  • Mixed vegetables
  • Soya chunks/Meal maker, Mushroom, Cauliflower, baby corn, sweet corn
  • Spice powders (Chilli pwd, dhania powder, garam masala powder, biryani masala powder,turmeric powder)
  • Ginger & Garlic paste
  • SaltWater
  • Coconut milk,milk
  • Curd,Lemon juice
  • Mint & coriander leaves
  • Green chillies,red chillies
  • Cooking oil + Ghee


BIRYANI,PULAO RECIPES
How to cook basmati rice Biryani spices  


Paneer Dosa Recipe – Dosa Varieties

$
0
0
Paneer dosa recipe
Paneer dosa was in my try list since I had this in a 101 dosa corner.We ordered Paneer cheese dosa for Raksha,Pav bhaji masala dosa for me and Spring dosa for Sendhil.Raksha couldn’t complete the plate as the dosa was really big.So myself & Sendhil had the remaining.I loved the paneer masala stuffing of the dosa &I could guess the ingredients easily.It was more like paneer bhurji.So I tried to recreate the same at home and succeeded in my attempt too.This is so easy to make and tastes yummy with coconut chutney as side dish.You can try this for breakfast and dinner as well.Lets see how to prepare this yummy,kids friendly dosa with paneer masala stuffing !!

Paneer masala dosa

Paneer dosa recipe


Paneer dosa recipePaneer dosa recipe - How to make dosa with paneer masala stuffing
Cuisine:Indian
Category:Breakfast
Serves:4-5 dosa
Prep time:10 Minutes
Cook time:20 Minutes
Total time:30 Minutes
INGREDIENTS

  • Paneer - 150 gms ( 1 cup grated)
  • Big onion - 1 no
  • G&G paste - 1/2 tsp
  • Tomato – 1 no
  • Turmeric powder - 1/4 tsp
  • Red chilli powder - 1 tsp
  • Dhania powder - 1 tsp
  • Garam masala powder - 1/4 tsp
  • Mint leaves - few ( optional)
  • Cooking oil – 1 tbsp
  • Fennel seeds/Saunf – 1/4 tsp
  • Salt & water - as needed
  • Dosa batter – 1 cup
  • Cooking oil – as needed
METHOD

  • Boil water in a pan and keep the paneer block inside the water for 5 minutes.It helps to make the paneer soft.Grate the paneer.Chop onion,tomato,green chillies & mint leaves.
Paneer dosa recipe
  • Heat oil in a kadai and splutter fennel seeds. Add chopped onions and saute until transparent.Add g&g paste and saute till raw smell goes off.
Paneer dosa recipe
  • Now add tomato pieces.Saute until mushy.Add turmeric powder,red chill pwd,dhania pwd & garam masala powder.Mix well.Add the required salt.
Paneer dosa recipe
  • Lastly add the grated paneer. Mix well.Check for taste.Garnish with mint leaves and coriander leaves,switch off the flame.
Paneer dosa recipe
  • Heat a dosa pan and pour a ladleful of batter.Spread it well and make it thin.Drizzle a tsp of oil and cook well in medium to high flame till the sides become crisp and center becomes golden brown.
Paneer dosa recipe
  • Do not flip the dosa.Keep the paneer masala inside the dosa.You can either spread it over the dosa or keep a ladleful of masala in the middle.Fold the dosa and serve hot with chutney !
Paneer dosa recipe


Note
  • Adjust the quantity of chilli powder & garam masala powder as per your taste.
  • You can skip g&g paste if you don’t like over powering of masala flavor.
  • Use few drops of lemon juice instead of tomato.But adding tomato gives a base to the masala.So its your choice.
Enjoy this yummy paneer dosa for breakfast or dinner !!
Paneer dosa

Milagu Jeeraga Aval Recipe – Poha Recipes

$
0
0
Last year i got few requests to share different types of poha recipes( Aval in tamil & Malayalam, Avalakki in Kannada, Rice flakes in English, Poha in Hindi, Atukulu in telugu). I have never thought or tried any recipes beyond my lemon aval/Lemon poha.When i got those requests,i started looking for varieties of poha recipes.At that time,my MIL taught me this easy pepper poha(Milagu aval in Tamil) recipe for breakfast & dinner.Its a super easy and super quick recipe that needs just 10 minutes to prepare.We usually make pepper idiyappam but never tried with poha.As Sendhil loves dishes with pepper,it was like double bonanza for meDancing
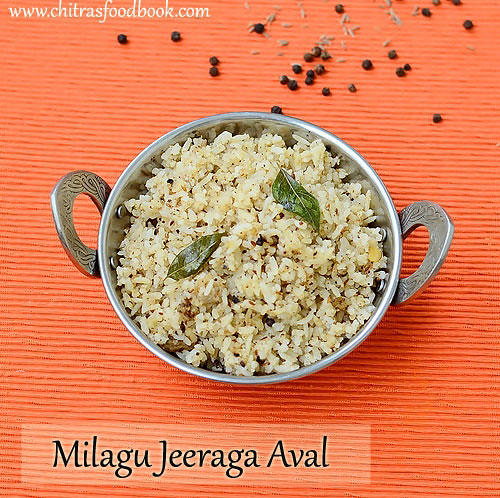
.No side dish is required for this recipe.So I make this atleast twice in a week.Working women and bachelors can try this recipe if you like pepper based food.You would love its taste and simplicity.Its is a no onion no garlic Jain recipe.So it can be prepared during festival seasons or for vrat/fasting days.Ok, lets see how to make this easy and yummy breakfast/dinner recipe using poha – Milagu aval/Pepper Poha !! I will try to share more poha recipes in my upcoming posts.


Milagu Jeeraga Aval/Pepper Cumin Poha Recipe


Milagu Jeeraga Aval/Pepper Cumin Poha RecipeEasy Breakfast/dinner recipe with poha - Milagu aval/Pepper poha
Cuisine:Indian
Category:Breakfast/Dinner
Serves:Serves 2
Prep time:5 Minutes
Cook time:5 Minutes
Total time:10 Minutes


INGREDIENTS
1 cup = 200 ml
  • Thick Aval/Poha - 1 cup
  • Pepper corns / Milagu - 1.5 tsp
  • Cumin seeds / Jeegaram - 1 tsp
  • Curry leaves - few
  • Cashew nuts - optional
  • Lemon juice - few drops ( Optional)
  • Salt & water - as needed
  • Ghee - 1 tbsp ( use oil if diet conscious)
METHOD

  • Wash the aval/Poha thrice to remove the debris & stones.By this time,poha would have half soaked.Add water just to immerse the poha.Soak it for 5 minutes.In the mean time,crush the pepper + cumin seeds to a coarse powder.
Milagu aval
Milagu aval recipe
  • Heat ghee in a pan and add the crushed pepper+cumin,curry leaves,cashews and salt. Mix well.
Mialgu aval recipe
  • Now add the soaked poha and stir well.Keep the flame low and cover cook for few minutes till poha becomes soft.Stir it once in the middle.Check for salt & spiciness. Add more salt & pepper powder if you need.Switch off the flame.Do not cook the poha for longer time because it would turn hard and chewy.So remove when it becomes soft.Squeeze lemon juice,mix well and serve hot.No side dish is required for this recipe.If you want,you can make coconut chutney and Enjoy !
Milagu aval recipe


Note
  • Add more pepper powder for more spiciness.
  • Adding lemon juice is optional but it gives a mild tangy taste to the dish which you would love it.
  • You can also use thin poha instead of thick poha.

Enjoy this easy,healthy,spicy Pepper Poha for breakfast or dinner !!
Poha recipes

Red Rice Idli Dosa Recipe – Healthy Idli Varieties

$
0
0
Red rice idli recipe
We all know Red rice has amazing health benefits when compared with our usual white rice.So i always think to include it in my regular diet.Last week I made this healthy red rice(Kerala Rosematta) idli recipe for the first time.I have tried varieties of idli recipes using millets,brown rice,oats and even with barley. When i saw 1/2 kg of red rice in my pantry which i bought for my Onam sadya,red rice idli & dosa flashed in my mind.I browsed through many recipes and watched some youtube video recipes too.Finally i came up with this version. Idli came out super soft and dosa was very flavorful except the color was dull white.I was very happy with the result and including this in my Idli varieties collection.Sorry,I am not able to post this recipe with stepwise pictures as they got deleted by mistake.I will try to update it with a picture of red rice very soon.Lets see how to make this healthy,soft idli recipe using Kerala special Red rice Happy.
Check out my Idli varities collection HERE
Red rice idli,dosa

Red rice idli,dosa recipe


Red rice idli,dosa recipeRed rice idli,dosa recipe - Heallthy breakfast ideas
Cuisine:Indian
Category:Breakfast
Serves:30 idli
Prep time:18 Minutes
Cook time:15 Minutes
Total time:33 Minutes


INGREDIENTS
1 cup = 200ml
  • Red rice - 2 cups
  • Salem Idli rice - 1/2 cup
  • White round urad dal - 1/2 cup
  • Thick Poha/Aval – 1 tbsp
  • Methi seeds - 1/4 tsp
  • Salt & water - as needed
METHOD
  • Wash and soak Red rice + Idli rice + poha together for 2-3 hours.Wash & soak urad dal + Methi seeds for 2 hours.

  • Grind the soaked urad dal first adding water little by little in regular intervals.I used nearly 1 to 1.25 cups of water. Make a smooth,fluffy batter.Remove in a bowl.

  • Grind the rice to a smooth paste adding required salt & water.Remove the batter and mix with urad dal batter.Use your hands and mix it well. Allow the batter to ferment for 15 hours or overnight.
  • The next day morning,batter would have raised a bit with sour smell.Batter din’t double for me.Mix the batter well and make idlis.Heat idli pot with water.Grease the idli plate with little oil and pour the batter.Steam the idlis for 10 to 15 minutes till the back of spoon comes out clean. Remove the idlis and serve hot with chutney & sambar.
  • For making dosa,mix the batter well.Add little water if its very thick.Heat dosa pan,pour a ladleful of batter and spread it thin.Drizzle a tsp of oil around the dosa.Cook both the sides and remove.Enjoy !
Note
  • Here i have used 5:1 ratio of rice & dal.You can use 4:1 if you use red rice alone.
  • I used a small portion of white rice just for the taste.You can skip it if you wish.

Enjoy this healthy,super soft red rice idli recipe for your breakfast & dinner !!

I served it with  Chidambaram kathirikai gothsu and tomato chutney
Red rice idli,dosa

Eggless Chocolate Cake Recipe – Moist & Spongy

$
0
0
Eggless chocolate cake recipe
Last month I tried this eggless,super soft,moist & spongy basic Chocolate cake recipe for my FIL’s birthday.I wanted to share this as my new year’s post but i couldn’t do it.This post was lying in my drafts.As i am out of station,i thought of sharing this post today. I tried to do icing/frosting for the cake but it was not goodSilly
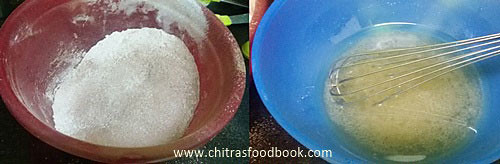
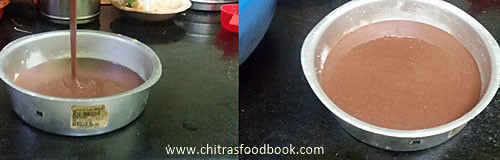
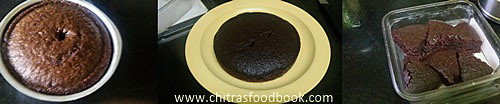
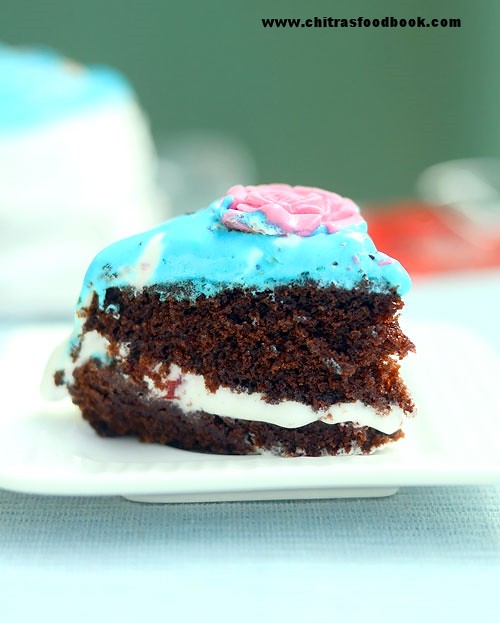
.I must learn to do it perfect.But the cake base was a super hit at home.I have tried eggless chocolate cake with condensed milk for my black forest cake recipe.So i was looking for a recipe without condensed milk & butter.I came across this recipe HERE,made a small change and tried it.It came out very well.I have baked this cake so many times for Raksha’s school Christmas & New year party but without icing.I just made a simple decoration by drizzling some Hershey’s chocolate syrup and sprinkled some sugar balls. All her friends loved the cake and asked her whether your mom is a chefLaughing.This was the best complement i’ve ever received for my baking.And now i am happily sharing this fool proof recipe with you all.Try it for your family and take the credits.Ok,lets see how to make this eggless,spongy,moist chocolate cake recipe using oil.If you wish to try this cake using pressure cooker,please refer THIS POST for the baking procedure.
Eggless chocolate cake

Eggless Chocolate cake recipe


Eggless Chocolate cake recipeEggless Chocolate cake recipe - Moist,soft and spongy
Cuisine:Indian
Category:Eggless baking
Serves:10-12 pieces
Prep time:10 Minutes
Cook time:35 Minutes
Total time:45 Minutes


INGREDIENTS
1 cup = 250 ml
  • All purpose flour/maida - 1.5 cups
  • Cocoa powder - 3 tbsp
  • Baking soda - 1 tsp
  • Baking powder - 1/8 tsp
  • Salt - a pinch
  • Granulated Sugar - 1 cup
  • Chocolate Chips - 2 tbsp
  • Water - 1/2 cup (125ml)
  • Boiled milk - 1/2 cup ( at room temp) ( Vegan use 1 cup of water instead of milk)
  • Vanilla essence - 1/2 tbsp
  • Lemon juice or White Vinegar - 1 tbsp
  • Oil - 1/4 cup (60 ml)
METHOD

  • Sieve and mix the dry ingredients ( Maida,baking soda,baking powder,salt and cocoa powder).Keep aside.Take the wet ingredients ( oil,water,milk,vanilla essence,vinegar) and mix well.Add sugar and stir well to dissolve it.
  • To this,add the sieved maida mixture.Make a smooth batter using a whisk.Make sure there are no lumps and sugar is dissolved properly.Grease a baking tray with butter and sprinkle maida all over it OR line the baking pan with butter paper.
  • The consistency of batter should be thin and falls like a thin ribbon.Lastly add the chocolate chips and mix well.
  • Pour the batter and keep it ready.Pre heat the oven in convection mode at 180c and keep the baking pan inside the oven.Let it bake for 30-35 minutes.Remove and check it with the back of spoon or tooth pick.If it comes out clean,cake is done else bake for 5 more minutes.Let the cake cool down for 15 minutes.Invert the cake and remove it in a plate.You can do icing & decorate the cake as you wish Or simply drizzle some chocolate syrup and sprinkle sugar balls.Serve & Enjoy !


Note
  • I used milk & water in equal quantity but the original recipe used only water.So Vegans can replace milk with water.
  • If you trying this cake for the first time,you can just half the measures given here and try it.
  • If you wish to try this cake in pressure cooker,do refer THIS POST for the procedure.
Try this easy,yummy eggless chocolate cake at home.You will love it !!

Sorakkai Dosa / Bottle Gourd Dosa Recipe–Sorakkai Recipes

$
0
0

bottle gourd dosa

Usually i make Kootu with sorakkai(Suraikai,sorekai in tamil,sorakaya in telugu,Lauki in Hindi,Bottle gourd in English).But this time for a change i tried dosa with bottle gourd as suggested by my MIL.She usually adds it while grinding rice flour dosa/verum arisi dosa or in paruppu adai to make the dosa very soft.But i added some spices along with rice & bottle gourd to make a spicy,flavorful dosa like adai.My friend Shalini used to tell me about her Karam dosa recipe.So i just used those spices for grinding this batter.It came out very well with a nice color as i expected.With coconut chutney as side dish,we loved it a lot.I was very happy that i could make a spicy,yummy,flavorful dosa variety adding a healthy vegetable.Friends,if you buy bottle gourd/Sorakkai,don’t forget to try this dosa.You can enjoy it for your breakfast and dinner as well.Ok,lets see how to make bottle gourd dosa with step by step pictures.

Here is my Sorakkai Kootu Recipe – 2 versions,check it out !

Sorakkai dosa

Sorakkai Dosa/Bottle gourd dosa Recipe


Sorakkai Dosa/Bottle gourd dosa RecipeSpicy,soft dosa made using the central part of bottle gourd.
 
Cuisine:Indian
Category:Breakfast
Serves:15nos
Prep time:120 Minutes + Fermentation
Cook time:5 Minutes
Total time:125 Minutes
 
INGREDIENTS
1 cup = 200ml
  • Idli rice - 2 cups
  • Sorakkai/Botlle gourd - 1 cup (chopped)
  • Red chilli - 8 nos ( I used Byadge chilli to get bright red color)
  • Ginger - 2 inch piece
  • Cumin seeds/Jeera - 2 tsp
  • Hing/asafetida - 1/4 tsp
  • Salt & water - as needed
METHOD

  • Wash and cut the bottle gourd.Scrape the outer skin and discard it.Now slit the bottle gourd into two pieces and remove the central soft,spongy part.Discard it.Chop the remaining bottle gourd into pieces and add to batter.


  • Wash and soak the idli rice for 2 hours.After 2 hours,take the big mixie jar and add the  chopped bottle gourd flesh part,red chillies,cumin seeds,hing and ginger piece.Grind it to a  smooth paste.Now add the rice draining the soaked water and required salt & water.Grind it to a smooth paste.

  • Transfer the batter to a bowl and let it ferment for 8 hours or over night. The next morning,mix the batter well and add some water if its very thick.Heat dosa pan and pour a ladleful of batter.Spread it thin and drizzle a tsp of oil around the dosa.Cook the dosa in medium flame and flip the other side.Cook for few minutes and remove.Serve hot with coconut chutney.

Sorakkai dosa

    Enjoy !
Note
  • If you don’t want to flip the dosa,cover & cook the dosa for few minutes,fold it and serve.
  • I used byadge chillies to get more color and less spicy taste.Please adjust the quantity of chillies as per your need.
  • If you wish to make this dosa as thick adai adding lentils,soak 1/4 cup of toor dal and 1/4 cup of chana dal with rice and grind the batter.


Enjoy this yummy,colorful,healthy bottle gourd dosa with coconut chutney & Idli podi !!

How to make bottlegourd dosa

Avarekalu Huli Recipe – Field Beans Gravy–Karnataka Recipes

$
0
0
Avarekalu huli
Avarekalu(Cow pea/field beans/Lilva beans in English,Mochai in Tamil) season is around in many parts of Karnataka.In Bangalore,every year during december-Janurary Avarekalu Mela is conducted in Food street,V V puram.Recently when i met my School moms friends,Tara was telling me about the varieties of avarekalu dishes she tasted in Avarekalu Mela.I got tempted to try some recipes with it and post here.Last year during this time,i shared Hitkidabele Avarekalu saaru and Avarekalu Pulao recipes.So this year i tried a yummy Avarekalu Huli recipe and Avarekalu dry palya  for rice by getting the recipes from my friend Megha.She shared her mom’s recipe which was very different from the ones i saw in various blogs.So i tried it & came out really well.We loved this gravy with rice.It was tasting more likeArachuvitta Vathakuzhambu.I used less oil than what Megha suggested.Still it was very tasty.Ok,Lets see how to prepare Karnataka style Avarekalu Huli.
Avarekalu saaru

Avarekalu Huli Recipe


Avarekalu Huli RecipeAvarekalu Huli Recipe - Gravy for rice adding field beans
Cuisine:Indian
Category:Side dish
Serves:Serves 2
Prep time:15 Minutes
Cook time:15 Minutes
Total time:30 Minutes
INGREDIENTS

  • Avarekalu with skin / Field beans - 1/2 cup
  • Potato - 1 no
  • Brinjal - 1 no
  • Big onion – 1 no
  • Garlic bulb – 1 whole ( with 15 cloves)
  • Salt & water - as needed
To grind
  • Tamarind - A big gooseberry size
  • Grated coconut – 1 tbsp
  • Red chilli powder – 1 tbsp
  • Dhania powder - 2 tsp
  • Turmeric powder - 1/8 tsp
  • Coriander leaves - 1 sprig ( optional)
To temper
  • Cooking oil or gingely oil - 1 tbsp
  • Mustard seeds - 1/2 tsp
  • Cumin seeds/Jeera - 1/4 tsp
  • Urad dal - 1/2 tsp
  • Curry leaves - few
METHOD

  • Wash and keep the avarekalu.Wash and peel the skin of potato.Chop into 4 big pieces.Wash and cut brinjal into chunks.
Avarekalu huli recipe
  • Pressure cook avarekalu,chopped brinjal & Peeled,chopped potato adding required water & salt.Set aside.
  • Soak tamarind in a cup of water.Brush the onion with oil.Burn the whole onion(with skin) over direct flame.Use a tong & hold the onion.Roast it all the sides in low to medium flame.When the skin of onion turns black,remove & let it cool.Similarly roast the greased whole garlic bulb on all sides till its skin turns black.( Refer Notes for variations)
Avarekalu huli recipe

  • Peel the outer skin of garlic & onion. Grind it to a smooth paste adding soaked tamarind, coconut,chilli powder,turmeric powder,dhania powder and coriander leaves.Mix this paste with the cooked avarekalu,potato & brinjal pieces. Check for consistency  & taste and add some water  or chilli powder,dhania powder if needed.
Avarekalu huli recipe
  • Let the gravy boil for few minutes.Gravy will thicken as it boils.Switch off the flame & temper mustard seeds,cumin,urad dal & curry leaves.Add to gravy and mix well.
    Enjoy !

Note
  • Adjust the quantity of chilli powder & dhania powder as per your taste.
  • This gravy is meant to be thick.If you want to make it slightly thin,add little water.
  • If you don’t want to burn the onion & garlic,Just chop them and saute in a tbsp of oil.
  • You can also replace red chilli + dhania powder with 1 tbsp of sambar powder.

Try this yummy avarekalu huli saaru recipe for rice & enjoy !!
Avarekalu huli

Bharwan Bhindi Recipe - Stuffed Okra Fry

$
0
0
Bharwan bhindi recipe
I love to try fry recipes with stuffed vegetables.Usually i made Stuffed brinjals like this.But its purely of South Indian style.So i was looking for a typical North Indian style stuffed vegetable fry recipe.This morning I came across Bharwan( meaning stuffed in English) bhindi i.e stuffed Okra masala fry in my favorite Vahrehvah Vahchef’s youtube video. The recipe for masala was so simple with besan & less oil.Its a no onion no garlic Jain recipe and it looked mouth watering too.So without any second thought,i went for this recipe by making some small changes as per my family’s taste buds.It came out really well and got thumbsup from SendhilDancing.As the chef says,the masala used in this recipe can be used to make Bharwa Shimla mirchi, Bharwan Karela and even stuffed tindora.And this stuffed bhindi fry would be a great side dish for roti/chapathi , simple Veg pulao or any paratha. But i loved to have it as a snackWinking.Lets see how to cook bharwa bhindi recipe with step by step pictures.

Bharwan bhindi recipe

Bharwan Bhindi Recipe / Stuffed Okra fry


Bharwan Bhindi Recipe / Stuffed Okra fryHow to make Bharwan Bhindi fry - stuffed okra fry recipe for rice & roti
Cuisine:Indian
Category:Side dish
Serves:Serves 2
Prep time:10 Minutes
Cook time:15 Minutes
Total time:25 Minutes
INGREDIENTS

  • Bhindi/Okra/Lady's finger - 15 nos ( medium sized)
  • Water - to sprinkle on okra while cooking
For stuffing
  • Cooking oil - 1.5 tbsp
  • Cumin seeds/Jeera - 1/2 tsp
  • Sambar powder- 3 tbsp
  • Besan flour - 2 tbsp
  • Aamchur powder - 2 tsp
  • Cumin powder - 1/2 tsp
  • Garam masala powder - 1 tsp
  • Dessicated coconut/dry coconut -1 tbsp ( optional)
  • Turmeric powder - 1/4 tsp
  • Chat masala - 1/4 tsp (optional)
  • Sugar - 1/2 tsp
  • Salt - as needed
  • Lemon jucie - as needed
  • Coriander leaves - to garnish
METHOD

  • Wash and pat dry the okra in a cloth.Chop the head portion and slit the middle part of okra.Keep aside ( Refer Pics)
Bharwan bhindi recipe
Bharwan bhindi

  • In a bowl,take all the spice powders,besan flour,salt & sugar.Mix well.Add lemon juice and water to make a thick paste.Masala for stuffing is ready.
Bharwan bhindi
  • Stuff the bhindi with the masala and reserve the remaining masala if any.
Bharwan bhindi
  • Heat oil in a kadai and when it gets heated , add cumin seeds and arrange the stuffed okra/lady’s finger by keeping the slitted part facing upwards.If  the masala part faces down,masala may ooze out in oil.So keep it upwards.Keep the flame completely low.Sprinkle some water all over the okra and close it with a lid.
Bharwan bhindi
  • When the bottom part is sauteed well to golden brown color,flip the okra and fry the masala for sometime.Sprinkle some water and close it with a lid.Keep the flame low.Okra will be cooked well and soft with a nice smell.Sprinkle some lemon juice and garnish with coriander leaves.Switch off the flame and serve hot with rice,pulao,roti !
Bharwan bhindi

Note
  • Check the taste of masala before you stuff in the okra.Adjust salt & spices.
  • You can use the same masala to stuff in tindora,brinjal,karela/bittergourd and even capsicum.
  • I found some recipes with peanut powder and dessicated coconut. But i don't think its a typical North Indian style.
  • If you want to add garlic and onion,add chopped garlic along with cumin seeds in oil.Then add the stuffed okra.After the okra is cooked well,add the thick onion slices,saute well and serve.
 
Easy,yummy suffed okra masala fry is ready to serve with pulao & roti !
Stuffed okra fry

Puffed Rice Dosa – Soft,Sponge Dosa Recipe

$
0
0
Puffed rice dosa
I must thank my reader Suchi Vasan for sharing this super soft,spongy dosa recipe.When she told me about the ingredients of this dosa,i just couldn’t believe it.Its just a two ingredient recipe and that too a dosa without urad dalBatting Eyelashes
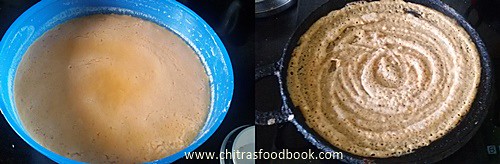
.Puffed rice ( Arisi pori in Tamil,Mandakki in Kannada,Murmura/bhel in Hindi,Borugula in Telugu) is the star ingredient for this recipe.As i haven’t tried any puffed rice recipes other than Kara pori,I got tempted to try this dosa & tried it on the same day.This dosa is not an instant version.Its batter needs to be fermented really well to enjoy its best taste.As Suchi said,dosas came out very well,very soft and spongy with lots of holes in it.I usually make sponge dosa adding poha/aval & methi seeds.But this recipe does magic just with the puffed rice.You can grind the batter easily in a mixie.With garlic chutney as side dish,it tasted great!! I will share the recipe for garlic chutney tomorrow.Now lets see how to make this soft,sponge dosa using puffed rice/arisi pori.
Check out my
Beach style Kara Pori
 Bhel Puri
Garlic flavored Kara Pori
Puffed rice dosa

Puffed rice dosa


Puffed rice dosaHow to make soft,spongy dosa using puffed rice - Yummy breakfast recipe
Cuisine:Indian
Category:Breakfast
Serves:8 nos
Prep time:20Hours
Cook time:3 Minutes
Total time:20H3Minutes


INGREDIENTS
1 cup = 200 ml
  • Puffed rice - 2 cups
  • Raw rice - 1 cup ( Use good quality sona masoori rice)
  • Salt & water - as needed
METHOD

  • Wash the rice and soak in a bowl.Wash the puffed rice and soak in another bowl.(You can soak both together too).Let the rice soak for 2 hours.
Puffed rice dosa recipe
  • After 2 hours,take the soaked puffed rice,squeeze it well and take in a big mixie jar.Grind it to a smooth paste adding less water.No need to remove the batter.Now drain the soaked rice and add to the same mixie jar. Grind to a smooth paste adding required water and salt.
Puffed rice dosa recipe
  • Transfer the batter to a vessel and mix with your hands to aid fermentation.Allow the batter to ferment for minimum 15 hours and maximum a day.The next morning batter would be raised slightly.Mix the batter well.Proper fermentation of  batter is very important for this dosa.
Puffed rice dosa recipe
  • Heat a dosa pan and pour a ladleful of batter.Do not spread the dosa.It will spread automatically.Make it like thick uthappam.Drizzle a tsp of oil around the dosa and cover the dosa with a lid.Let it cook in medium flame for 2 minutes.Open the lid and remove the dosa.You will see the dosa with full of holes and it looks spongy.Serve hot with chutney.I made this spicy Garlic chutney as suggested by Suchi.I will share its recipe tomorrow.Serve & eat hot to know its best taste !!


Note
  • You should use good quality raw rice for making this dosa
  • Batter should be fermented well.So see to it.
  • You can either cover n cook the dosa without flipping OR cook like utappam by flipping it.

Try this easy puffed rice dosa for your breakfast and enjoy !!
Puffed rice dosa recipe

Garlic Chutney / Poondu Chutney - Red Chutney Recipe

$
0
0
Garlic chutney recipe
As i promised in my yesterday’s post here is the spicy,tangy,garlicky red chutney recipe that i had served with Puffed rice dosa.This recipe was shared by my reader Suchi vasan :)This tomato garlic ( Poondu in Tamil,Lahsun in Hindi) chutney is one of the best side dish for this puffed rice dosa.As the dosa has mild sourness this spicy,tangy chutney pairs with it very well. Its also a simple and easy to make chutney recipe with just 3 major ingredients.Not just for puffed rice dosa,you can make this chutney as a side dish for our regular idli dosaand it tastes good with curd rice too.Try it and enjoy.Lets see how to make this yummy tomato garlic chutney for puffed rice dosa !
You might be interested in
Easy Tomato Garlic chutney for chapathi
Onion Garlic chutney
Spicy Momos chutney
 42 Chutney recipes collection
Poondu chutney

Garlic chutney recipe / Poondu chutney


Garlic chutney recipe / Poondu chutneyEasy,spicy garlic chutney recipe - Side dish for idli dosa
Cuisine:Indian
Category:Side dish for idli dosa
Serves:Serves 2
Prep time:10 Minutes
Cook time:10 Minutes
Total time:20 Minutes
INGREDIENTS

  • Ripe tomato - 2 nos (medium sized)
  • Garlic cloves - 15 nos 
  • Red chilli - 4- 5 nos ( I used 2 spicy chillies & 2 byadgi chillies for nice color)
  • Salt & water - as needed
  • Cooking oil - 2 tsp
To temper
  • Gingely oil/Sesame oil - 1 tbsp
  • Mustard seeds - 1/2 tsp
  • Urad dal - 1/4 tsp
  • Curry leaves - few
METHOD

  • Wash and chop the tomatoes.Peel the garlic cloves and keep it ready.In a pan heat cooking oil and saute the red chillies,garlic.Saute for a minute and then add tomatoes.
Garlic chutney for idli dosa
  • Saute until tomato turns mushy.Add the required salt and let the mixture cool down.Grind the mixture to a smooth paste adding enough water.
Garlic chutney recipe
  • In a pan,heat gingely oil and temper with mustard seeds,urad dal and curry leaves.Add this chutney to the oil and let it boil for few minutes till it thickens.Serve it with idli,dosa / puffed rice dosa.Enjoy !
Garlic chutney recipe


Note

  • Adjust the number of chillies as per your taste buds.Here i used 2 spicy chillies and 2 byadgi chillies to get a nice color.
  • This chutney tastes good even without tempering.If you are in a hurry,you can skip the tempering part .
  • Use 10 cloves of garlic if its very big.


Enjoy this yummy garlic chutney with idli,dosa !!
Garlic chutney

Chanar Dalna Recipe – Bengali Recipes

$
0
0
Chanar dalna recipe
Last year i tried few Bengali dishes to share a lunch menu collection. I posted few dishes from the menu and this recipe was in pending list.Today when i was checking my drafts,i found this post lying in the folder.Chanar Dalna is an authentic vegetarian Bengali dish served for rice.It is made using potato and freshly prepared Chenna/homemade paneer.But i used store bought paneer and referred Sanjeev Kapoor’s recipe.Its a no onion no garlic recipe too.It came out pretty well.This weekend i will share the Bengali lunch menu platter.Now lets see how to make Bengali style Chanar Dalna Recipe – Vegetarian version !
Do check out my other bengali recipes

 Bengali chanar dalna recipe

Chanar dalna recipe


Chanar dalna recipeChanar dalna recipe - Paneer & Potato cooked in a spicy gravy
Cuisine:Indian
Category:Side dish
Serves:Serves 2-3
Prep time:10 Minutes
Cook time:20 Minutes
Total time:30 Minutes
INGREDIENTS
1 cup = 200ml
  • Homemade paneer or chenna - 200gms
  • Potato - 2 nos ( medium)
  • Ripe tomato - 2 nos (small)
  • Green chillies- 2 nos
  • Ginger - 1 inch piece
  • Cumin seeds- 1.5 tsp
  • Red chilli powder - 1tsp
  • Turmeric powder-1/4 tsp
  • Ghee -1 tbsp
  • Garam masala powder - 1 tsp
  • Sugar -1/2 tsp
  • Salt to taste
  • Milk - 1/2 cup
  • Cooking oil - to fry paneer (I shallow fried the paneer cubes)
METHOD

  • Cube cut paneer and Peel potatoes,cube cut it.Slit the green chillies and chop the ginger into small pieces.Grind 1 tsp of cumin seeds,red chilli powder,turmeric powder and ginger into a smooth paste adding little water.
  • Heat oil and deep fry or shallow fry paneer cubes till it turns light golden brown.Set aside.In the same oil,fry the potato cubes till light brown and keep aside.
Chanar dalna recipe
  • In a kadai heat ghee and add 1/2 tsp of cumin seeds.Add the potato cubes,slit green chilli,,tomato pieces(if using)ground masala paste,garam masala powder,sugar and saute well for 2-3 minutes without burning the masala.Add the required salt and half cup of water.Cover and cook the potatoes.
    Chanar dalna recipe
  • Lastly add the milk and fried paneer cubes.Check for salt and simmer the gravy for a minute.switch off the flame. Serve hot with rice.
Chanar dalna recipe

Enjoy !

Note
  • Some recipes called for tomatoes too.so if you wish,you can add 2 small roughly chopped tomato and saute until mushy before adding masala paste.
  • Adjust the quantity of spices as per your taste.
  • This gravy is supposed to be watery.So add water and milk accordingly.
  • You can skip milk and add water alone.

Enjoy this Bengali style Paneer gravy – chanar dalna for rice !!
Chanar dalna recipe


Chocolate Covered Strawberries Recipe – Valentine’s Day Recipes

$
0
0
Chocolate covered strawberries recipe
Valentine’s Day is fast approaching.Many of you might have started thinking about gifting ideas and to make some special recipes on Valentine’s day.Before 10 years,when our marriage date was fixed,2005 Valentine’s day was very special to us.He gifted me ruby stone gold stud with a chocolate boxLove Struck  
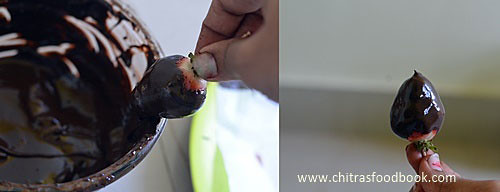
and i gave him a T Shirt.From then, every year on Valentines day,he gives me some special gifts like Camera,mobile phones,dress,jewelleries,handbags etc whereas me as a wife shower all my love by making some interesting,new dishes for him as he loves to eat varieties of food.This year,when i was thinking about Valentines day recipes,my friend Shalini told me about this Chocolate covered strawberries( Strawberries dipped in chocolate sauce).I browsed for this yummy dessert recipe & found it is a traditional gift for Valentine's Day in the United States.I became double happy & tried it this morning to start off Valentines day special recipes in my blog.
For this recipe,i referred few youtube videos for tips and tricks.I won’t say i made it perfectTongue but still as a first timer,Iam happy with the outcome.Here i have showed you how to melt chocolate using microwave but i’ve discussed the other methods of melting as well.I used dark sweetened compound chocolate for melting.You can use white compund chocolate too.Even though the preparation is easy,there are few points you should keep in mind.So refer “Notes” section for tips before you start.For variations,you can make homemade chocolate covered banana and other fruits like blueberries,prune,chocolate covered almond and even chocolate covered oreos.I decorated them with sprinklers,rice crisps.Run your imagination and play with it.Lets see how to make chocolate covered strawberries at home easilyHappy.


Chocolate covered strawberries

Chocolate Covered Strawberries Recipe


Chocolate Covered Strawberries RecipeHow to make Chocolate Covered Strawberries at home using microwave 
Cuisine:Indian
Category:Sweet
Serves:-
Prep time:10 Minutes
Cook time:5 Minutes
Total time:15 Minutes
INGREDIENTS

  • Compund Chocolate - 100 gms ( I used Vanleer brand,sweetened)
  • Fresh Strawberries - 10 nos
  • Sprinklers,rice crisps - for decoration
**Please refer”Notes”section before you start..
METHOD

  • Wash & pat dry the strawberries completely.Make sure strawberries are completely dry because chocolate will not be coated over wet strawberries.
  • Break the compund chocolate into small pieces. Take them in a clean,dry,microwave safe bowl ( make sure there is not even a single droplet of water). Heat in medium power ( I kept 450W) for 30 seconds.Remove the bowl and stir it with a clean,dry spoon.
chocolate covered strawberries
  • Again microwave in medium power for 1 minute.Remove and stir well. Repeat this process until the chocolate is melted.No issues if there are minute pieces of chocolate.It will melt in the residual heat.Remove the bowl and keep mixing to melt completely.It took approximately 2.5 minutes to melt in my microwave.But this time may vary.So keep an eye.Over doing may stiffen the chocolate.Take care !!
chocolate covered strawberries
  • Now take the dry strawberries and insert a toothpick in the head part.Hold the toothpick and dip 3/4th or whole strawberry ( as per your wish) in the melted chocolate.Swipe it in the rim of bowl or pat it to remove the excess chocolate.Arrange the strawberries on a plate.Do this process quickly before the chocolate hardens.
chocolate covered strawberries
  • Suppose if the chocolate is hardened before you finish the work,microwave them in medium power for 30 seconds to melt them.If you are not able to bring the correct consistency for chocolate,add 1 tbsp of odourless cooking oil  for 100gms of chocolate and then melt in microwave.Chocolate will melt properly.Serve after few minutes once the chocolate sets.Enjoy !
Other methods of melting chocolate
  • Direct heat: This method is easy and convenient. Place the chocolate in a heavy saucepan over very low heat, stirring constantly till the chocolate begins to melt. Immediately remove the pan from the heat and stir the chocolate until it is smooth.Be careful while using this method because there are many chances for the chocolate to scorch.To avoid this,do the process in very low flame with constant stirring.
  • Double boiler: This method takes a little longer than the direct-heat method but eliminates the possibility of scorching the chocolate. Place water in the bottom of the bowl  and chocolate pieces in another bowl that fits the water bowl.The top of the water should be 1/2 inch below the upper pan. Then place the double boiler over low heat. Stir the chocolate constantly until it is melted. The water in the bottom of the double boiler should not come to boiling while the chocolate is melting.Stir chocolate occasionally as it softens. When you have just a few small unmelted chunks, remove bowl from heat (residual heat will melt the rest).


Note
Points you should keep in mind
1. There should be no water in strawberries or chocolate.So pat the strawberries and dry them completely before you dip them in the chocolate.
  • Make sure all equipment is completely dry. Any moisture on the utensils or in the container may cause the chocolate to seize/stiffen. If this happens, stir in 1/2 to 1 teaspoon shorteningor odourless cooking oil (not butter) for every 30 gms of chocolate.
  • Be careful to keep water from splashing into the chocolate. A single drop will cause the chocolate to seize.
  • Keep heat low to avoid scorching if using double boiler method.
  • Always stir chocolate during melting.
2.Melt the chocolate very carefully.Be patient and stir the chocolate every 30 seconds for best results.
  • If the chocolate becomes rock hard before completing the dipping process,add a tbsp of cooking oil  for 100gms of chocolate and melt to bring it to the right consistency.
Enjoy this easy,yummy deseert for your special day ! Have a fun filled celebration !!

Bengali Lunch Menu Recipe – Vegetarian Thali List

$
0
0
Bengali Lunch menu List
Its been a year since i shared a North Indian lunch menu here. After i had tried & posted my Punjabi& Gujarati Lunch Thali,i was looking forward to try Rajasthani and Bengali Lunch platters.Based on the suggestions i received from Facebook’s Chef at large group( the group which i admire the most)foodies,i tried this menu list for a Sunday lunch.Thanks everyone for flooding your ideasHappy.Being a vegetarian,i tried some good, authentic recipes to make an yummy lunch menu.I prepared Bengali Chaler payesh, Mishti Doi, Mishti pulao, Begun bhaja, Kalai er dal, aloo posto, Doodh Shukto, Bengali tomato Khejur chutney and pickle.I have shared the links for all these recipe below. I am yet to post Doodh shukto and tomato chutney recipes.But i have given the link for the source of these recipes.I thoroughly enjoyed cooking and tasting all these dishes.When i cooked all these recipes,i found Bengali Gobhido bhog rice, Panch phoron – 5 spice mix plays a major role in their cooking.Cooking procedures were very simple yet delicious.It took nearly 1.5 hours to make this entire plattter.Sendhil & Myself enjoyed this thali very much. I loved chaler Payesh ,Begun bhaja the most whereas Sendhil’s choice was Chanar dalna and tomato chutney Winking.Over all i am very happy that i tried & tasted this authentic Bengali Vegetarian Lunch Menu.Lets check out the menu list with some pictures below.

Check my other lunch thali from other cuisines HERE

Authentic bengali lunch menu

Recipe Links

Authentic bengali  vegetarian lunch menu

Check my lunch thali from other cuisines HERE

Fresh Fruit Cream Recipe – Dessert Ideas For Party

$
0
0
Fruit cream recipe
Last Saturday I watched Chef Venkatesh Bhat’s sweet special episode in Samayal Samyal Programme,Vijay TV. Among the recipes he showed, this fresh fruit cream dessert attracted me very much.The recipe was so easy & simple. It looked so rich,creamy,colorful and appealing to eyes.I thought it would be the best recipe for Valentine’s day celebration and tried it for our Sunday lunch along with  Veg biryani.When i browsed for more details,I found most of the recipes call for Whipping cream and condensed milk. But whipping cream is not widely available in India.So i tried it with Amul fresh cream instead of whipped cream.Its result din’t disappoint me.It came out really fantastic & lip smackingPartyPeace Sign. We loved it very much.Usually I make fruit custardfor my guests and birthday parties. After tasting this fruit cream dessert,i felt this would be even more special to try for guests and party celebrations.Friends,if you are looking for an yummy dessert recipe to impress your husband on this Valentine’s day,Do try itLove StruckI am sure your will be showered with praisesHappy.But one thing i should warn you here,this is a high calories dessert.So work out more :) Ok,Lets see how to make fruit cream at home with simple steps.
Fresh Fruit cream recipe

Fruit cream recipe


Fruit cream recipeFruit cream recipe using Amul fresh cream,fruits and nuts
Cuisine:Indian
Category:Dessert
Serves:Serves 2-3
Prep time:10 Minutes
Cook time:20 Minutes
Total time:30 Minutes
INGREDIENTS

  • Amul fresh cream - 200 ml  ( U can use whipping cream too)
  • Fruits - 1/2 cup ( I used 1/2 apple, 4 strawberries, some tutti frutti)
  • Nuts - 2 tbsp of chopped cashewnuts
  • Vanilla essence - 1 tsp
  • Powdered sugar or icing sugar – 1/3 cup ( add 1/4 cup and increase based on ur taste)
METHOD

  • Take the Amul fresh cream from the refrigerator.DO NOT SHAKE IT. Take the thick cream in a wide bowl leaving the water content.Make sure there is no water in the cream because thin cream may take more time to become thick and stiff.
fruit cream recipe
  • Now take an electric beater and beat the thick cream in low speed for 1 minute.Now increase the speed and beat it until the cream becomes stiff and forms a soft peak.( Electric beater can do a better job than hand whisk.You can try in mixie but i am not sure how it turns out)
fruit cream recipe
  • Add 1/4 cup of powdered sugar or icing sugar,vanilla essence. Beat it again till sugar mixes well with the cream.Check for sweetness and add more sugar if needed.
fruit cream recipe
  • Keep the beaten cream in the freezer for 10 minutes. In the mean time,chop the fruits and nuts. Add it to the frozen cream and mix well.Serve immediately ! Enjoy ! This recipe stays good for 2 days when refrigerated.So you can make it for parties well in advance .
fruit cream recipe
fruit cream recipe


Note
  • You can use fruits like Pomegranate, chopped Kiwi and even banana if you like.
  • You can also add saffron threads.
  • Use whipping cream instead of fresh cream if you have in hand.
  • This recipe stays good for 2 days when refrigerated.So you can make it for parties well in advance .

Try this easy,quick and rich dessert recipe for parties and other special occasions.Enjoy !!
Fruit cream dessert recipe

Homemade Stovetop Pizza – No Oven Veg Pizza

$
0
0
stovetop pizza
Making homemade pizza must be the dream for many.Me too not an exceptionBatting Eyelashes.Whenever I order Pizza online from Dominos or Pizza Hut,i used to think “When I am i going to make it on my own???Day dreaming” Of course,I have tried pizza using readymade pizzabase and shared a post in my blog years ago.But i was waiting to make a perfect pizza from scratch following a simple recipe.Recently my friend Shalini shared me an easy,no knead,no wait, stovetop pizza recipe(Also known as Tawa pizza/skillet pizza)video in youtube.I was super excited to see the ease and quickness of this recipe and tried it on the same day.I used a simple topping with onions,tomato,olives and capsicum.It was excellent in taste and got a big thumbs up from my family members!! Raksha loved it very much and asked me to make it the next day too.I tried a no yeast stovetop pizza as well.I will try to share that recipe by next week.As Valentine’s day is nearing,i thought this post would be useful for people to cook pizza without oven and treat your familyHappy.You can make the pizza base/crust thick or thin as per your wish.This recipe uses Self rising flour.As a susbtitute you can use maida + baking powder + salt.Check its quantity in ingredients section.I am sure this recipe would surely help you in making a great Veg pizza at home and that too within 20 minutes.You can enjoy it for breakfast,dinner or as an evening snack.Just give a try and share your feedback here,I am waitingggg Winking .Ok, lets check how to make this super easy,quick Tawa Veg pizza on stovetop with step by step pictures.
stovetop pizza
Before going in detail i would like to share some Pros and Cons of this recipe
Pros
  • Making this pizza is super quick.There is no need of fermentation time for the pizza dough to double. You don’t have to knead or punch the dough as well.You can mix everything instantly and start baking.
  • Proofing of yeast is also not needed if your dry yeast is very small in size like rava/semolina.As mine were bigger like mustard seeds,i proofed it for 5-10 minutes.
  • Its a stove top recipe.So no microwave or convection oven is needed.
  • The softness of this pizza is no less than oven baked pizza when eaten hot.So you can enjoy it without any compromise.
Cons
  • I felt the quantity of yeast is slightly higher but don’t worry.There won’t be any smell at all.
  • A good conditioned Non-stick Pan is a must for this recipe.You can’t bake in Aluminium or steel pans.
  • As a general rule of Pizza, it should be eaten hot hot,directly from the tawa.When it turns warm,it becomes chewy.Reheating in microwave is not advisable.You can try for a minute in tawa in very low flame if you wish.But try to eat them hot to enjoy its best taste.
  • If you want to make the dough in advance,you can do it.But refrigerate the dough by wrapping in a foil till use because the bottom of pizza will turn out yellowish due to yeast.
how to make pizza without oven

Homemade Veg Pizza Recipe - Stovetop Version


Homemade Veg Pizza Recipe - Stovetop VersionHow to make Veg Pizza recipe from scratch at home without Oven - Tawa pizza/Skillet pizza/Stovetop pizza recipe
Cuisine:International
Category:Breakfast/Dinner
Serves:Serves 1-2
Prep time:10 Minutes
Cook time:15 Minutes
Total time:25 Minutes


INGREDIENTS
1 cup = 250ml
  • Self Rising flour - 1/2 cup ( I used Blue bird brand) ( Use 1/2 cup maida+ 3/4 tsp baking powder + 1/8 tsp salt as substitute)
  • All Purpose flour/Maida - 1/2 cup
  • Warm water - 1/2 cup ( add more only if needed)
  • Dried Yeast - 1 tsp ( I used Eagle brand)
  • Honey - 1 tsp
  • Salt - a small pinch
  • Cooking oil or olive oil – 2 tsp ( to grease the dough)
  • Pizza sauce or tomato ketchup - as needed
For toppings
  • Big onion - 1 no
  • Deseeded tomato - 1 no
  • Chopped Olives - few
  • Capsicum - a small piece
  • Mozarella Cheese - as needed ( I used Amul)
METHOD

  • Heat 1/2 cup of water till lukewarm.Take a bowl and add the luke warm water.To this,add 1 tsp of dry yeast and 1 tsp of honey.Mix well and cover the bowl with a lid.Let it rest for 5 minutes.Yeast will dissolve in water and it will become foamy.
  • In the mean time,take the self rising flour,maida and a pinch of salt in a non-stick tawa on which you are going to bake the pizza. Mix well and and make a dent in the center.
how to make pizza without oven
  • Now add the yeast water little by little and make a non-sticky pizza dough. There may be some yeast water leftover.Don’t worry.Just add the required water only.Apply oil all over the dough and spread it on the tawa.Remember this pizza will rise and becomes thick and spongy after cooking.So if you want to make thin crust pizza,divide the dough into two portions and spread it.
how to make pizza without oven
  • Prick some holes using a fork and apply the tomato sauce or pizza sauce.Grate some cheese and sprinkle over the sauce layer.Arrange the toppings as you wish and cover it with grated cheese.Add more or less cheese as per your wish.Mozarella works the best.You can try cheddar cheese too but you won’t get the strings as you see in the picture.
how to make pizza without oven
  • Now keep the tawa over the stove in very very low flame.It is better to use a small burner stove.Close the tawa tightly with a lid. Cook the pizza for 5 minutes.Now open the lid slightly ( a small gap is enough) and make some air let in.Let the pizza cook in this state for another 10 minutes.
how to make pizza without oven
  • Stay nearby and check for the smell.If you get any burning smell, switch off the flame immediately.The cooking time of this pizza depends on the thickness of tawa you use,the thickness of pizza base and the size of burner.So stay nearby till pizza gets cooked well.Once the cheese is completely melted,remove the pizza onto a plate and cut it with a pizza cutter.Serve hot with Ketchup or sprinkle pizza seasoning for extra punch !Enjoy !!
     how to make pizza without oven


Note
  • To substitute self rising flour,use 1/2 cup all purpose flour,add 3/4 tsp of baking powder and 1/8 tsp of salt.But its better to use store bought self rising flour as its perfectly milled.So there may be slight difference in the softness.
  • Cook this pizza in very low flame to avoid burnt bottom. Stay nearby and watch the clock.Its afterall 15 minutes. Once you are used to this recipe,u can cook this pizza like a breeze : )).
  • For spicy pizza,use zucchini,Oregano mix. For Indian style masala pizza,sprinkle some tandoori masala powder on top of pizza before cooking.You can also add marinated paneer pieces like Paneer Tikka.
Try this easy,stovetop pizza on this special occasion and enjoy with your family !!
Homemade Veg pizza recipe - stovetop

Cold Coffee Recipe – How To Make Cold Coffee Without Icecream

$
0
0
Cold coffee
Basically i love to experiment different types of coffee at home.Long back i had tried and shared homemade Espresso coffee without machine.After that i tried to make Cappuccino at home but it was not upto the mark. My recent crush is to try Cold Coffee at home. I have not tasted cold coffee in Cafe Coffee Day(CCD).But i have heard a lot from my friends.So I got tempted to give a try on my own & thought Valentine’s day would be a good choice because Sendhil likes to have cold coffee more than our South Indian filter coffee. This morning i made it for the first time following this recipe. I have never thought its so easy to make at home. Its just a mix and blend of instant coffee powder,cocoa powder,milk and ice cubes. With a mild bitterness, it was awesome.Being a coffee lover,i enjoyed every sip thoroughlySilly. I tried to decorate the glass with hershey choco syrup.But it wasn't perfect :( Cold coffee can be made with & without ice cream.Today i made it without icecream and used Bru instant coffee powder.But I read using Nescafe and ice cream makes it tastier,creamy and rich like Cafe Coffee Day.So try to use them if you have in hand.Soon i must try Frappe,mocha and other variants of coffeeWinking.Ok,now lets see how to make cold coffee recipe at home.Try it for your loved ones on this Valentine’s day. Enjoy one coffee with two straw Love Struck.
how to make cold coffee at home

Cold coffee recipe without ice cream


Cold coffee recipe without ice creamHow to make cold coffee without ice cream at home
Cuisine:Indian
Category:Beverages
Serves:Serves 2
Prep time:5 Minutes
Cook time:5 Minutes
Total time:10 Minutes


INGREDIENTS
1 cup = 200ml
  • Instant coffee powder - 2 tbsp ( I used Bru,Nescafe would be better)
  • Unsweetened cocoa powder - 1/2 tbsp
  • Water – 3 tbsp
  • Sugar - 3-4 tbsp
  • Boiled milk - 2 cups ( use full fat milk for best taste)
  • Ice cream - 1 scoop ( optional, Vanilla or chocolate)
  • Ice cubes - few ( I used 3 nos)
METHOD

  • Heat 3 tbsp of water in a pan and mix coffee powder,cocoa powder along with sugar.Boil the mixture in slow flame till sugar dissolves completely.Keep stirring.Mixture will becomes a thick solution. Switch off the flame and let it cool.
cold coffee recipe
  • Take a big mixie jar and add 2 cups of milk ( Preferrably boiled milk at room temperature or chilled), 3 tbsp of coffee solution,ice cubes and blend well for few seconds till the coffee becomes frothy.( Store the remaining coffee solution in a refrigerator and use it the next day itself) Check for taste and add more coffee solution,sugar as per your taste.
cold coffee recipe
  • Transfer it to a glass along with froth and serve it with a scoop of icecream on top.If you are not using ice cream,just decorate it with a sprinkle of coffee powder or cocoa powder.You can also add colorful sprinklers or even choco chips.
cold coffee recipe
Enjoy !

Note
  • Adjust the quantity of sugar as per your taste.
  • Add more cocoa powder if you like chocolate flavor in your coffee.
  • Full fat milk gives more creamy,frothy coffee.But i used low fat milk here.
  • Store the remaining coffee solution in refrigerator and use it the next day.Do not keep it for long.
Enjoy this cold coffee with your loved ones and have a lovely day !
Cold coffee recipe
Viewing all 968 articles
Browse latest View live