Quantcast
Channel: Chitra's Food Book
Viewing all 968 articles
Browse latest View live

Hitikida Avarekalu Saaru Recipe/Lilva beans Gravy-Side dish for Ragi Mudde

$
0
0
 Avarekalu-gravy
I was waiting for Avarekalu season to start just to post this gravy recipe in my blog.Now the season is started & u can see avarekalu( Flat beans/Hyacinth beans/Indian lilva beans in English,Mochakottai in Tamil,Surti papdi in Hindi) everywhere in Bangalore.My apartment residents buy in kgs almost everyday and add them in almost all the dishes like uppittu/upma,Pulao,saagu/Kurma and even in sambar.Thanks a ton to my friend Megha for teaching me this wonderful Karnataka style avarekalu saaru recipe.Myself & Sendhil started liking Ragi Mudde only after having it with this gravy as side dish.Last year,same time,i went to Megha’s house to learn “How to make Ragi Mudde”.At that time,she gave me this gravy to taste with mudde.I loved it very much and noted down the recipe.She immediately packed some & told me to give Sendhil too.He liked it a lot and he also appreciated me that i have learnt 2 healthy & yummy Karnataka dishes from my friend.I started making this gravy with mudde regularly in weekends.I am yet to perfect ragi mudde recipe.I will try to post with a video soon after i get it right.This particular gravy tastes more like kurma/Saagu and this has no tamarind/Huli.Coconut masala & tomato makes the base for this gravy.It can be done very easily in one pot and its one of the best side dish for Ragi mudde.Scroll below to see how to make this yummy hitikida avarekalu saaru recipe ! Sorry, I have not given stepwise pictures as i lost them in a folder.I will update this post soon.

Avarekalu

Avarekalu saaru

Hitikida avarekalu saaru recipe


Hitikida avarekalu saaru recipeHitikida avarekalu saaru recipe for rice !
Cuisine:Indian
Category:Gravies
Serves:Serves 2
Prep time:10 Minutes
Cook time:15 Minutes
Total time:25 Minutes


INGREDIENTS

  • Avarekalu/Flat beans - 1 cup
  • Tomato - 1 no
  • Big onion - 1 no
  • Curry leaves - few
  • Salt & water - as needed
To grind: Paste - 1
  • Cooking oil - 1 tbsp
  • Big onion -1 no ( chopped)
  • Ginger - 1 inch piece
  • Garlic cloves - 6 nos
  • Red chilli powder - 1 tsp
  • Dhania powder - 1.25 tsp
  • Turmeric powder - 1/4 tsp
  • Coriander leaves - fistful ( less is enough)
To grind: Paste - 2
  • Grated coconut - 2 tbsp
  • Khus khus/poppy seeds - 1 tsp
  • Cinnamon - 1 no
  • Clove - 1 no
  • Water - as needed
To temper
  • Cooking oil - 1 tsp
  • Mustard seeds - 1/2 tsp
METHOD

  • Remove the seeds ( avarekalu ) and soak it in water over night or for 4 hours.Peel the skin by pressing it between ur thumb finger & fore finger.It will come off easily.After removing the skin,wash the seeds & set aside.This is called as Hitikida bele.

  • Heat a tbsp of oil in a kadai & saute all the ingredients given under”To grind: Paste-1” and grind them to a smooth paste adding enough water.Remove in a bowl.Grind the ingredients given under “To grind: Paste – 2” to a paste and set aside.

  • Heat oil in the kadai and splutter mustard seeds. Now add chopped onions & tomatoes.Saute till tomato turns mushy.Now add the paste – 1 & saute till its raw smell leaves it.Then add the hitikida avarekalu ( peeled seeds) and mix well.Now add the second paste.Mix for a minute & add a cup of water.Cover & pressure cook it in low flame for one whistle.

  • Open the cooker after the steam is released completely.Mix well & allow it to boil for sometime if u feel there is excess water.Else remove in a bowl & garnish with coriander leaves.Serve with ragi mudde.


Enjoy !


Note

  • Adjust the quantity of red chilli powder as per ur spice level.
  • You can use coriander leaves for garnish.But use less for grinding.Adding more may change the flavor.

Enjoy this hitikida bele saaru with ragi mudde.Tastes yum !!
side dish for ragi mudde


Veg Fried Rice Recipe In Rice Cooker(Indian)-Sunday Lunch Recipes-3

$
0
0

I am glad i have successfully reached the 3rd post in my Sunday lunch Recipes SeriesHappy.I have been sharing biryani,pulao& other rice varieties that i make in weekends.This week,i have blogged my vegetable fried rice recipe in Indian style using electric rice cooker.I know most of u make veg biryani & veg pulao in rice cooker.But making a fried rice in rice cooker may be new to some of u.Not just this,the method i have shared here may also be new & it is somehow different from our usual fried rice recipe.A very big thanks to my dear friend Shalini for teaching me this easy,hassle free,wonderful ,Indian style fried rice recipe.Whenever i go out for shopping in weekends with my family,i make this rice recipe along with curd rice.It stays warm & as soon as we reach home,i just saute the required amount in ghee & serve it hot hot.As we love to have fried rice with tomato sauce as side dish,i don’t make any specifically.But my friend suggested peas butter masala& paneer butter masalaas the best side dish for fried rice.So make it as per your choice.Ok,Lets see how to make fried rice recipe in electric rice cooker.
Check out my tomato rice recipe using rice cooker& Chinese veg fried rice recipe


Veg fried rice recipe in rice cooker


Veg fried rice recipe in rice cookerIndian style Vegetable fried rice recipe using Rice cooker
Cuisine:Indian
Category:Lunch
Serves:Serves 3
Prep time:60 Minutes
Cook time:20 Minutes
Total time:80 Minutes


INGREDIENTS
To cook in rice cooker
  • Basmati rice - 1 cup
  • Water - 2.25 cups
  • Lemon juice - 1/4 tsp
  • Oil - 1 tsp
  • Finely chopped vegetables - 1/2 cup ( 1 carrot,5 beans,1 potato,green peas)
  • Salt - as needed
To saute in oil
  • Cooking oil - 2 tbsp
  • Shredded cabbage - 1/4 cup
  • Capsicum - a small piece
  • Spring onion - 2 sprigs
  • Big onion - 1 no (optional)
  • Garlic cloves - 5 nos ( optional) 
  • White pepper powder - 1tsp ( add more for spicy taste)

  • Ghee - 1 tsp ( for one person)
  • spring onions – to garnish
METHOD

  • Wash the rice twice & drain the water.Soak it adding 2.25 cups of water,lemon juice & oil for 1 hour.Rice will be soaked well.In the mean time,finely chop the vegetables,onion,capsicum & spring onion.Keep it ready.

  • Switch on the rice cooker,keep in cooking mode & allow it to heat for sometime. As soon as the plate is heated,add the soaked rice along with water,finely chopped carrot,beans & potato.Add the required salt,mix well & cover the rice cooker.Let the rice cook well.Open it once in the middle & fluff it with a fork.Once its cooked,rice cooker will switch to Keep Warm mode automatically.
Veg fried rice-1

  • Finely chop the cabbage,onions,garlic cloves,bottom part of spring onion & capsicum. Heat oil in a kadai & saute them well adding little salt( remember we have added salt in rice) Add this to the cooked rice.Add pepper powder & keep it closed till use.Now the rice cooker will be in”Keep warm” mode.
Veg fried rice-2
Veg fried rice-3
  • Just before serving,heat ghee in a kadai and add the required amount of fried rice.Saute well in high flame for a minute,Keep tossing & serve hot immediately.Enjoy with any side dish or tomato sauce.
Veg fried rice-4


Note

  • I have not used soya sauce here.You can use it if  u need.
  • Adding onions & garlic is purely optional.My friend doesn’t add it.
  • Adding lemon juice in rice helps to give u white colored rice after cooking.But do not add more.
  • I don’t add ajinomotto as it is not good for health.


Try this easy veg fried rice recipe using rice cooker & enjoy ur weekend lunchHappy


Kulcha Recipe|Plain Kulcha Recipe

$
0
0
Plain kulcha recipe

I have tried Kulcha only once when i prepared Punjabi lunch menu and that too it was stuffed Amritsari aloo kulcha,not the plain one.I have forgotten the taste of all the other recipes i tried for that Punjabi platter but i still remember the softness of the kulcha i made.At that time,i had followed the recipe from “The Hindu-Food Safari” Section which was an excellent,fool proof,easy kulcha recipe without yeast.So i made this plain kulcha following the same recipe for our Sunday breakfast.Kulchas are meant to be thick & round but i made it thin as per my family’s likings & i am bad in making shapesTongue.It came out really awesome.I couldn’t believe when Raksha had 3 kulchas and asked for moreSurprise.Not just Raksha,even Sendhil & myself loved its softness very much, though we felt bad about the maida used in itWorried .Sendhil was asking me the difference between Naan & kulcha.So i browsed & found some points which i have shared them below.He told me to try the same recipe with wheat flour too.I must give it a try.I made Restaurant style dal fry as side dish for Kulcha.It was a lovely combo.Friends,try this plain kulcha recipe without yeast.I am sure u won’t regret itHappy .Just grease the kulchas with butter or ghee & relish it with the most popular side dish Punjabi Chole.It will taste heaven i say !
Here is difference between kulcha & naan for your reference

Naan Vs Kulcha
  1. Naan and Kulcha are flatbreads that have Indian origin. While Naan is the more celebrated type of bread, Kulcha is a typical Punjabi bread that has old Punjabi traditions.
  2. Naan is made in oven or earthen ware made of clay using charcoal to provide heat to cook the bread whereas Kulcha can be made on stove top too.
  3. Naan is made with yeast and sometimes with milk and yogurt to make it soft and also to give it a bounce. But Kulchas are made using baking powder,baking soda,milk & yogurt to give softness.
  4. Although Kulcha is similar to naan in looks and flavor, it is typically thicker and fluffier than naan.
  5. Naans are usually oblong in shape while Kulchas are round.
Source : http://www.differencebetween.com/difference-between-naan-and-vs-kulcha/
Ok,Lets see how to make this soft kulcha recipe with stepwise pictures.


Kulcha Recipe


Kulcha RecipePlain kulcha recipe without yeast
Cuisine:Indian
Category:North Indian Main
Yields: 12-15 nos
Prep time:60 Minutes
Cook time:2 Minutes
Total time:62 Minutes


INGREDIENTS
For the dough
  • Maida/All purpose flour - 2 cups
  • Baking powder - 1 tsp
  • Cooking soda - 1/2 tsp
  • Salt - 1 tsp
  • Sugar - 1 tsp
  • Cooking oil - 3 tbsp
  • Curd - 1/4 cup ( I used curd in semi solid consistency)
  • Warm milk - 1/4 cup
  • Warm water - 1/4 cup

  • Butter or oil - to grease the kulchas
  • Kalonji seeds or Black sesame seeds - to sprinkle
  • Coriander leaves - few
METHOD
  • In a wide bowl,sieve the maida,baking powder,cooking soda & salt.Make a well in the center & add the oil,sugar and curd.Mix well to make a crumbly mixture.
Kulcha recipe-1
  • Now add the warm milk and mix well.Lastly add the warm water little by little & make a soft,non-sticky dough.Knead it for 2 minutes and set aside.Making a non-sticky dough step is very important to get a super soft kulcha.Cover the dough with a damp cloth and let it rest for minimum of one hour( I rest it for only one hour and not more than that)
kulcha recipe-2

  • After an hour,take the dough and make golf sized balls.Cover all the balls till use.Take one ball and dust it with maida only once.
Kulcha recipe-3
Kulcha recipe-4
  • Roll it to a thick,round shaped kulcha and sprinkle some kalonji seeds & chopped coriander leaves on one side of kulcha.Just press it well with ur hands or using the rolling pin roll it over the kulcha.They will be studded well.
kulcha recipe-5
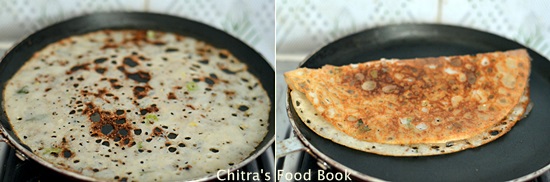
  • Now heat a weightless non-stick dosa pan.Take a kulcha and apply water on one side.Drop the kulcha onto the pan such that the water applied side should face down and kalonji side should be up.Refer picture below.
Kulcha recipe-6
  • As soon as u put the kulcha, u can see some bubbles appearing all over the kulcha.Immediately flip the pan & show it over the burner.The flame should be high.Dark spots will appear over kulcha.Remove it in few seconds.(As we have applied water,kulcha will stick to the pan and it won’t fall off easily while u flip the dosa pan.Suppose if the kulcha falls down,use a tong and cook it for few seconds over the flame & remove) If u don’t want to flip the dosa pan,u can just remove the kulcha & cook it over direct high flame for few seconds and remove.
Kulcha recipe-7
  • Grease it with butter or ghee & serve it hot with Punjabi chole,any paneer gravy or dal !
Kulcha recipe-8

Enjoy !


Note

  • Addition of warm milk & warm water is important for making soft kulcha.You can use milk alone instead of adding water.
  • The dough should be non-sticky & soft.So please add milk & water very carefully.
  • Resting the dough for minimum one hour is very important because the baking powder,soda & yogurt reacts well & makes the kulcha soft.
  • If u are concerned about maida,replace it with wheat flour & give a try.I hope it will come out well.


Try this easy,super soft kulcha at home.I served it with dal fry,pickle & curd.It was awesome !
Kulcha recipe

I love with pickle more than other sides Winking
Kulcha

Potato Curry Recipe/Urulaikilangu Poriyal

$
0
0
Potato curry

This is my favourite potato curry recipe next to my mom’s easy version.Its a pure South Indian style potato poriyal recipe for rice.I learnt this from my MIL.I usually make this poriyal & Aviyalfor my guest.All my guest like this curry very much & ask the recipe from me.This is my daughter’s favourite too.Its a best side dish for Sambar,rasam& More kuzhambu.Try it and let me know how u liked itHappy.I make it less spicy for my family.Please adjust the quantity of sambar powder as per your spice buds.Soon i will share an easy potato curry recipe for bachelors.
Check out my brahmin’s style easy potato curry recipe too !


Potato poriyal recipe

Potato curry recipe


Potato curry recipePotato curry recipe/Urulaikizhangu poriyal - One of the best side dishes for Sambar & Rasam
Cuisine:Indian
Category:Side dish
Serves:Serves 3
Prep time:15 Minutes
Cook time:10 Minutes
Total time:25 Minutes


INGREDIENTS

  • Medium sized Potatoes - 3 nos
  • Salt & water - as needed
To grind
  • Grated coconut - 2 tbsp
  • Sambar powder - 1 tsp ( I use 1/2 tsp)
  • Big onion - 1 no ( medium size)
  • Turmeric powder - 1/8 tsp
  • Cumin seeds/Jeera - 1/2 tsp
To temper
  • Cooking oil - 1 tbsp + 1/2 tbsp
  • Mustard seeds - 1/2 tsp
  • Urad dal - 1/2 tsp
  • Cumin seeds/Jeera - 1/4 tsp
  • Curry leaves - few
  • Lemon juice - Few drops (optional)
METHOD

  • Wash and pressure cook the potatoes.Peel the skin and cut them into bite sized cubes.Set aside.Chop the onions into chunks for grinding.Chop another big onion finely for sautéing.
  • In a mixer,take the grated coconut,chopped big onion & jeera,sambar powder & turmeric powder.Pulse it once or twice.Onions should be coarsely ground.
potato poriyal step

  • Now take the potato cubes and mix it with the ground paste. Add the required salt & check for taste.Adjust the sambar powder & salt.
  • Heat a kadai with oil and temper mustard seeds,cumin seeds & urad dal.Add curry leaves & hing.After the dal turns golden brown,saute the onions till transparent.
potato poriyal step-1
  • Then add the masala coated potato cubes.Saute in low to medium flame till u get nice aroma from it and potato gets roasted nicely.Add 1/2 tbsp of oil the middle while roasting if u feel the mixture is dry.Do not cover n roast it.
potato poriyal step-2
  • Remove the roasted potato & squeeze some lemon juice if needed.Serve with sambar,rasam or more kuzhambu.
potato poriyal step-3

Enjoy !


Note

  • For variations,u can use raw banana or brinjal in place of potato but cook them in prior without losing its shape.
  • U can also 3 cloves of garlic along with onions while grinding.That gives a nice masala smell.
  • You can also garnish with finely chopped coriander leaves & squeeze lemon juice if u wish.


Make this yummy potato curry for rice & enjoy with sambar or rasam.Tastes great!


Gobi Manchurian Recipe-How To Make Crispy Gobi Manchurian

$
0
0
Gobi manchurian

I usually make Gobi Manchurian following my baby corn manchurian recipe.This time,for a change i tried crispy gobi manchurian recipe from Bharatz kitchen after getting tempted by the title.He had mentioned as “Crispiest Gobi Manchurian” with a clear video recipe.Usually in manchurian,gobi turns soggy & soft immediately after mixing with gravy/sauce.But as he mentioned,this one stayed crispy for 30 minutes,ie till my photo session was overWinking.This recipe really works well and tastes similar to the restaurant ones.Some pre preparation work is needed for this recipe but its all worthy.If u don’t want to make gravy ,simply skip the corn flour in sauce part and make it as gobi Manchurian dry version.It tastes even more crispy.Soon i will post that recipe too.As Bharat explained,the secret of making crispy Manchurian lies in 2 things.One,u have to use small sized florets for deep frying.Do not use bigger size florets. This makes a great difference in the texture.The second thing is,you have to deep fry the florets twice.Anything when deep fried twice gives u the best crispiness.My MIL usually tell this to me and i have experimented the same with my masala vada& urad dal vadatoo.Deep frying twice helps to maintain the crispiness for long time.The same formula is applied here.But one thing,i should warn you here.Oil absorption will be slightly more than the usual deep frying as we are doing it twice.So use oil absorbent/Tissue paper & keep changing it whenever needed.Also work out more to burn the additional calories ;).
Friends,try this recipe confidently even if you are a beginner.Try this for your family n kids as an evening snack or as a starter for dinner.I am sure everyone will appreciate you.WhistlingLets see how to make gobi manchurian at home easily !

Gobi manchurian recipe

Gobi manchurian recipe


Gobi manchurian recipeGobi manchurian - An yummy starter recipe !
Cuisine:Indian
Category:Starter
Serves:Serves 2
Prep time:35 Minutes
Cook time:15 Minutes
Total time:50 Minutes


INGREDIENTS

  • Cauliflower florets/Gobi pieces – 25-30 nos ( small sized)
  • Corn flour - 2 tbsp
  • Ginger-garlic paste - 1 tsp
  • Pepper powder - 1 tsp
  • Salt - little
  • Water,turmeric powder & salt - as needed to boil gobi
  • Cooking oil - to deep fry
For the batter
  • Maida/All purpose flour - 1/2 cup
  • Corn flour – 1/4 cup
  • Red food color – a pinch ( optional,i dint use)
  • Salt & water -as needed ( i used 1/2 cup water)
For the sauce/Gravy
  • Cooking oil - 1 tbsp
  • Finely chopped garlic cloves - 5 nos
  • Ginger - 1/2 inch piece ( finely chopped)
  • Big onion - 1 nos (-do-)
  • Spring onion - 2 sprigs (-do-)
  • Capsicum - 1/4 no (-do-)
  • Red chilli powder - 1/2 tsp ( use 1 tsp to make it very spicy)
  • Pepper powder – 1/2 tsp
  • Sugar – 1/4 tsp
  • Salt - as needed
  • Sauce mix ( Recipe follows)
Sauce mix ingredients
  • Corn flour - 1.5 tsp
  • Water - 1/2 cup
  • Tomato sauce - 1 tbsp
  • Soya sauce - 1 tsp
  • Chilli sauce - 1/2 tsp
METHOD

  • Remove small sized florets from the cauliflower.Suppose,if u have removed them big,just cut them into small sized florets.This is very important to get crispy gobi manchurian.Now boil the gobi in water mixed with turmeric powder & salt for 3 minutes.Remove and drain all the water immediately using a colander.Show it under running water to stop the gobi being cooked.It should stay firm.
Gobi-manchurian-recipe-1
  • Now add pepper powder,corn flour,G&G paste and little salt to the washed cauliflower florets.Mix it well & refrigerate it for 30 minutes.In the mean time,finely chop all the ingredients needed for sauce & keep the sauce mix ready by mixing corn flour & other mentioned ingredients in water & keep it lumps free.
Gobi manchurian recipe-2Gobi manchurian recipe-3
  • Take a wide bowl and add maida,corn flour,salt and mix well.Add water to make a slightly thin batter like dosa batter.Now remove the florets from fridge & mix it with batter.Make sure all the florets are well coated with the batter.

Gobi manchurian recipe-4
  • Heat oil in a kadai and when it gets heated , put the florets one by one and deep fry them in medium flame for 2 minutes till they are 3/4 th cooked.Do not wait for the bubbles to cease or the cauliflower turns golden brown because we are going to deep fry again.So remove the florets when they are still white in color.Drain in a tissue.Again heat the oil for some more time but not smoky and add the florets now.Deep fry them till they turn golden brown & crispy.Bubbles will cease now.Now remove & drain in another tissue.You will find the gobi to be super crispy now.Have a bite n see ,hehe(if u don't want to deep fry twice,just fry it till it becomes golden brown and crispy & proceed)
Gobi-manchurian-recipe-5
Gobi-manchurian-recipe-6
  • In another pan,heat 1 tbsp of oil & saute all the finely chopped veggies.Mix well adding some salt & sugar.Now add the sauce mix,red chilli powder & pepper powder and let it boil till the gravy reduces to half.Lastly add the deep fried gobi pieces,saute quickly and coat it well.Switch off the flame.Garnish with finely chopped spring onions & remove.
Gobi-manchurian-recipe-7
Gobi-manchurian-recipe-8

Serve hot & Enjoy !


Note


  • Deep frying twice is very important to get crispy manchurian.But it absorb more oil .So use tissue/absorbent paper.
  • If u don’t want to feep fry twice,u can just fry it once but u should do it till gobi turns golden brown & bubbles in the oil ceases.
  • If u want to try this as gobi machurian dry version,omit the sauce mix and add a tbsp of tomato sauce,1/2 tsp of soya sauce & 1 tsp of red chilli powder after sauteing the onions & capsicum.Mix well & add the gobi pieces,mix well & serve immediately.Do not use corn flour paste here.


Try this yummy gobi manchurian recipe for your family.Have it along with veg fried rice.Tastes yummmm !!
Gobi manchurian recipe

Chettinad Baby Potato Biryani Recipe-Sunday Lunch Recipes-4

$
0
0

Baby potato biryani
Actually i wanted to try some Chettinad biryani recipe for Sunday's lunch recipes & browsed for Anjappar Hotel style biryani to try with vegetables.But ended up making this chettinad baby potato/Kutti Urulai kilangu(in Tamil) biryani recipe.This is the first time i made a biryani using baby potatoes.I referred Jeyashri’s blog for the recipe but modified it slightly to suit our taste buds.I am very happy & completely satisfied with its flavor & taste.Now i can confidently try this recipe for my guests too.Lets see how to make this yummy potato biryani recipe in my Sunday Special Lunch Recipes Series-4.
Small potato biryani

Baby Potato Biryani Recipe


Baby Potato Biryani RecipeBaby Potato Biryani Recipe - Chettinad style
Cuisine:Indian
Category:Lunch
Serves:Serves 3
Prep time:60 Minutes
Cook time:15 Minutes
Total time:75 Minutes


INGREDIENTS

  • Basmati rice - 1 cup ( I used India Gate)
  • Water - 2 cups
  • Salt - as needed
To grind & Marinate
  • Baby potatoes/small potato - 15 nos
  • Cooking oil - 1 tsp
  • Big onion - 1no
  • Green chillies - 3 nos
  • Mint leaves - 1/4 cup
  • Curd/Yogurt - 1tbsp
  • Cashewnuts - 5 nos
  • Soambu/Fennel seeds - 1/2 tsp
  • Ginger - 1 inch piece
  • Garlic cloves - 5 nos
  • Cloves/Krambu - 2 nos
  • Cardamom - 2 nos
  • Kalpasi/Black stone flower/Kallu hoova - 4 nos( small)
To saute in oil
  • Cooking oil - 2tbsp
  • Ghee - 1 tbsp
  • Biryani leaf - 1 no
  • Cinnamon/Pattai - 1 no
  • Big onion - 1 no
  • Tomato - 1 no ( optional,i dint use)
  • Red chilli powder - 1/4 tsp
  • Coriander powder/Dhania powder - 1/4 tsp
  • Turmeric powder - 1/4 tsp
METHOD

  • Wash the rice well & drain the water.Add 2 cups of water to it & soak the rice for 1 hour.
  • In the mean time,wash & pressure cook the baby potatoes in high flame for 3 whistles.Peel the skin and set aside.

  • Heat a kadai with 1 tsp of oil and saute the big onion slices.Remove & take this in a mixie jar.Add green chillies and other ingredients given under “ To grind & marinate” & grind everything to a smooth paste adding enough water.
Potato biryani-1
  • Take the peeled potatoes & add the ground paste to it.Prick the potatoes with a fork & mix well.Let it marinate for 20 minutes.
Potato biryani-2
  • Heat oil + ghee in a pressure cooker base and saute the biryani leaf & cinnamon.Then add the onion slices.Saute well till it turns transparent.Then add the finely chopped tomatoes if using.Saute well till mushy.Now add the marinated potatoes along with masala.Add chilli powder,dhania pwd & turmeric pwd.Saute well till raw smell goes off.
Potato biryani-3
  • Now add the soaked rice along with water & required salt.Mix well & cover cook in low flame for one whistle.It takes 10-12 minutes.Remove the lid after the steam is released.Fluff it with a fork.
Potato biryani-4

Enjoy !


Note

  • If u don’t have small potatoes in hand,use big potatoes but cook it & chop them into bite sized pieces before marination.
  • You can also add the combination of coriander & mint leaves in equal ratio while grinding.
  • Skip adding kal pasi if u don’t have in hand.But please use it if u have because it gives a great smell to the biryani.
  • You can also sprinkle some lemon juice at the end before closing the cooker.Its optional.


Try this Chettinad baby potato biryani for this weekend ! I served with homemade potato chips.It was yummy to tummy Drooling
Small-potato-biryani

Thinai Payasam Recipe/Foxtail Millet Kheer With Jaggery-Millet Recipes

$
0
0
Thinai arisi payasam

Thinai arisi/Foxtail millet payasam in one of the easiest yet delicious recipe using millets.It tastes very similar to rice payasam/Arisi payasam.But one thing i should tell you is the yield.Just 1/4 cup of thinai/foxtail millet is enough to make payasam for 3 persons.Without knowing this,i made payasam with 1/2 cup of thinai and i got sooooo much i.e. nearly half of my big sized cooker.Now i am blinking how to empty itDoh.So i just halved my quantity and shared the recipe here.This would be sufficient for 2-3 people.Ok,lets see how to prepare thinai arisi payasam recipe.
Check out my other millet recipesinthis page.

Foxtail millet kheer

Thinai arisi payasam/Foxtail millet kheer


Thinai arisi payasam/Foxtail millet kheerThinai arisi payasam/Foxtail millet kheer
Cuisine:Indian
Category:Sweet
Serves:Serves 2-3
Prep time:5 Minutes
Cook time:15 Minutes
Total time:20 Minutes


INGREDIENTS

  • Thinai/Foxtail millet - 1/4 cup
  • Grated jaggery - 1/2 cup
  • Water - 1.5 cups
  • Boiled milk - 1/2 cup
  • Cardamom seeds - 2 nos
  • Cloves - 1 no
  • Mace - a small piece
  • Edible camphor - a small pinch ( optional)
  • Ghee – 1 tbsp + 1 tsp
METHOD

  • In a pressure cooker base,add a tsp of ghee.After its heated,add the thinai arisi and roast it well till u get a nice aroma & as u roast,thinai becomes non-sticky.Add the mentioned water and pressure cook in low flame for one or two whistles.Open the cooker & mash it well.

    Thinai arisi payasam
  • In the mean time,grate the jaggery and add 1/4 cup of water to cover it. Let it melt.Strain the syrup and add it to the cooked & mashed thinai.Allow it to boil.Add some water if needed.
Thinai payasam-1
Thinai payasam-2

  • After the raw smell of jaggery goes off,switch off the flame & add the crushed cardamom powder.Roast clove,cashews & mace.Powder the mace and add everything to the payasam.Mix well.Now add the boiled milk.Finally add a small pinch of edible camphor if needed.Garnish with roasted cashews and serve !
Thinai payasam-3
Enjoy !


Note

  • Generally 3 cups of water is enough to cook 1 cup of thinai.i.e ratio is 1:3.Here i used 1:6 ratio of thinai & water as i wanted the payasam to be thin.
  • This payasam will tend to thicken as time proceeds.So keep some milk reserved.
  • As i mentioned in my write-up,the yield of the payasam will be more.So adjust accordingly.


Make this thinai arisi payasam,offer God & enjoy.It tastes awesome !
Thinai payasam

Vada Pav Recipe-Mumbai Batata Vada With Garlic Chutney Recipe

$
0
0
Vada Pav Recipe
Vada pav needs no introduction.As u all know,its a very famous street food which was born in Mumbai,Maharashtra.Here in Bangalore,i have tasted vada pav only in Goli outlets.Recently i went to Goli with my school moms friends just for a kitty party.There were nearly 7 varieties of vada pav.We ordered one each in all the varieties,we shared & relished it.Everything had its own taste & flavor.I loved masala vada pav more than all.In Goli,they use readymade frozen batata vada & the moment we order,they just deep fry the vadas in oil using an electronic fryer for 6 minutes at 180c and serve us really hot.The one i tasted in Goli tempted me to try at today.As my daughter is a very big fan of pav recipes,she told me to make & keep it ready for her evening snacks after she is back from the schoolHappy. For this recipe,i watched the making of vada pav in you tube videos & browsed through few websites too.Believe me,it came out awesome!I made Batata vada,Sukha(Lehsun)/dry garlic chutney,Green chutney and everything came out really well.I was very happy with the outcome.Now i can make yummy vada pav at home easily for my family & guests as well.But still i wish to taste the original Vada pav from Mumbai fast food corners at least once in my life timeDrooling.


Vada Pav Recipe

Vada Pav Recipe


Vada Pav RecipeVada pav recipe-Batata vada with dry garlic chutney & Green chutney
Cuisine:Indian
Category:Snacks
Serves:Serves 4
Prep time:20 Minutes
Cook time:15 Minutes
Total time:35 Minutes


INGREDIENTS
For batata vada
  • Boiled Big potato - 2 nos
  • Green chillies - 2 nos ( finely chopped)
  • Cumin seeds - 1/2 tsp
  • Salt - as needed
  • Coriander leaves - few
  • Lemon juice - 1/2 tsp
  • Ginger&Garlic paste - 1 tsp
  • Turmeric powder - 1/4 tsp
  • Hing/Asafetida - 1/8 tsp
  • Cooking oil – 2 tsp
  • Mustard seeds – 1/2 tsp
  • Curry leaves - few
For dry garlic chutney
  • Dry coconut powder - 3 tbsp (Kobbari podi)
  • Red chilli powder - 2 tsp
  • Garlic cloves - 6 nos
  • Salt - as needed
For green chutney
  • Coriander & Mint leaves - 1/2 cup
  • Green chillies - 2 nos
  • Lemon juice - 1/2 tsp
  • Ginger - Small piece
  • Garlic - 2 cloves
For Batata Vada Batter
  • Gram flour/Besan – 1 cup
  • Rice flour – 1 tbsp
  • Cooking soda – a pinch
  • Salt – as needed
  • Red chilli powder – 1 tsp
  • Turmeric powder – 1/8 tsp
  • Water – as needed ( to make bajji batter consistency)
Pav buns – 6 nos
Butter – as needed
METHOD

  • Wash & pressure cook potatoes.Peel the skin and mash it well.Set aside.Now take the mashed potatoes & add finely chopped green chillies,turmeric powder,salt,coriander leaves and G&G paste. Mix well
Vada pav recipe
  • Grind the ingredients given under “ Dry garlic chutney” to a powder adding required salt. Keep it ready in a bowl.Again grind the ingredients for “Green chutney” and keep aside.
Vada pav chutney recipe
  • Now heat oil in a pan and splutter mustard seeds & curry leaves.Add the mashed potato mixture & mix well until everything comes together as a mass.Remove & let it cool.Then make golf sized balls and keep it ready.U can make it flat or round balls.
Vada pav recipe

Vada pav recipe
  • Now prepare the bonda batter by mixing all the ingredients in a bowl.Mix well and dip the potato balls.
Vada pav recipe
  • Heat oil and put a pinch of batter for testing the heating point of oil.If the batter rises up immediately,heat is just right.Simmer the flame & drop the bonda in batches,cook them both the sides.Remove & drain the oil.While u deep fry the bondas,u may get some tail portions,collect them together,crush it using ur hands and mix with dry garlic chutney.They are nothing but besan crumbs.But this step is completely optional.If u don’t want to follow this,just remove them and have it as such.It tastes super crispy.
Vada pav recipe
  • Take the pav buns and slit it like an open book using a knife.
Pav bun
  • Now heat the dosa pan and add 2 tbsp of butter.Sprinkle some dry garlic chutney powder and place the pav buns over the chutney powder.Grease it well in the inner part.
Vada pav recipe
  • Take the roasted buns and sprinkle some more garlic chutney powder if needed.Then apply green chutney on one side of pav and place the batata vada.Cover it and serve immediately with fried green chillies on side.
Vada pav

Enjoy !


Note


  • Add more chillies in potato mixture if u want more spicy vada.
  • Some poeple add roasted & crushed peanuts & sesame seeds to dry garlic chutney.But its completely optional.U can also add a pinch of tamarind piece while grinding.
  • This dry garlic & green chutney stays good for a week if refrigerated in an air tight box.
  • Make sure u use fresh pav buns for best taste.I used nilgiris brand pav buns here.
  • Green chutney is optional here.In Goli,they din’t add green chutney for classic vada pav recipe.So its ur choice.

Mumbai vada pav recipe
Enjoy this mumbai style vada pav recipe with hot masala chai.Tastes heavenly !!
Vada-pav-recipe

Eggless Milk Powder Cake Recipe Using Vermicelli Payasam Mix-Mother’s Recipe Contest

$
0
0

Eggless Milk Powder Cake Recipe

Mother’s Recipe products are well known to you all.They have a wide range of Instant mixes,Pickles,Papads & ready to use paste varieties.But i am a big fan of their pickles & payasam mix.Recently they had announced an “Innovative Recipes”cooking contest for Indian Food Bloggers and sent me a gift hamper containing their assorted products.Please see the picture below for the products i received from them.As soon as i got the products,even before clicking,i opened the pickle & tasted it.So you can find that pack open in the picture Winking.As per the contest rules,i should try n share a recipe that has to be something different and innovative using their products.So i used their Vermicelli payasam mix& made this eggless cake today.As the mix had powdered sugar,Milk powder & cardamom,making this cake was easier to me.It came out very well,soft n spongy too.I have not used egg,condensed milk,butter or even curd.Just milk and oil does the magic here.Its a low cal version too.Now i realized,by just using a payasam mix,we can make super soft cakes too.Thanks to Mother’s Recipe for giving me this opportunity & to make me think innovativelyBatting Eyelashes.Friends, don’t forget to try this cake if u have Mother’s Recipe Semiya Payasam Mix in handHappy.Its a great tea time snack for your kids & you as well !!
Check out these links to get a fair idea about Mother’s Recipes Products if you are new to it !
http://mothersrecipe.com/

https://www.facebook.com/imissmymothersrecipe?fref=ts
Lets see how to make this yummy eggless milk powder cake recipe Happy


Mother's Recipe Products

Eggless Milk Powder Cake Recipe


Eggless Milk Powder Cake RecipeEggless milk powder cake recipe using Mother's Recipe Vermicelli Payasam Mix
Cuisine:Indian
Category:Cakes
Serves:Serves 4
Prep time:10 Minutes
Cook time:25 Minutes
Total time:35 Minutes

INGREDIENTS
1 cup = 200 ml

  • Mother's Recipe Vermicelli Payasam Mix - 1/2 cup
  • All purpose flour/Maida - 1 cup
  • Milk powder -1/4 cup
  • Sugar - 4 tbsp ( Powder it)
  • Baking powder - 1/2 tsp
  • Cooking soda - 1/4 tsp
  • Boiled milk - 1/2 cup + 2 tbsp ( at room temp)
  • Cooking oil - 1/2 cup ( I used refined oil)
  • Vanilla essence - 1 tsp ( add more if u wish)
  • Cashewnuts - 2 tbsp ( for crunchy taste)
METHOD

  • Powder the sugar & keep aside.Take 1/2 cup of vermicelli payasam mix and remove the raisins if u find any.No need to remove cashews.Grind the vermicelli mix to a fine powder & set aside.
Eggless Milk Powder Cake Recipe -1
  • As a general rule in cake making,first take all the dry ingredients( maida,milk powder,powdered mix,powdered sugar,baking powder & soda)in a wide bowl.Sieve them well.
Eggless Milk Powder Cake Recipe
  • To this,add the oil.Mix well and make like crumbs.
Eggless Milk Powder Cake Recipe
  • Now add the milk & vanilla essence and mix them well using a whisk in one direction.Make sure there are no lumps.Do not beat the mixture.Fold it gently.Add the chopped cashew nuts.Check the consistency of batter.If it is very thick,add 2 tbsp milk.The batter should fall like a ribbon.That’s the correct consistency.
Eggless Milk Powder Recipe

  • Now take a baking pan and line it with a butter paper or grease the pan with oil & sprinkle maida all over the pan to coat it. I used a non-stick pan for baking.So i din’t grease it.I used the pan as such.Fill the pan with batter and pat it well to break the air bubbles.
Eggless Milk Powder Cake
  • Preheat the oven in convection mode at 180c and bake the cake at 180c for 25-30 minutes.First keep the time for 20 minutes & brush the top of cake with milk.Again bake it for 3 minutes.Check the cake by inserting a tooth pick.If the tooth pick comes out with uncooked batter,u have to bake for another 2 minutes.Again remove & check with the tooth pick.If the cake is not done,bake for 2 minutes more.Mine took exactly 28 minutes.Once the cake is done,the tooth pick will come out clean little crumbs.Hope u can see the crumb in the picture below.
Eggless Milk Powder Cake
  • Allow the cake to cool down for 20 minutes.Now run a knife all through the sides of cake and invert the pan over a plate.It will come off easily.Cut them into slices & enjoy with your coffee/tea !
Eggless Milk Powder Cake


Note


  • Add more milk(few tbsp) to adjust the consistency of cake batter.But make sure u bake for more time because cake takes more time to bake based on the consistency of batter.
  • You should bake it until the tooth pick comes out clean or with little crumbs.Over baking makes the cake hard & chewy sometimes burnt too.
  • Under baking gives you a sticky tasting cake.So please adjust the baking time as per your oven.


Eggless-Milk-Powder-cake

Enjoy this yummy cake with coffee or tea ! It tastes yum!
Eggless Milk Powder Cake


Paneer Cutlet Recipe-Paneer Snacks Recipes

$
0
0
Paneer Cutlet Recipe
Here is my second entry for Mother’s Recipe Innovative Cooking Challenge Contest.I used their Instant Poha Mix/Aval upma mix for making this cutlet recipe & it turned out awesome.Actually speaking,i wanted to try Paneer cutlet Recipe without Aloo/Potato for a long time.I am so happy i was able to achieve it with the help of this poha mix.Like potato,poha is also one of the best binding agents for cutlet.As i have followed this in my Mc Donald’s burger recipe,i tried this cutlet recipe using Instant Poha mix very confidently.As i expected,the result was great!My daughter & My better half loved it to the core.With crispy exterior & soft interior,it was just perfect.As the poha mix had all the seasoning ingredients,it made my job simple.I just cooked the mix adding spice powders,mashed paneer and made these cutlets quickly & easily.Its an yummy evening snack recipe for kids and that too without potatoes.Thanks to Mother’s Recipe for giving this opportunity to Indian Food Bloggers and make us think different & innovative through this Challenge.Here i have deep fried the cutlets.You can go for shallow frying & make it as a low calorie snack.You can also opt for baking and make it even more healthy with zero oil.I have discussed baking method too.For variations,u can add boiled corn kernels and mixed vegetables too.Ok, lets see how to make this paneer cutlet recipe using Instant Poha Mix.
Check out my first entry for this contest : Eggless Milk Powder Cake recipe using Instant Payasam Mix.
Click on this links to know more about Mother’s Recipe products.
http://mothersrecipe.com/

https://www.facebook.com/imissmymothersrecipe?fref=ts
Paneer Cutlet Recipe

Paneer Cutlet Recipe


Paneer Cutlet RecipePaneer Cutlet Recipe without using Potato
Cuisine:Indian
Category:Snack
Serves:10 nos
Prep time:10 Minutes
Cook time:20 Minutes
Total time:30 Minutes


INGREDIENTS

  • Mother's Recipe Instant Poha Mix - 200 gms( 1 packet)
  • Water - 400 ml
  • Grated paneer– 3/4 cup( around 100gms)
  • Big onion - 1 no
  • Ginger-Garlic Paste-1 tsp
  • Red chilli powder - 1 tsp
  • Dhania powder - 1/2 tsp
  • Garam masala powder -1/2 tsp
  • Aamchoor powder –1/4 tsp
  • Turmeric powder - 1/8 tsp
  • Maida-1 tbsp
  • Salt - as needed
  • Mint & coriander leaves - 2 tbsp ( each,finely chopped)
  • Cooking oil - to fry
To coat the cutlets
  • Corn flour - 1/4 cup
  • Water - as needed to make thick batter
  • Bread crumbs & Powdered corn flakes( only for baking ) - 1 cup or as needed
METHOD

  • Take the paneer & grate it using a fine grater or mash/crumble it well using your hands.Set aside.
  • Heat oil in a kadai and saute the finely chopped onions.Add the g&g pasteand saute till its raw smell leaves completely.
Poha cutlet recipe
  • Now add 2 cups( 400 ml) of water with little salt( the mix had salt in it.So use less) and allow it to boil.When it comes to boil,add the poha mix.Mix well & cover cook it for 8-10 minutes in medium flame.Mix it once in the middle.Poha will be cooked well & becomes mushy.All the water will be absorbed.
Poha cutlet recipe
  • Now add the grated paneer & mix well.Add turmeric powder,red chilli pwd,dhania pwd,garam masala powder & aamchoor powder.Mix well,add maida,mix well.Let the mixture become a whole mass like dough.Switch off the flame.Lastly add the finely chopped coriander and mint leaves.Mix well.Check for salt.Squeeze in little lemon juice and allow the cutlet mixture to cool down.
Paneer cutlet recipe
  • In the mean time,take the corn flour,add water and make a slightly thin like dosa batter.Take the bread crumbs in a plate.( For homemade bread crumbs,just powder the brown part of bread and use as such.I did this way)
Homemade bread crumbs
  • Take a medium orange sized ball from the cutlet mixture and pat it.Dip it in corn flour batter & then in bread crumbs.Do this twice to get a super crispy exterior.
  • Heat oil to deep fry or shallow fry and drop the cutlets.Fry them till golden brown by flipping it whenever needed.Remove & drain it in a tissue.Serve with ketchup/tomato sauce.
  • For baking,make the cutlet mixture as mentioned above.Dip it in corn flour batter,then in powdered corn flakes & finally in bread crumbs.Repeat it twice.Now preheat the oven in 200c and bake the cutlets in 200c,convection mode for 10-15 minutes in one side.Flip it and again bake them for another 10-15 minutes.Remove & serve hot.
    Enjoy !
To use plain poha/Aval, take 1 cup of poha,wash & soak it for 20 minutes till it turns soft.Add cumin seeds while sauting onions & proceed as mentioned above.


Enjoy this yummy paneer cutlets with Tea !
Paneer-cutlet-recipe


Garlic Rasam/Poondu Rasam Recipe-Rasam Varieties

$
0
0
Poondu rasam recipe

I learnt this rasam recipe from my MIL.We usually make this as pepper rasam/Milagu rasam for sore throat & cough problem by adding more pepper.Its a good remedy for cold.I follow the same recipe and make it as garlic rasam by adding more garlic cloves and red chillies instead of pepper.As this recipe is without tomato & dal,it can be done in few minutes.Try this rasam recipe,u will love it.Its my favourite & I can have a plateful of rice mixed with this hot rasam & papad as side.It tastes delish !

Garlic rasam recipe

Garlic rasam/Poondu rasam


Garlic rasam/Poondu rasamGarlic rasam recipe-Poondu rasam for rice !
Cuisine:Indian
Category:Lunch
Serves:Serves 3
Prep time:5 Minutes
Cook time:5 Minutes
Total time:10 Minutes


INGREDIENTS

  • Tamarind - Small gooseberry size
  • Salt & water - as needed
  • Turmeric powder - a pinch
To grind
  • Pepper corns - 1 tsp
  • Red chillies - 2 nos ( use 1 for less spice)
  • Garlic - 8 cloves ( with skin)
To temper
  • Ghee - 2 tsp
  • Mustard seeds - 1/2 tsp
  • Cumin seeds - 1/2 tsp
  • Curry leaves - few
  • Coriander leaves - to garnish
METHOD

  • Soak tamarind in little water for 10 minutes.Take all the ingredients given under “ to grind”.First grind the pepper corns along with red chilli.Lastly add the garlic cloves with skin and grind them coarsely.Remove it.
Poondu rasam recipe
  • In a kadai,heat ghee, splutter mustard seeds & jeera.Add curry leaves.Add one pinched red chilli and add the tamarind extract using 1.5 cups of water,turmeric powder and salt.Allow it to boil till raw smell of  tamarind goes off.

  • Add the ground powder and 1/4 cup of water. As soon as the water comes to a roll boil,switch off the flame & add coriander leaves.
Garlic rasam recipe
  • Serve it with hot rice n ghee.

    Enjoy !


Note

  • You can make this rasam as pepper rasam by adding more pepper corns.For this recipe,u can add 1 tbsp of pepper.
  • you should just crush the garlic coarsely and not a fine paste.


Enjoy this flavourful rasam with hot rice and papad !
Garlic rasam recipe

Eggless Pancakes Recipe With Wheat Flour

$
0
0
Eggless pancakes recipe with wheat flour

Its been years since i shared an international recipe in my blog.I badly wanted to post a recipe this week.After searching so many recipes,i settled down with this eggless pancakes.I have never thought making pancakes at home is so easy and simple.As i have not tasted pancakes so far,i din’t have any idea about its softness & texture.My friends in abroad had told me,its like our South Indian thick dosa/Uttapam.But after i made this eggless pancakes on my own following this recipe,i was amazed to see my golden,fluffy & soft pancakes.I was very happy and proud that i made a popular(American) international breakfast recipe at home perfectly and that too in my first attempt.Basically pancakes are done using plain flour/Maida.Here i have used our regular chapathi atta/wheat flour and made small changes in the actual recipe to suit our taste.And I am completely happy with the results.Actually I halved the original recipe & tried it.So this quantity serves only one person.so follow this recipe & once u get it right,u can double the same recipe.
Friends,do try this not so sweet,soft,fluffy n healthy eggless pancakes recipe with wheat flour for your breakfast.Enjoy topping it with any pancake syrup like maple syrup,caramel sauce,honey or just choco chips.Tastes yummmm..!! Very soon i will share my favourite savoury pancakes recipeWinking.
Note:Please adjust the quantity of sugar if u like your pancakes to be sweet.Never skip baking powder which is the magic ingredient here.Just follow this recipe with my tips to achieve the best results.All the very best for beginners Happy.

eggless wheat flour pancakes recipe

Eggless wheat flour pancakes recipe


Eggless wheat flour pancakes recipeEggless pancake recipe using wheat flour - Easy,simply,fluffy and soft !
Cuisine:International
Category:Breakfast
Yields:3 nos
Prep time:12 Minutes
Cook time:3 Minutes
Total time:15 Minutes


INGREDIENTS

  • Wheat flour/Atta - 1/2 cup ( I used aashirvaad)
  • Baking powder -1 tsp ( use fresh powders for best result)
  • Cinnamon powder - 1/2 tsp
  • Salt - a pinch
  • Sugar - 1/2 tbsp
  • Water - 1 tbsp
  • Milk - 1/2 cup ( boiled, at room temp)
  • Cooking oil - 1/2 tbsp
  • Melted Butter - 1 tbsp
  • Vanilla essence - 1/2 tsp
METHOD

  • Take a bowl and mix all the dry ingredients( wheat flour,cinnamon powder,baking powder,salt & sugar)Now add the wet ingredients namely oil,water,melted butter,vanilla essence and milk.
Eggless pancakes recipe
  • Mix with a whisk gently.Do not over beat it.The consistency of batter would be thick at the same time it should be pourable as shown in the picture.Adjust the quantity of milk based on the flour u use.But add 1-2 tbsp extra and definitely not more than that.
  • After mixing the batter,rest it for 10 minutes which is very important. The baking powder will react with other ingredients and gives you a fluffy pancake.
Eggless pancakes recipe
  • Heat a dosa pan. I used non-stick pan here.Iron griddle works the best.Make sure the pan is not over heated.To check the right temperature of the pan,just sprinkle few drops of water & if the water sizzles slightly,pan is just right.
    • Never let the pan smoke.Heat of the pan is very very important to get nice colored,uniformly cooked pancakes.If your pan is over heated,u will not be able to make round pancakes.Shape won’t be proper.Also the color of pancakes turn dark brown. 
    • In case if the pan is over heated,switch off the flame for sometime & then make pancakes.It will come out well.Also u should cook the pancakes only in low to medium flame.
  • Grease the pan with butter and simmer the flame completely.Then pour the batter.Spread the batter lightly with a back of ladle but the pancake should be thick enough.So do it carefully.
  • Keep the flame low & cook one side till u see bubbles all over the pancake.Now flip it.U will see the golden colored top.Cook the other side for few seconds and remove in a plate.
  • Serve it with butter & syrup/Honey !
Eggless pancakes recipe

Enjoy !


Note

  • Adjust the quantity of milk based on the atta u use.I used aashirvaad here.
  • You can replace atta with maida/all purpose flour.But i guess u won’t do,hehe..
  • Do not use baking powder more than the mentioned quantity.If u use more baking powder,pancake may taste bitter.
  • Do not get confused with baking powder & baking soda.Use only baking powder.
  • If u have frozen butter,first melt it in a pan and then add to the batter.
  • Do not make the batter thin or spread it well.Pancakes are supposed to be thick.So spread the batter lightly and cook in low flame for best results.
  • Adding cinnamon powder & vanilla essence is for flavor.So don’t avoid it.Add more sugar for sweet tasting pancakes.


Eggless wheat flour pancake

Try this American breakfast at home.Kids would love it !
Eggless pancakes recipe

Kerala Veg Biryani Recipe-Malabar Biryani-Sunday Lunch Recipes 5

$
0
0
Vegetable Layered Biryani
Sorry friends.I was not able to post this recipe last Sunday as i travelled to Palani,Tamil nadu.It was an unexpected trip.So i am posting this yummy Kerala style Vegetable layered biryani recipe for this week’s Sunday Lunch Recipes series-5.Generally Kerala biryani @Malabar biryani is mostly done with chicken or mutton.But when i saw this kerala style veg biryani recipe in this& this blogs,i became very happy and bookmarked them immediately.I was expecting coconut in the recipe but to my surprise the recipe & making is very similar to Hyderabad DUM biryani sans saffron.I just combined both the blog recipes and it came out awesome.I was happy with this Veg DUM biryani recipe.Everyone loved its taste & flavor.If u don’t want to follow DUM method,u can make it simple by just sauting everything in cooker base as we do for our normal biryani.I had tried this in either ways.It tastes good.So try this biryani for your family,friends & relatives and take the credits!! Lets see how to make this Kerala Vegetable biryani recipe !
Kerala Vegetable Biryani recipe

Kerala vegetable biryani - Malabar style


Kerala vegetable biryani - Malabar styleMalabar style vegetable biryani - Kerala recipe
Cuisine:Indian
Category:Lunch
Serves:Serves 3
Prep time:60 Minutes
Cook time:20 Minutes
Total time:80 Minutes


INGREDIENTS

  • Basmati rice - 1 Cup (I used India gate)
  • Cloves – 3 nos
  • Cinnamon – 1 inch piece
  • Cardamom – 2 nos
  • Water – 1.75 cups
  • Ghee – 1 tsp
For Gravy
  • Ghee – 3 tbsp  (OR use oil + ghee in equal measure)
  • Bayleaf – 1 no
  • Kalpasi/Black stone flower – 2 nos
  • Big onion - 2 nos
  • Ginger & Garlic Paste – 2tsp
  • Green chilli paste – 1 tsp( grind 3-4 nos)
  • Tomato – 1 no ( finely chopped)
  • Garam masala powder or Biryani masala powder - 1/2 tbsp
  • Chilli powder/Pepper powder – 1/2 tsp ( optional)
  • Yogurt - 2 tbsp
  • Mixed vegetables - 1/2 cup ( 1 carrot,5 beans,handful of peas,1 big potato)
To  roast & garnish
  • Ghee- 1 tbsp
  • Big onion - 1 no
  • Cashews - few
Coriander & mint leaves – few
Lemon juice – as needed
METHOD

  • Wash and soak the basmati rice for 30 minutes to 1 hour.Cook the rice in a pot or kadai adding 1.75 cups of water by adding cinnamon,cardamom & cloves.Cover cook in medium flame till rice is cooked 3/4th.Remove the rice once all the water is absorbed by it.Spread it in a plate & fluff it with a fork.Set aside.
Kerala Veg Biryani
  • Wash and chop all the vegetables.
  • In a pressure cooker base,heat ghee,saute bayleaf and kalpasi.Add  the g&g paste & green chilli paste.Saute till raw smell emanates completely.Now add the onion slices.
Kerala Veg biryani
  • Now add the finely chopped tomato pieces.Saute till it turns mushy.Now add the garam masala or biryani masala powder.Mix well.Check for taste & add chilli powder or pepper powder if needed.Lastly add the vegetables,salt & curd.Mix well.Add little water(say 1/2 cup) & pressure cook in high flame for one whistle.( Do not over cook the veggies.One whistle in high flame would do)
Kerala vegetable biryani
  • After the steam is released,open the cooker & mix the masala.Make sure the masala is not too dry.If it looks dry,add 1/4 cup of water,give a boil & make it wet with moisture content.
  • Heat 1 tbsp of ghee in a kadai & roast onions & cashews till golden brown.Set aside.
Kerala Veg biryani
  • Now take a kadai or a pot with flat bottom.Spread one layer of rice & sprinkle few drops of lemon juice.Now spread a layer of cooked vegetable masala over the rice.Sprinkle some Finely chopped mint & coriander leaves.Again spread the rice,then masala & mint leaves.Repeat the same until all the rice & masala are over.Lastly add the fried onions & cashews.Cover the kadai with a suitable tight flat lid.
Vegetable Layered biryani
Kerala Vegetable biryani
  • For DUM : Heat a dosa pan in high flame for 3 minutes & after the pan is heated well,simmer the flame completely.Keep the biryani pot/Kadai.Boil water in a bowl and keep the boiled water above the biryani pot/kadai.Let it sit for 10 minutes in very low flame.If u feel,vapour comes out of the kadai,wrap the mouth of kadai/Pot with thermal foil before u put in dum.If u have a tight lid,then u don’t have to wrap the pan.After 10 minutes,remove the pan and fluff the rice with a fork.Serve hot with raita.

Vegetable Dum biryani
Enjoy !


Note

  • Adjust the quantity of spices as per ur taste.
  • U can also add saffron soaked milk while layering.
  • U can put the Dum using pressure cooker but keep the cooker directly over very low flame for 5-10 minutes.


Have this yummy Kerala Malabar Vegetable biryani recipe.I served it with onion Raita & made Gulab Jamun for dessert Drooling.
Kerala Malabar biryani recipe

Rava Dosa Recipe(Instant Version)-South Indian Breakfast Recipes

$
0
0

Instant Rava dosa recipe

Rava Dosa is one of the most popular South Indian breakfast recipes.Crispy Rava dosa is Sendhil’s most favourite dosa variety in hotels.Whenever we go to restaurants,i order plain uttapam for myself & his choice would be mostly rava dosa.As it is my man’s favourite,i have tried making this dosa many times in my kitchen to impress himLove Struck.But most of my attempts were flop showsNot talking.It may be due to the wrong proportions of rava,rice flour & maida or the consistency of batter might not be right.When i told this to my friend Shalini,she suggested her fail proof rava dosa recipe which she has been successfully making it for years.I tried it yesterday for our Sunday breakfast.It came out unbelievably great!Sendhil loved it a lot & had more dosas.I became very happy,excited & i immediately called my dear Shalu to thank her.I must also thank Vahchef for some additional tips i learnt by watching his video.Friends,try this recipe.I am sure you won’t be disappointed with the results.Also don’t forget to follow the tips i have shared in this post which helps you to make perfect lacy rava dosa.Ok,Over to the recipe with a pictureHappy.

Check out my other Rava Recipes : Rava Kesari,Rava idli,Rava Kichadi,Rava Upma,Masala rava kichadi,Rava Payasam,Rava Ladoo,Rava roti,Microwave rava kesari,Milk kesari recipes.


Crispy Rava Dosa Recipe

Rava dosa recipe-Instant Version


Rava dosa recipeCrispy restaurant style rava dosa recipe for breakfast
 
Cuisine:Indian
Category:Breakfast
Serves:12 nos
Prep time:15 Minutes
Cook time:3 Minutes
Total time:18 Minutes


INGREDIENTS

  • Rice flour – 1 cup
  • Unroasted Rava – 1/2 cup
  • Maida – 1/4 cup
  • Water – 3 cups + 1/4 cup( add 2 tbsp more in the middle)
  • Curd – 1/4 cup ( semi solid)
  • Salt – as needed
  • Cumin seeds/Jeera – 1/2 tsp
  • Pepper – 1 tsp (crushed)
  • Green chilli – 1no ( finely chopped)
  • Coriander leaves  & curry leaves – Few ( finely chopped)
  • Asafetida/Hing– as needed
  • Ghee or cooking oil - as needed to drizzle dosas
METHOD

  • In a wide bowl,take the curd and rava.To this add rice flour,maida & salt.Add 3 cups of water & mix well with a whisk.Now add the cumin seeds,crushed pepper,Finely chopped green chillies,coriander leaves,hing & curry leaves.Mix well without lumps.Check for batter consistency.Leave it for 10 to 15 minutes.
  • In the mean time,u can grind coconut chutney for side dish.After 10 minutes,check the batter,it would be thick slightly.So add 1/4 cup of water.Mix well & check whether the batter is right.I have given the water quantity i used for this recipe.Take it as a reference & adjust the quantity.The consistency of batter may not be correct in the first attempt.You will come to know the right consistency only after making the first dosa.( The first dosa may not come out perfectly crispy.Based on the texture of dosa,add little more water & make the second dosa.So it comes by trial & error only.You should get the perfect one at least for 3 rd dosa if u are a beginner.)
  • Heat a dosa pan.I used iron pan here.Non-stick also works fine.Dosa pan should be well heated but not smoky.Grease the pan with oil.Hold the ladle 15cms away from the pan & pour a ladleful of batter around the corner of dosa pan.Make a circle.Again take some little batter & fill the inner portions.I.e. u should pour the batter in a circular motion from outer to inner portion of pan.Do not fill the holes.Instead drizzle some ghee in the holes.
Instant Rava Dosa Recipe
  • Keep the flame medium to medium high.Drizzle a tsp of ghee all over the dosa.Cover the pan with a lid & cook for sometime till u see the dosa turning crispy & golden brown.I( I covered the pan with my idli pot lid)

Instant Rava Dosa Recipe

  • Do not flip the dosa.Just fold it & serve immediately with coconut chutney & sambar.Before making the next dosa,mix the batter very well because Rava may settle down in the bottom of bowl.If u feel the batter is thickened,add 2 tbsp of water.Mix well & make dosa.Keep the flame high till u pour the batter & as soon as u pour the batter,reduce the flame to medium & cover cook as mentioned above.Repeat the same procedure for all dosas.

Instant rava dosa

  • Here is a rava dosa picture i made using non-stick dosa pan.


Enjoy !


Note
  • For variations & for health reasons,u can follow the same recipe without maida.It comes out well.
  • The consistency of rava dosa batter is very important to make crispy,lacy dosas.So add water as needed.
  • Cooking in medium flame for more time gives u crispy dosa.Cooking in high flame makes the dosa brown & uncooked in the middle.
  • Covering the pan while cooking helps to cook the dosa quick & gives u nice uniform golden color.
  • you should mix the batter really well every time before making dosa.The batter may thicken after u make 3-4 dosas.So add 2 tbsp water & thin down the batter.
  • Adding ghee while making dosas gives nice flavor & restaurant touch.So use it as per your wish.
  • For making onion rava dosa,sprinkle finely chopped onions in greased tawa.Then pour the batter.Onions will be cooked well.
  • To make fruit n nut rava dosa,sprinkle finely chopped cashews,badam & tutti frutti over the pan and pour the batter.Cook in medium flame.


Check out my other Rava Recipes :Rava Kesari,Rava idli,Rava Kichadi,Rava Upma,Masala rava kichadi,Rava Payasam,Rava Ladoo,Rava roti,Microwave rava kesari,Milk kesari recipes.


Rava Dosa Using Non-stick Pan.

Instant Rava Dosa recipe


Enjoy this crispy,lacy rava dosa with your favourite chutney & sambar!!

Rava Dosa Recipe


Easy Brinjal Gothsu/Kathirikai Gothsu Recipe For Idli,Pongal

$
0
0

Brinjal gothsu recipe

I am a big big fan of brinjal recipes.But Sendhil & Raksha are just opposite to me.So i make brinjal dishes only when my in-laws visit my place.This morning,i made this easy gothsu recipe learning from my MIL.Its a very easy,one pot brinjal gosthu recipe.In this method,u don’t need to roast & powder the spices as we do for Chidamabaram kathirikai gosthu.The procedure of this brinjal gravy is very similar to my MIL’s Thanjavur style tomato gosthu.We usually make this as a side dish for Idli.But recently i had tasted this with pongal too.It was yummy.Its a great recipe for bachelors & working women who look for easy side dish recipes.All u have to do is just chopping,sauting & pressure cooking,Tada! This gravy would be ready under 15 minutes.Just try once,u will come to knowHappy.My MIL makes it watery as we like it that way.Here i have made it slightly thick to suit pongal.Finally,the consistency is ur choice.Lets see how to make this yummy kathirikai/Brinjal gosthu recipe for idli and pongal.

Brinjal gothsu

Easy brinjal gosthu/Kathirikai gotsu recipe


Easy brinjal gosthu/Kathirikai gotsu recipeEasy brinjal gosthu recipe-Side dish for idli and pongal
 
Cuisine:Indian
Category:Side dish
Serves:Serves 2
Prep time:5 Minutes
Cook time:10 Minutes
Total time:15 Minutes


INGREDIENTS

  • Brinjal - 3 nos ( medium)
  • Small onions or big onion - 20 nos/1 no
  • Green chillies - 4 nos
  • Tomato - 1 no
  • Tamarind - small berry size ( Sundakkai alavu)
  • Moong dal - 1.5 tbsp
  • Turmeric powder – 1/8 tsp
  • Salt & water - as needed
To temper
  • Cooking oil - 2 tbsp
  • Mustard seeds - 1 tsp
  • Urad dal - 1 tsp
  • Chana dal - 1 tsp
  • Curry leaves - few
  • Hing/asafetida - a big pinch
  • Idli/Dosa batter OR Rice flour - 1/2 tbsp/1.5 tsp 

Coriander leaves – to garnish

METHOD

  • Wash and chop the brinjal into small squares.Soak in water till use to prevent discoloration.Similarly chop the onions,green chillies finely.

  • Heat oil in a cooker base.Splutter mustard seeds,urad dal & chana dal.Then add the finely chopped onions,green chillies,curry leaves & hing.Saute till onion turns transparent.

Brinjal gothsu recipe

  • Now add the finely chopped tomato pieces & brinjal. Add some salt and saute till tomato turns mushy.Lastly add the tamarind extract and moong dal.Mix well.Add little turmeric powder,required salt and water.
Brinjal Gothsu

Kathirikai gothsu

  • Pressure cook in low flame for one whistle.After the steam is released,mash everything well.No problem if some dals are visible.Its enough if its just cooked & blossomed.Then add the idli/dosa batter or rice flour diluted in 1/4 cup of water.Mix well & allow the gravy to boil till it thickens lightly.Make it slightly thin if using for idli & thick for pongal.Garnish with lots of coriander leaves.Serve hot with idli or pongal.

Brinjal gothsu recipe

Enjoy !


Note

  • If u are serving for idli,add sesame oil/gingely oil while eating.It tastes great.
  • Add more chillies based on ur taste.
  • Tamarind should be very less.Its used just to remove the mild bitterness of brinjals ( we call it as “Kaaral” taste in Tamil)
  • This recipe is completely different from chidambaram gosthu.So it tastes mildy spicy and tangy.
  • Adding idli/dosa batter helps to thicken the gravy.U can also replace it with rice flour.
  • Garnishing with coriander leaves gives a nice smell.


Enjoy this yummy,easy brinjal gosthu with idli or pongal !

Kathirikai gothsu recipe


Eggless Red Velvet Cake In A Mug(1 min microwave cake)-Valentine’s Day Recipes

$
0
0
Eggless red velvet cake recipe

Valentine’s day is around the corner.I am sure u all would be scratching your head about what to make something special for your loved onesLove Struck.Here u go, a super easy,soft n spongy,eggless one minute red velvet cake in a mug using microwave under one minute.Last year i have shared some easy,instant microwave cake recipes( refer side bar) and i am really happy that i am getting rave reviews about those recipes from my readers.This has been a real boost which inspires me to try more microwave recipes especially one minute mug cakes.When i was looking for Valentine’s day recipes ideas,i found home made Chocolates & Red Velvet Cake are the most wanted recipes on lover’s day.As I have already posted an easy, no cook,3 ingredient home made chocolate recipe here,i wanted to share this easy red velvet cake recipe without using eggs & buttermilk for you all to try out on this Valentine’s day.Here i have used red food color as i din’t want to take chance with beetroot in my first attempt.Soon i will try n share this recipe replacing artificial color.You can make this cake in the next few minutes just after reading this recipe & surprise your sweet heart/HusbandParty.
Yesterday,my Husband Sendhil had left to Norway for a short official trip.So we celebrated our Valentine’s day in advance with this yummy,super soft,Romantic Red velvet cake recipeRose.We both enjoyed this cake with one spoon in one mugLaughing,hope u can understand what i mean hereWinking.
Friends,Do try this easy cake for your loved ones.I am sure it will be a great choice for this celebration ! And don’t forget to share your feedback about this cake with meWinking.Lets see how to make this easy red velvet cake recipe for two on this special Valentine's day !


Easy red velvet cake recipe

Easy Red Velvet Cake in a mug using microwave


Easy Red Velvet Cake in a mug using microwaveMicrowave red velvet cake under 1 minute - Eggless,butterless recipe.
Cuisine:Indian
Category:Cakes
Serves:Serves 2
Prep time:5 Minutes
Cook time:1 Minutes
Total time:6 Minutes


INGREDIENTS

  • All purpose flour - 4 tbsp
  • Sugar – 2.5 tbsp
  • Baking powder - 1/4 tsp
  • Salt - a pinch
  • Cocoa powder- 1 tsp
  • Red food color - 2 pinches or 2 drops
  • Vanilla essence - 1/4 tsp
  • Vinegar/Lemon juice - 1/2 tsp
  • Milk - 3 tbsp (Use  boiled milk at room temp)
  • Vegetable oil/cooking oil - 1.5 tbsp
METHOD

  • Take all the wet ingredients ( maida,sugar,cocoa powder,baking powder and salt) in a big mug or bowl.Mix it well adding food color.
  • Then add the milk,oil and vanilla essence.Mix well without any lumps and make sure sugar is dissolved well.
Red velvet cake
  • The consistency of batter will be semi solid & it should fall like a thick ribbon.Make sure the batter is filled till half of the mug because this cake will double while cooking.
  • Now microwave the mug in high power for 1 minute.Cake will raise & its size would be doubled.( mine is 800w.Please adjust the timing as per the power of your microwave) Check with a toothpick or back of a spoon.If it comes out clean,cake is done.Else keep it again for 10 secs.
  • For simple decoration,u can put sprinklers on top as i did OR dust it with powdered sugar.If u apply frosting,it would be even more rich. Make your choice & variations !
Easy red velvet cake recipe
  • Serve with any frosting or just sprinkle powdered sugar & enjoy !


Happy Valentine’s day !!


Note

  • Do not mix everything together.First mix the dry ingredients & then go for mixing wet ones.
  • Adjust the time based on the power of your microwave.
  • It tastes mildly sweet.So add more sugar based on ur tastebuds.But make sure sugar is dissolved before u microwave.


Red velvet cake recipe

Try this easy red velvet cake on Valentine’s day & have a fun filled day with your loved ones !
Wish u all a very happy Valentine’s dayLove Struck
Easy red velvet cake recipe

Coconut Milk Veg Biryani Recipe/Thengai Paal Biryani-Sunday Lunch Recipes-6

$
0
0
Coconut milk veg biryani recipe

Today being Valentine’s day,I made this special coconut milk vegetable biryani for our lunch.Of course my husband is in Norway but still i made this biryani along with basundi for my daughter & in-laws.I will show this platter to Sendhil online in skype callWinking.Today my daughter Raksha gifted us her own made Valentine’s day card along with heart shaped,iced Red Velvet CakeLove Struck .Can u find them in the above pic ?? ;)We were really surprised and moved to see her love & affectionHappy.
Ok,coming to this recipe,Generally i don’t add coconut milk in my biryani but its been my long time wish to try biryani adding coconut milk/Thengai paal.I am happy that i tried on this special occasion.I was so happy with the outcome & the addition of coconut milk made my biryani so rich & took it to the next level.Actually i thought to make white colored biryani  and din’t add spice powders but i couldn’t bring that color.Mine looked half whiteSad .You can make any variations to this recipe.It comes out well in all the ways.Try it & let me know how it turned out for you!

Coconut milk Veg biryani

Coconut milk veg biryani recipe


Coconut milk veg biryani recipeCoconut milk veg biryani recipe- Sunday special lunch recipe
Cuisine:Indian
Category:Lunch
Serves:Serves 3
Prep time:30 Minutes
Cook time:15 Minutes
Total time:45 Minutes


INGREDIENTS

  • Basmati rice - 1 cup
  • Thick Coconut milk + water - 1 + 0.75 cups ( I used 2 cups equal measure)
  • Cooking oil + Ghee - 1 tbsp + 2 tbsp
  • Bay leaf - 1 no
  • Jhapatri - 1 no (optional)
  • Big onion - 1 no
  • Mixed vegetables - 1/2 cup ( Carrot-1,Beans-5 nos,Potato-1 no.Peas-handful)
  • Mint & coriander leaves - 2 tbsp ( finely chopped)
  • Lemon juice - 1/2 tsp
To grind
  • Cashew nuts – 5 nos
  • Green chillies - 4 nos
  • Cinnamon - 1 inch piece
  • Cloves - 3 nos
  • Cardamom - 2 nos
  • Star anise - 1 no
  • Fennel seeds - 1/2 tsp
  • Ginger - 1 inch piece
  • Garlic cloves - 5 nos
  • Kalpasi/Black stone flower - 1 no
  • Water - as needed
METHOD

  • Wash and soak the basmati rice adding 1.5 cups of water for 1 hour.Grind 1 cup of grated coconut adding 1 cup of warm water and take thick milk.Keep it aside.
  • Wash and chop the vegetables & set aside.
Coconut milk veg biryani
  • Take all the ingredients given under “ To grind” and grind them coarsely without adding water.Then add little water & make a smooth paste.Set aside.
Coconut milk veg biryani
  • Heat oil+ghee in a pressure cooker. Saute bayleaf & Jhapatri.Then add the ground paste & finely chopped mint,coriander leaves.Saute well till raw smell vanishes off.
Coconut milk veg biryani
  • Now add the chopped vegetables,mix well.Add the required salt,soaked rice along with water and coconut milk.Lastly add lemon juice in water & check for taste.Add salt if needed.Add slitted green chillies if u feel,spice is less.
Coconut milk veg biryani
  • Cook in low flame for one whistle.It takes 10 minutes.After the steam is released,fluff the rice with fork & serve it hot with raita.
Coconut milk veg biryani
Enjoy !


Note
  • For variations,u can add 1/2 tsp of red chilli powder & biryani masala powder.In that case,reduce the green chillies to 3nos.
  • Soak basmati rice for minimum 30 minutes to get soft,elongated rice.
  • You can also fry the soaked rice in ghee before adding in biryani.

Coconut milk biryani,Curd rice,Basundi and a piece of Red Velvet cake for lunch.Come n join me friendsHappy
Coconut milk veg biryani recipe

How to ferment Idli batter in Winters in Cold Countries

$
0
0
Idli batter fermentation in cold countries

Hi Friends,
Today’s post is a very basic post about fermentation of idli,dosa batter in winter season especially in cold countries like Canada,US etc.I have got few requests from my readers to post some tips for fermentation in cold countries and a video to make idlis.Very soon i will make a detailed video post on how to make soft idlis.My younger sister Radha is in Canada.As u all know,Canada is one of the coldest countries in the world.My sis always makes the best  & super soft idlis in spite of the cold weather.So i thought she is the best person to clear all my doubts.When i asked her to make a post,she happily accepted my request & helped me a lot by taking step by step pictures and mailed everything clearly.Thank u so much my dear.Luv uLove Struck.I hope this post will help the people who is feeling bad & worried about making non-fermented,hard idlis.The tips i have shared here will solve the fermentation problems i feel.Friends,please mail me or leave a comment here if u have any tips to share.It will help everyone.Thanks for visiting this page.

My sister grinds the batter once in a week.The quantity she had mentioned below comes for 5 days.She makes idli for the first two days for both breakfast & dinner and dosa for 3 days.She uses Thanjore idli rice & plain packet of urad dal,not any particular brand.My sister’s friend Sukanya in US also follows the same method to make idlis.Here is the idli batter procedure along with the quantity of ingredients mailed by my sister.

ldi batter procedure
  • Soak 9 cups idli rice + 1 tsp methi seeds.Soak 2.5 cups of urad dal separately for 3 to 6 hrs.
  • After soaking,drain the water and grind urad dal first adding enough water.Remove in a big container.Then grind the rice,add salt and mix it thoroughly with the urad dal batter using your hands.
  • Here is the picture of batter i got before fermentation by 4pm.Keep it inside the oven and switch on the oven light. Leave the batter for one full day(24 hrs).
Idli batter fermentation in cold countries-3
  • The batter is fully fermented the next day by 4pm.
    During this process the outside temperature was -23c and the heater temperature at home was 23c.
Idli batter fermentation in cold countries-2
Check out my idli,dosa batter post for grinding with stepwise pictures.My sis does the same way.Check out idli batter using mixie if interested.


Some general tips for fermentation of idli batter
TIPS FOR FERMENTATION
After going through some websites ,  i am giving some additional tips for batter fermentation. Hope it will work for u Smile .
  • First recommended thing for batter fermentation is to mix the batter using ur hands..Mix the dal and rice batter thoroughly.. Uneven mixing causes failures. Mixing them by hand works best!
  • A warm temperature is essential for fermentation. 25 to 28 °C (77 - 82.4 °F) will be ideal. If the weather is cold, keep some warm water in a large bowl and immerse the vessel containing the dough. To help maintain the temperature of the warm water bath, cover it with a blanket, or better, use a regulated heater, like a heating pad or aquarium heater. Even easier, turn on the light in the oven, and use that to keep the batter warm.
  • When u grind the batter, pre heat the oven in 90c for 10 minutes and switch off the oven.Now keep the batter covered inside the oven and turn the oven lights on.. It helps ..
  • Add 1/4 tsp of baking soda or baking powder to the ground batter and then ferment. It will help the batter to raise well in harsh cold conditions..
  • Allow at least 24 hours to ferment. If you don't see tiny bubbles the next morning, the dough will not rise and you have to start all over again.
  • If nothing works for u , try adding a fermentation starter like a spoonful of commercially prepared idli batter as they have live culture, it helps for fermentation..
  • Use chlorine-free water when grinding, as this will be the water that the batter will have in it when fermenting. Tap water will work, but will inhibit the ferment a little. Most modern water filters remove both chlorine and chloramine. Use non-iodized salt such as ‘Kosher salt’ and Use spring water, boiled or filtered tap water to avoid Chlorine/Fluorine.
  • I also read from Indus ladies that adding 1/2 tsp of ENO plain fruit salt for 1 cups of idli batter makes the idli soft even if its not fermented well.Please try this too but iam not sure how it works.
I hope u find this post useful Happy.Thank you.Have a nice day !
Last but not the least,check out my 12 Idli varieties here if interested Winking


Semiya Kesari Recipe/Vermicelli kesari

$
0
0
Semiya-kesari-recipe

Vermicelli kesari aka semiya kesari is one of the easy n yummy Indian dessert recipes.Making a perfect semiya kesari was my dream.When i was a beginner in cooking kesari recipes,i have tried this many times but i end up making vermicelli halwa or half cooked hard,chewy kesariTongue.Recently i applied my rava kesari technique and used more water to cook the vermicelli.It came out perfect this time ! I was so happy with the results and it tasted great.So thought of sharing this recipe with u all.But one thing which i felt bad is the color of this kesari.I have added more food color by mistake & my kesari resembled beetroot halwaWorried.So please be careful while adding food color.And I have not used fine vermicelli here.I used the normal,thick roasted vermicelli( Bambino).So adjust the quantity of water based on the vermicelli.Its very to easy to make if u follow the steps carefully.Even beginners and bachelors can give a try.Ok,Lets see how to make vermicelli kesari/semiya kesari recipe !


Semiya kesari recipe


Semiya kesari recipeSemiya kesari recipe- Easy n yummy dessert recipe
Cuisine:Indian
Category:Sweet
Serves:Serves 2
Prep time:5 Minutes
Cook time:15 Minutes
Total time:20 Minutes


INGREDIENTS

  • Roasted vermicelli - 1/2 cup
  • Water - 2.5 cups
  • Red food color - 1 pinch
  • Sugar - 1/2 cup + 2 tbsp
  • Cardamom - 2 seeds ( crushed)
  • Ghee – 1.5 tbsp
METHOD

  • Heat water in a kadai and add 1 tsp ghee to it.When the water starts to roll boil,add the roasted vermicelli & food color.
Semiya kesari recipe
  • Mix well till all the water is absorbed by the vermicelli.Cover & cook for 10 minutes in medium flame.Mix once in the middle.Make sure the bottom is not burnt.
  • Check whether the vermicelli is cooked properly.For this,take few strands of vermicelli and try to mash it with ur fingers.If it breaks & mashes,its cooked right.Now add the sugar and mix well.The mixture will become watery as soon as u add sugar.Mix well in high flame for a minute.Mixture will thicken slightly.Bubbles will appear all over the sides.
Semiya kesari recipe
  • When u mix it,u will find the kesari becoming non-sticky and start to leave the kadai.Add the remaining ghee,cardamom powder.Mix well & switch off the flame.Transfer the mixture to a plate when the mixture is watery.Do not wait for the kesari to leave the sides of pan completely.It will becomes chewy when it cools down.So remove the mixture when it is wet and slightly watery.It should fall into the plate like a ribbon.This kesari will set perfectly once it cools down to room temp.Serve once it becomes warm.If u want to serve really hot,mix it for few more seconds to drain the excess water.I guess nobody will eat it hot from the stove ;)).So its better to remove it when there is moisture in kesari.
Semiya kesari recipe
Two most important things u should notice while making this kesari is : Vermicelli should be cooked properly.Do not mix for long time till kesari leaves the sides of pan completely.As soon as u see the kesari thickens and start to leave the kadai,remove it from the stove.Mixture should be slightly watery and wet. 


Note

  • I used 1:5 vermicelli and water ratio.If u use fine vermicelli, use 1:2 water.
  • If u use fine vermicelli,add 3/4cup of sugar for 1 cup of vermicelli.
  • Check whether the vermicelli is cooked properly before adding sugar because the kesari will turn hard and chewy.
  • Semiya kesari takes less ghee than rava kesari.So use less.
  • Remove the kesari when the mixture is slightly watery.It will set well as soon as it becomes warm.Do not mix till it leaves the sides of pan completely.

Try this yummy semiya kesari for ur guests.They would love it for sureLove Struck
Semiya kesari

Brinjal Fry Recipe/Eggplant Roast For Rice

$
0
0
Brinjal fry

Last week when i went to Reliance fresh to buy vegetables,i took a big sized brinjal/Kathirikai to try Baingan bharta recipe.But i couldn’t make it & i had completely forgotten about it.Yesterday i was running short of vegetables and all i had was this brinjal.As i had already tried ennai kathirikai poriyal ,Bengali begun bhaja and some more curries,i wanted to try out something new.I googled for brinjal chops and i found this brinjal fry recipe in Nalini’s blogwhich was similar to my expectation.Basically i love the flavor of fennel seeds in masala.So i tried this recipe by making it little more spicy for myself as I am the only person who eats brinjal in my house.I had it with mysore rasam.It was a delectable combo and i took two servings of itDrooling.After a long time,i made a spicy lunch menu and ate it happilyDancing.If u are a brinjal & fennel seeds lover,then this recipe is for u.Tomorrow I will share mysore rasam recipe.Friends,try this spicy brinjal fry for Rasam or More kuzhambu.It takes very less time to prepare in busy mornings and u can pack it for your lunch box as well.I am sure your friends will ask the recipeWinking.
Check out my Ennai Kathirikai poriyal,Begun Bhaja,Brinjal Podi curry,Kathirikai poriyal recipes too.

Brinjal fry

Brinjal fry/Eggplant roast recipe


Brinjal fry/Eggplant roast recipeSpicy,hot eggplant fry/Kathirikai roast recipe-An yummy side dish for rice
Cuisine:Indian
Category:Side dish
Serves:Serves 2
Prep time:10 Minutes
Cook time:15 Minutes
Total time:25 Minutes


INGREDIENTS

  • Big brinjal - 3/4 no( Use 4 if medium size)
  • Salt & water - as needed
  • Cooking oil - 2 tbsp
To grind
  • Fennel seeds – 1.5 tsp
  • Red chillies - 5 nos
  • Garlic cloves-5 nos
  • Turmeric powder - 1/8 tsp
  • Sambar powder - 1 tsp
  • Salt – as needed
To temper
  • Mustard seeds – 1/2 tsp
  • Urad dal – 1/2 tsp
  • Cumin seeds /Jeera – 1/4 tsp
  • Curry leaves – few
Lemon juice – few drops
Coriander leaves – to garnish
METHOD

  • Take all the ingredients given under “ to grind” in a mixie jar.First grind it to a powder.Then add the required water and grind it to a smooth paste.No problem if the mixture is slightly watery but it should be a smooth paste.
  • Wash and chop the brinjals into medium thick round slices.Do not slice very thinly because they will mash it up while cooking.If u use normal purple brinjal,just slit them into 4 pieces.Immerse in water till use to prevent discoloration.
Brinjal fry
  • Now heat oil in a kadai and splutter mustard,urad dal,jeera and curry leaves.Add the brinjal and saute for few minutes.Add salt & ground masala paste.Mix well and coat the brinjals.
Brinjal fry
  • Keep the flame medium and cover cook the brinjals for 4-5 minutes.Flip it once in the middle.Check whether they are cooked properly.Add some lemon juice.Garnish with coriander leaves.
Brinjal fry
Serve hot with sambar rice,rasam or simply with dal.Tastes yum!

Enjoy !


Note

  • The brinjal should be cooked in masala paste & oil.No need to add water.If u feel the mixture is too dry,u can sprinkle little water to cook the brinjals.
  • For proper cooking of brinjals,always keep the flame medium & cover it with a lid.
  • Please reduce the quantity of sambar powder as per ur taste.The quantity i have mentioned here gives a spicy fry.
  • Adding lemon juice helps to balance the spicy taste as well as helps to absorb the iron content of brinjal in the body.


Enjoy this hot n spicy brinjal masala fry with rice.Tastes gr8 !

Viewing all 968 articles
Browse latest View live